For photographers who still love shooting analog film (like myself), DSLR Film scanning holds incredible promise. It offers analog photographers the best of all worlds, with incredible image quality and gorgeous colors from their negative scans in a faster, easier workflow.
But here’s the thing… DSLR Film scanning also takes a bit of setup, equipment and know-how to get great negative scans. And with color negatives especially, getting great colors in the conversion is far from a given. As I’ve built my own setup for scanning film, I’ve seen a lot of mistakes that can trip you up and degrade your results.
So whether you are looking to try DSLR scanning for the first time, or you just want to improve the results from your setup, this guide is for you!
I’ll take you through my DSLR-scanning workflow step-by-step, showing you what to do and (just as importantly) mistakes you should avoid. We’ll look at:
- Why use your DSLR to scan your film negatives?
- How to DSLR scan your film negatives (VIDEO)
- What you’ll need: Hardware
- What you’ll need: Software
- The ideal “all-RAW” workflow
- Image Comparisons
- Conclusion & Comments
Ready? Let’s scan some film!
Why DSLR Film Scanning?
Before we look at setup, let’s look at what we can hope to gain by using a DSLR to scan our color film negatives. These are just a few of the advantages that we hope to gain by switching or improving our DSLR scanning setup.
1. DSLR Film Scanning is literally 100x FASTER than a traditional scanner
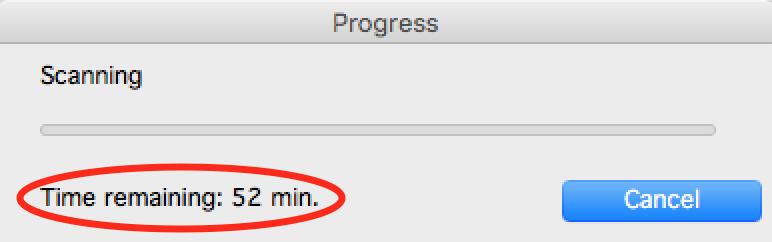
With my Epson V600, it took me up to an hour to scan and process a single frame at full res! Now, with my DSLR setup, I can scan an entire roll of 120 film in about 10 minutes.
This is a BIG one for me.
When I used a traditional scanner, I’d often spend 5 minutes preparing a single scan, and then up 50 minutes waiting for one high-res scan (using my Epson Perfection V600). It was a long, painful experience, and I honestly never had the patience to make it through an entire roll at once.
With DSLR Film scanning, each “scan” happens as quickly as photo – in a fraction of second. I can now get through an entire roll in just a few minutes. And because I’m shooting RAW, I don’t have to worry about making too many adjustments during the DSLR scanning process. I can batch-edit everything later in post. It’s really a game changer!
2. DSLR Film Scanning has the potential for dramatically better colors and tones (because of RAW)
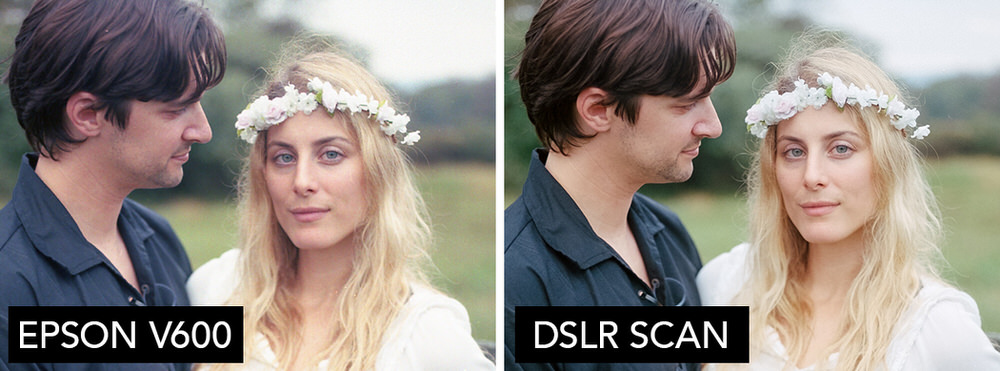
With my DSLR scan setup, I’m able to process my negatives in an all-RAW workflow. When done correctly, this leads to significantly better tones and colors.
I was constantly disappointed with the colors I got from my negative scans with a traditional film scanner. Even after a LOT of work in post, they still didn’t look quite right. The problem is that the software in most scanners is just horrible at producing good colors. And even worse, they are fundamentally changing (and degrading) the colors and tones in the scan in a way that you cannot “undo” later.
By shooting RAW with your DSLR film scanning setup, you’re able to capture the colors and tones in your negative in a way that makes it easier to manipulate during conversion. This is incredibly important, because to convert your negatives into color-corrected positives, we need all the editing leeway we can get!
IMPORTANT: This doesn’t mean that DSLR scans will automatically look better – you have to have the right workflow for processing your DSLR scans in their RAW form to be able to get better tones and colors than a traditional scanner. Later, I’ll show you how I process my DSLR Scans in an all-raw workflow that produces great results.
3. DSLR Film Scanning gives YOU greater creative control of your final image
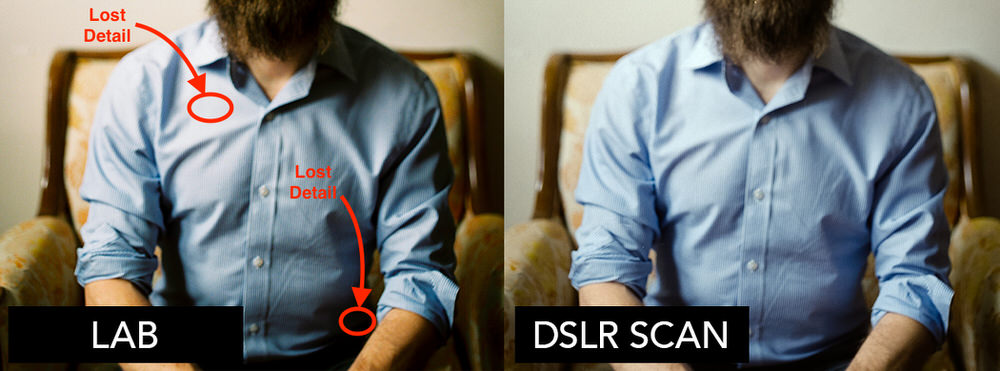
Even with the best film labs, you are giving up creative control of your film negatives. For instance, the lab scanned image on the left was over-processed, missing highlight and shadow detail which could not be recovered in the JPEG I received back. With DSLR scanning, I could control every detail of how the image was processed.
The only alternative that can product results close to DSLR scanning your negatives is to send off your negatives to a professional film lab. Not only are these pro-labs expensive, but there is another major drawback: you lose creative control! Some of the decisions the lab makes just can’t be undone. Because most likely, you will get back an 8-bit JPEG, which has very little room for further editing. Want to see more details in the shadows? Or pull back some highlights? Too bad. You’ll quickly notice that the information you want to bring out just isn’t there anymore.
With a DSLR scanning setup, you have full, glorious control over your RAW data. And with development tools like Negative Lab Pro, you can choose exactly how you want to process that data, in a non-destructive workflow that will even let you emulate those pro-lab film scanners!
Sold on DSLR film scanning? Ok, let’s look at how it’s done.
VIDEO: How to scan film color negatives with a DSLR
It’s important to watch this video carefully and follow each step. It may be a little different for you depending on your camera model, but the main points should remain the same. There is a purpose for each step I show!
👆👆👆NOTE: The process is ONLY be covered in the video above. Watch first. 👆👆👆
DLSR Film Scanning Equipment List
Ok, you’ve watched the video already right? If not, stop reading this, and go back up an watch!
HARDWARE:
Here’s a list of the basic hardware I used in my DSLR film scanning setup, along with links of where I got mine. Of course, you can substitute much of this with your existing equipment.
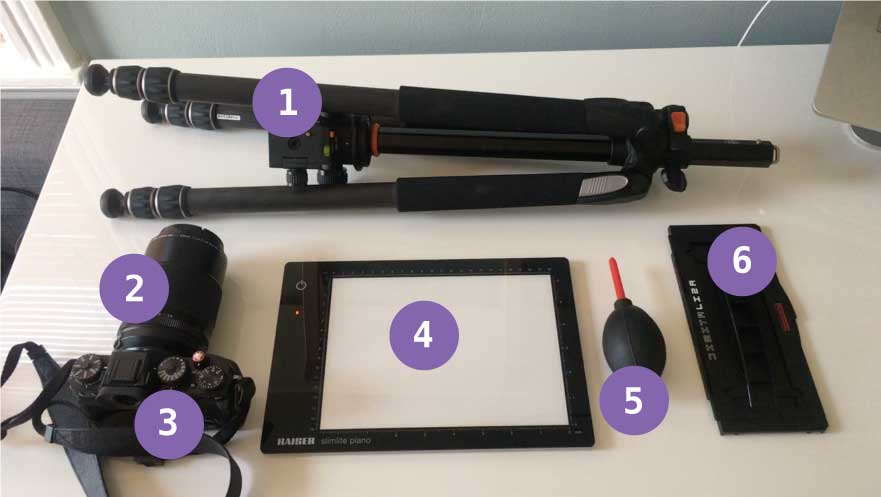
1) Tripod:
This tripod is great! Picked it up on Amazon for 1/4 of the price of more expensive tripods, but performs great, and once you invert the main column, it’s a perfect tripod for this setup.
» Vanguard Alta Pro – $150 at Amazon.
2) Macro Lens:
This lens is insane. If you are using the Fuji X system, would highly recommend checking this out – not just for film scanning but for it’s amazing macro shots (the image stabilization is a HUGE bonus when you’re in the field, although you should leave off image stabilization during scanning to ensure maximum sharpness.)
» 80mm Fujinon Macro – 1,049 at Amazon.
3) Camera
For this setup, I used my Fuji X-T2. If you’re in the market for a camera, I would highly recommend it. The Live Mode is a HUGE help for framing, focusing and exposing your negative.
» Fuji X-T2 – $1,099 at Amazon.
4) Light Table
I looked at a lot of Light Tables and for now, this one is really working out well. As shown in video, make sure it plugged in and at maximum brightness.
» Kaiser Slimlite Plano – $109 at Amazon.
» Much more insight and discussion on best light tables for DSLR film scanning here
5) Air Blower (and other cleaning tools)
It’s worth getting a whole cleaning kit, but the air blower and brush from this DSLR cleaning kit are especially useful for making sure your equipment and negatives are dust-free.
» Camera Cleaning Kit – $10 at Amazon.
6) Film Scanning Masks/Carriers:
UPDATE: In the past year, there’s been an EXPLOSION of great new film scanning masks that I prefer over the Digitaliza. It truly is a great time to be shooting film! Here are a few of my favorites:
HIGH-END:
» Negative Supply ($329 for 35mm carrier,$479 for 120 carrier) – These guys are making the highest quality film scanning tools on the market. The design and build quality are absolutely top-notch and they’ve really thought through how to improve film flatness AND workflow speed. Sure, it’s an investment, but their units feel like they would survive a nuclear blast (seriously).
MIDDLE-TIER
» Essential Film Holder (£90 includes both 35mm, 120 and diffuser) – A clever design that works with both 35mm and 120 film, and includes a quality diffuser (which opens up more options for light sources – for instance, you can use the diffuser directly against an iPad screen). It’s a good value for all it includes, and works quite well. » Skier Sunray Copy Box ($239 includes 35mm mask, 120 mask, diffuser and high-quality LED light source) – If you’re building a digital camera setup from scratch, this is a fantastic solution. Almost everything you need is included in a small footprint unit. The way it is designed eliminates some of the most common issues I see with DIY digital camera scanning setups. The downsides are that the unit gets hot quickly (so could be an issue for very large projects)
ENTRY-LEVEL
» PIXL-LATR (£39.99 includes both 35mm, 120 and diffuser) – Another clever product, the PIXL-LATR uses a modular design that can be rearranged to suit your needs. And because it comes with a diffuser, it’s easy to use with LED screens you already own (like an iPhone or iPad). At £39.99, the build quality is obviously going to be lower than the more expensive units, but it gets the job done! One trick I’ve found is that a 4×5 of ANR Glass (like this one) fits perfectly inside. So I’ve rigged mine up with one for incredible flatness.
🚫Hardware Items I would recommend you NOT use:
Probably just as important as what I include in my process is what I DON’T include. I’ve seen some of these items recommended on other blogs, but in my own tests they were either unnecessary, or degraded negative quality.
🚫 Color Filters
I’ve seen a number of bloggers recommend using a combination of blue and green color filters during shooting to reduce the orange mask naturally. While this will bring your negative to a more neutral balance in camera, it also introduces more opportunities for uneven distributions of light (which is very very difficult to correct for in post) and it will not improve your image quality. The main argument for using color filters is capturing more data from the blue channel during shooting, but as long as you expose your negative to the right (as shown in video), you will have more than enough data for processing RAW.
🚫 Extension Tubes
As tempting as it is to just take an existing lens and add an extension tube to it to make it a macro, you will NOT get the same results. You will see much more softness in the corners of your scans, and you will be much more prone to getting flares and uneven light, which cause MAJOR headaches during conversion.
🚫 Additional “glass” or “plastic”
Take off any filters on your camera lens, and do NOT place any glass on or beneath your negatives during shooting. Additional glass can produce a number of unwanted effects, such as introducing more dust to your image, uneven distribution of light, and newton rings. If you are concerned about the “flatness” of your negative, you can upgrade your scanning mask, or use magic tape around the edges of your film to tape your negative directly to your light table.
EDIT: The one exception to this is ANR glass (Anti-Newton Ring). You can use this hold your negatives flat, and it won’t cause any newton rings.
🚫 Your Scanners Default Film Mask
In my tests, scanner supplied film masks do a poor job of keeping film flat, and can sometimes cause uneven distribution of light (leading to portions of the film appearing discolored). In my opinion, it is well worth upgrading to a better scanning mask, or taping the film directly to your light table.
SOFTWARE
The software you use to process your negative is a CRITICAL piece to getting great results with a negative scan. Even if you follow the steps perfectly to capture your negative, it won’t matter if you don’t have a RAW method for conversion and editing.
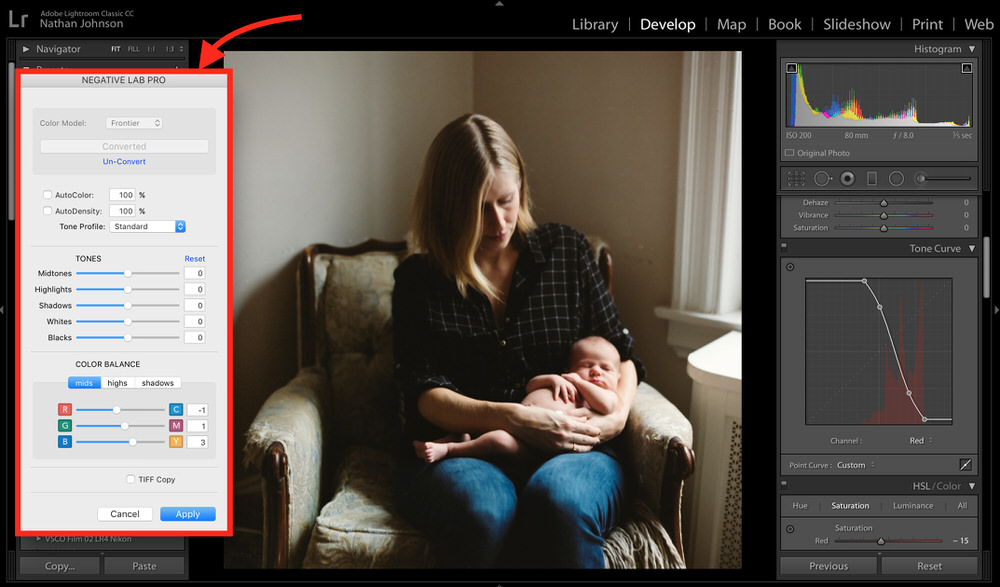
Negative Lab Pro is a Lightroom Plugin that let’s you convert and edit color negatives in an all-RAW process
» Negative Lab Pro + Lightroom:
To really take advantage of all that beautiful RAW data in your DSLR scan, you need a workflow that let’s you keep your process RAW, which is exactly what Negative Lab Pro is for! While there are other, non-RAW ways to process your negative scans (like Photoshop or ColorPerfect), these methods hurt the tones and colors in your image (they’re also “destructive” which makes it difficult to re-edit in the future). To show you what a difference this makes, I’ve included some comparisons later on in this guide.
» Negative Lab Pro (https://www.negativelabpro.com).
The ideal RAW workflow with Negative Lab Pro
Negative Lab Pro is a Lightroom plug-in I’ve developed for converting negative images inside your Lightroom workflow. While it can be used with regular negative scans, it includes a number of features that makes it especially well-suited for use with a DSLR film scanning in an All-RAW workflow.
Here’s how Negative Lab Pro works with RAW DSLR scans:
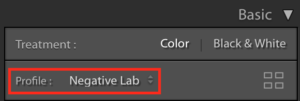
1. Custom RAW Camera Calibrations
This is a crucial (and often missing) step in the DSLR negative conversion process. Standard camera profiles have fine-tuned settings in them that were designed for positive, digital shots. So when you are working on a negative scan, those changes will have the OPPOSITE effect they were meant to have, greatly throwing off your tones and colors. Negative Lab Pro includes over 600 custom camera profiles that were made to match your DSLR camera with a calibration built specifically for working with negatives (we’ll take a look at the difference this makes in the image comparison section).
2. Scanner emulations!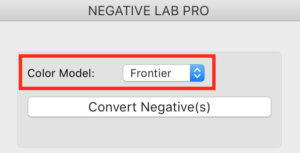
Another problem with most methods of negative conversion is that they take RAW data (which is already spoiled by the wrong calibration) and then interpret the tones and colors linearly. This produces flat tones and unappealing colors. The beautiful tones and colors we typically associate with analog film are based on the color models of two scanner models: the Fuji Frontier and Fuji Noritsu scanners. Negative Lab Pro lets you emulate these pro scanners right inside of Lightroom (or you can choose no emulation).
3. Automatic analysis and settings adjustments
In just a few seconds, Negative Lab Pro will analyze the RAW data in your negative image for you. It looks at each color channel independently, automatically adjusting for film density and color correction – something that is nearly impossible to do well by hand. You can convert a single negative (in the Develop module), or you can batch convert multiple negatives (in the Library Module).
4. Non-destructive, RAW editing tools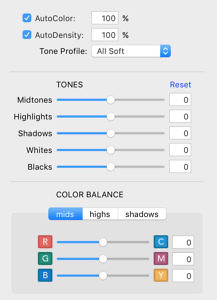
You’ll find that you will almost alway want to make some tweaks to the initial negative conversion – either to the tones or the color balance. Making these changes directly in Lightroom is quite difficult and can have unintended results (as everything is inverted and each color channel is in its own “space”), but fortunately, you can make most changes directly inside of Negative Lab Pro, and it will update the Lightroom settings for you. It also saves these changes to custom metadata, which means the next time you pull up Negative Lab for that particular image, you’ll be able to pick up right where you left off.
5. Additional Lightroom adjustments (optional)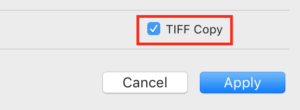
If you want to make additional adjustments to your converted image using Lightroom’s existing tools (like the HSL panel), you select “Make Tiff Copy” when you apply your changes in Negative Lab Pro. This will produce an 16-bit, lossless Tiff copy of your current negative and import it into the same Lightroom folder (right after your RAW negative). On the TIFF copy, all the regular Lightroom settings and sliders will work as they normally do (since you are now working on a positive image). This can be really useful for make fine-tuned changes, just be aware that if you need to make major changes to the tones in your image, it is best to do it on the RAW file with Negative Lab Pro first. Only export to TIFF once you’re close to finished.
6. Film Specific Metadata
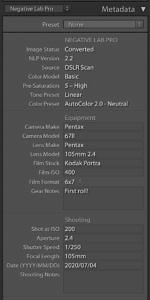 Using metadata on your images is a great way to organize your images, find specific types of images, or share information about an image when you post it online. Lightroom has an incredible metadata engine, but by default it is missing metadata that is specific to the analog process. Negative Lab Pro adds a film-specific metadata section to Lightroom! So, you can add metadata about the analog gear you used to shoot a negative, metadata about your shooting settings, metadata on how you’ve digitized the negatives, and metadata on how you’ve developed your negatives. On the original RAW, the film-specific metadata is non-destructive to the standard fields (important so that Lightroom doesn’t misinterpret your image), but when you go to export an image, you have the ability to overwrite standard EXIF tags and Auto-Generate Rich Captions. You can also use the metadata you add in Lightroom for sorting your Library, searching for images, or creating Smart Collections!
Get a FREE 12-shot trial of Negative Lab Pro (https://www.negativelabpro.com)
Image Comparisons
I though it would be useful to end this with some comparisons of the output you get using different methodologies compared to our “DSLR scan + Negative Lab Pro” setup. To do this, I’ve had the same negatives processed a number of different ways.
NOTE: For each of the examples below, you can drag the slider to reveal the differences.
ColorPerfect (non-RAW) vs Negative Lab Pro (RAW)
Before using Negative Lab Pro with my DSLR Film scanning setup, I had tried a Photoshop plugin called “ColorPerfect.” Since ColorPerfect is a photoshop plugin, it cannot work directly on the RAW file – you must first convert your RAW file to a TIFF file (using another application called “MakeTIFF”). Not only does this add a lot of mess to your workflow, but as you’ll see below, it severely degrades color and tonal quality.
LEFT: ColorPerfect (non-RAW workflow). RIGHT: Negative Lab Pro (RAW workflow).
LEFT (before) Notice how drab the tones and colors are in ColorPerfect’s non-raw conversion. There is also a noticeable color cast in the highlights (with patches of yellow and cyan). RIGHT (after): This is a RAW workflow using Negative Lab Pro (on the Noritsu color setting). Not only is this initial conversion better, but the workflow is simpler since it all happens in Lightroom.
This comparison shows just what a dramatic difference it makes having the right software to process your negative. Negative Lab’s all-raw process produces rich, smooth tones, with neutral grays and brilliant colors. Look especially close at the difference in those skin tones.
Lightroom (Manual Method) vs Lightroom with Negative Lab Pro
It is possible to manually set your curve points in Lightroom to process a film negative into a positive. But because you have to adjust each color channel separately, it is difficult to make many adjustments beyond the basic conversion. And as we’ll see, there are also color and tonal issues introduced by the default Camera Profiles (in this case, Adobe Standard), as the tonal and color adjustments embedded in them have the OPPOSITE effect for the inverted photo!
LEFT: Lightroom (manual method). RIGHT: Negative Lab Pro for Lightroom (automatic conversion).
LEFT: This is as good as I could get this image by hand in Lightroom after about 10 minutes of adjusting curves. The most noticeable problems are in the skin tones and the color balance in the highlights. RIGHT: Again, this was the automatic conversion by Negative Lab Pro in Lightroom. The color is perfect and the skin tones are bright, even and natural. It’s able to do this partially because of it’s custom camera calibration profiles (made specifically for negative development) and it’s image analysis, which is able to set and adjust all three color channels more precisely than can be done by hand.
As you can see, there are visible color issues in the manually developed negative. These issues are difficult (or impossible) to address by hand as they require edits to the individual R/G/B tone curves, in an inverted space. Luckily, In just a few seconds, we’re able to get a significantly better results with Negative Lab Pro.
Photoshop Conversion Methods
One of the most popular methods of conversion is using a combination of sampling the film mask, creating a subtractive layer with the sampled color, inverting, and then using auto-curves in Photoshop. Doing it all manually is very time consuming, but there are a number of photoshop actions that automate the process.
Sometimes this works great, and other times it does not. It almost always requires a fair amount of manually fiddling with curves afterwards to try to get close to accurate.
LEFT: Photoshop (action). RIGHT: Negative Lab Pro for Lightroom (automatic conversion).
In this case, I’ve followed all the recommended steps from the photoshop action, and it left me with a pretty nasty cyan tint. Even if I correct for the tint, the hues are still way off, and the conversion has a fundamentally “digital” look to it.
Professional Lab Scan vs Negative Lab Pro
Finally, let’s look at the ultimate test: a professional lab scan vs our DSLR scan processed with Negative Lab Pro. Can our DSLR scan really produce better color and tonal results than one of the premier film labs in the country? Let’s find out!
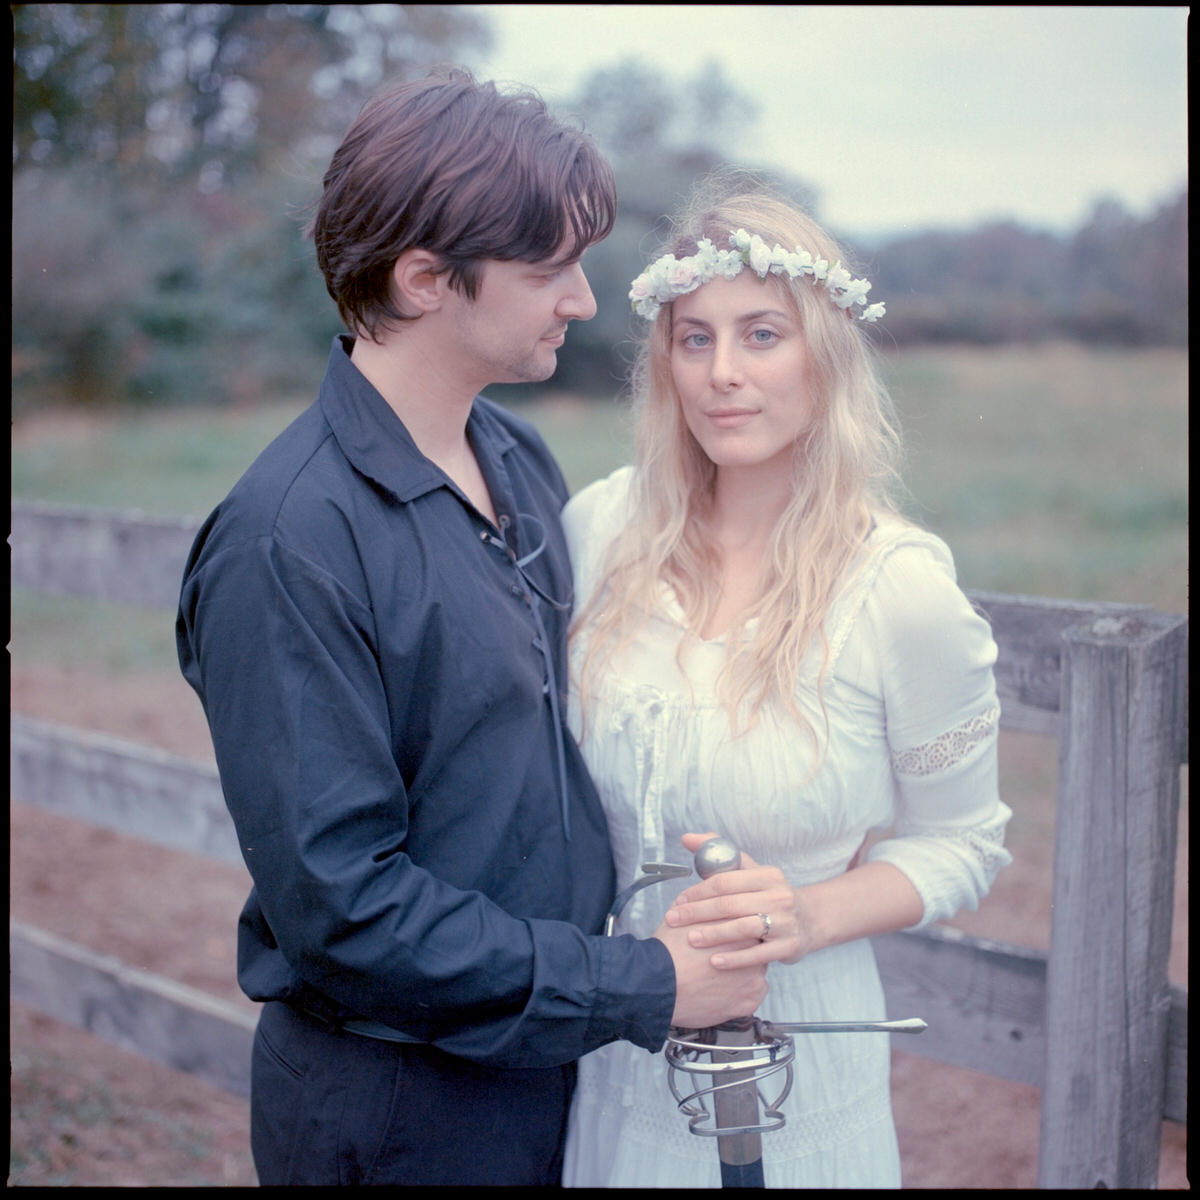
LEFT: Professional Lab (TheFindLab). RIGHT: DSLR Scan with Negative Lab Pro
LEFT: The professional lab scan is actually pretty good, but there are still a few issues. The highlights and shadows are protected, but overall, the tones feel flat. There’s also a slight magenta/purple tint to the highlights that feels unnatural. Perhaps most upsetting is the amount of the image that was “cropped out” by their misaligned scanner, which I would not have known about had I not scanned it myself later. RIGHT: Our DSLR film scanning process produces better, more natural skin tones, with better color separation and tonal depth. As a bonus, we also haven’t lost any of the image to scanner crop!
While the professional lab scan performs well, there are still some minor issues that result in drab feeling skin tones, poor color separation, and lack of depth. Additionally, the labs scanner has cropped our image (especially the right hand side).
By scanning our film with our DSLR, then processing RAW with Negative Lab Pro, we’ve been able to get noticeably improved skin tones, truer color reproduction, and full creative control.(Which is great news, because I paid $130 to have just 5 rolls of 120 film developed and scanned by that lab, which I will never need to do again!)
Conclusion & Comments
As we’ve seen, with a carefully defined setup and processing strategy, it is possible to get better color and tones using a DSLR scanning setup with your color negatives. And as DSLR technology improves, these advantages will only continue to grow!
Have questions about your DSLR film scanning setup, or processing film negatives? Leave a comment below!
Get a FREE 12-shot trial of Negative Lab Pro here (https://www.negativelabpro.com)
Sounds great and easy. I’d love to check this out, as soon as it is launched
Looks amazing, Nate! I watched your video on Youtube, then managed to make my way to your website. Excellent stuff that I’ll have to come back and spend a bit more time with!
I tried to sign-up for your email notification for when the LR NegativeLab plugin becomes available (or for additional beta testing if you still need testers), but I’m not receiving the confirmation email to click to verify my subscription.
I’ve tried it twice, checked my junk and trash folders, but have still not received the confirmation email. I’ll check again in the morning, but this is really exciting since I’m not particularly satisfied with Colorperfect nor my manual curves adjustments in PS or LR.
This looks great! love to try it out. Looks easy to work with. One comment if you make tiff file it would be great if it has the same name as the original. People will see by the extension what kind of file it is. That will be more easy to use if you batch process i think. Good luck.
Thanks Herman! So right now, if you select “TIFF Copy”, it will use the existing name + “-positive.tif”. So if the filename was 01688.NEF it then becomes 01688-positive.tif . The reason I do this is because conceivably you may want to make a tif copy of a tif negative (for instance, if you scanned a negative with a flatbed scanner and that output a tif). Make sense?
This look amazing! Will definitely buy when it becomes available!
One question though. I’m working to transfer my whole workflow to my iPad Pro with Lightroom CC. Feels more natural working there. I know I can transfer presets from Classic to CC, but these presets have an extra settings panel. Will it be possible to use with CC and on Mobile? Or any future plans for this? Thanks!
Right now, it will not work on mobile or on “Lightroom CC for Desktop.” The reason is that Adobe has not yet opened that SDK up to developers. If they do open it up and I’m able to add support for Negative Lab Pro, I certainly will!
Can you make plug-ins for DXO and Capture one pro as well. I would use this all the time if it was a lightroom cc mobile plug-in. I hope this happens.
Can I scan the photos on a light table with my phone and a phone macro lens if my phone shoots raw? I just want to quickly review all the files to determine which ones want to send away. I don’t scan with my dslr. Id prefer to just quickly snap them with my phone and convert, that is good enough for a contact sheet.
Hey! You can use your iPhone if you want just a quick test scan. Take the shot in your Lightroom CC Mobile app, set for RAW capture. Have it synced to Lightroom Classic CC, then use Negative Lab Pro according to normal instructions.
For the time being, I’m focusing on improving the existing app for Lightroom. I took a look at the new Capture One plugin kit yesterday, and it would be a significant amount of work (for starters, I’d have to develop a completely separate app for Windows and Mac – which is a real bummer).
So when will it be available?
Now available. You can download a free 12 shot trial at https://www.negativelabpro.com
Hi Nate – I am very interested in your software for negative scanning. It looks fantastic. I heard about it at PhotoPlus Expo in NYC yesterday. I watched the two videos, and I get that if I want to do some follow-up adjustments in LR (after using your software) there’s an additional step to create a TIFF. The thing is, there are some useful tools in LR I sometimes need after basic adjustments. For example, if it’s a landscape, I might want to darken down the sky using the graduated filter. So what happens after I make the TIFF and do my additional adjustments? Does the image stay as a TIFF or do I convert it back to something such as a DNG? Is this like creating a virtual copy and I am then working in the virtual copy? I’d love to hear more about this next step. Thanks! Daniel
Hi Daniel! Yes of course! If you’d like to continue working on the RAW version of your negative after converting and editing with Negative Lab Pro, you can! I agree that there are some cool things that you can do directly in Lightroom while still working in negative space, but it does behave differently in most cases than what you may expect, and it will cause some wonky effects. The ability to make a positive Tiff copy is something that you can do at any time and certainly isn’t a requirement – it’s just for those who want to use Lightroom act as you would normally expect when editing an image. It is made as a copy, so you don’t lose the original RAW file. You can look at the guide video here for more details: https://www.negativelabpro.com/guide/
Cheers!
-Nate
Hi Nate, for the flatbed scanners guys (Epson v550 in my case) do you have any tips? Thanks!
Yes, I’ll put together a larger guide for getting better tones and colors from flatbed scanners using Negative Lab Pro… in the meantime, the biggest tips are to 1) make sure to scan as a “positive”, 2) Keep it completely linear with no changes to tones or color, 3) Use the white balance selector in the histogram panel and sample off the film mask 4) Export to tiff with highest bit depth possible.
Cheers!
I’m seeking advice. What is your option about using your process and software with a Nikon D3400 or D5600? Thanks.
Will it work with Lightroom 5?
No, sorry. Needs at least Lightroom 6.
Hello Nate ! It seems to be an awesome plugin you’ve developped here. But is it a good idea to use it for black and white film ? I only shoot Kodak Tri-X. Thanks !
It works really really well with B+W, with a big advantage in both quality control and in workflow… I’ll do another post and video showing my process for b+w using Negative Lab Pro… just set the color model to “B+W” and then the Tone Profile to “Linear + Gamma” – that’s a very good, neutral starting point for future tone edits. Once you have an inversion you like for a photo, it’s very easy to batch process to a whole group of photos!
Wow, just went from “wish” (cheap Chinese scanners) to DP Review, and then to you. Will be following up in the New Year … and shoot with Fuji … so this seems like a great match. Thank you so much for posting these clear directions, process notes and recommendations! You’ve made 2019 really special for me! 🙏🏻🙏🏻🙏🏻
Fascinating stuff. As a professional scanner operator (there are still a few of us left), I do have to take issue with the notion that you can characterize something as a “Professional lab scan” and have it be representative of anything other than that specific scan of that specific negative. Negative scanning is highly dependent on the particular software used to drive the scanner, and in many cases the software is limited to that scanner. There are exceptions, such as Vuescan or Silverfast, of course. But the other issue is that scanning a color negative is a highly subjective undertaking, and no two operators will make the same decisions. My old high-end drum scanner (Hell s3900) is a fantastic piece of equipment, but the software is totally unsuited to scanning color negatives, so I end end up scanning them as positives, inverting and adjusting in Photoshop. This can work remarkably well, or it can turn into a disaster, depending on the shot’s lighting condition or the film emulsion. I get better results with my Creo/Scitex Eversmart flatbed, the OxygenScan software does a good job with color negatives, but there is some adjusting to do. Silverfast with a Nikon Coolscan ED9000 gets me the best results right off the bat, but if it makes the “wrong” automatic decision, you’re sort of locked in and it can be hard to adjust further. I’ve had excellent results using a Howtek drum scanner and Trident software, others get excellent results using an Isomet drum scanner with the built-in software, but each scan is different. In any case, the operator’s subjective decision is critical, so it’s hard to characterize a professional lab scan as representative of anything other than that particular situation. It certainly sounds like your product is a step forward in making good color negative “scans” a practical undertaking. I’ve been experimenting with a 36MP DSLR and Photoshop Camera Raw, and it’s a challenge. Thanks and good luck.
Very very good point. Absolutely. There is a ton of skill (and subjectivity) that goes into the final edit (whether it is a negative via a pro lab or a digital photo edited in Lightroom). That said, the machines commonly used in labs for scanning (like Frontier and Nortisu) definitely have their own biases when it comes to hues and tones. They impart their own “look” to the conversions, and to me that’s part of the magic of shooting negative film, and part of what I’ve tried to capture in some of the options in Negative Lab Pro. But like anything else, Negative Lab Pro is just a tool, and it is up to the user to determine the look they want to accomplish.
Cheers!
Great article. Question: When you used the XF80mm, is the minimum focus distance (25cm I believe?) close enough to be able to get the 35mm film to fill the frame? Can you use the 80mm without cropping, or would a macro extension tube be recommended to get full resolution?
Hi! Yes, I can easily get 35mm to fill frame (and then some!) with the XF80mm… since it is a true 1:1 macro, I believe I could capture an area the same size as the sensor itself (23.6 x 15.6 mm), while the size of 35mm frame is actually 36 × 24 mm. So it would also be possible to stitch together several shots of a single 35mm frame to increase resolution!
I know this seems impractical, but any chance Negative Lab Pro will be ported to work with other raw development software (e.g. Luminar) in the future? LR is a bit too expensive for a student like me with its subscription model… I’d be happy to buy NLP in that case 🙂
Hi! For the moment, I’m focused on Lightroom. It’s possible in the future I could make something else, but no promises!
Hi Nate, question: I tried to scan my 35mm negatives with a setup consisting of my 4×5 camera with a sharp Schneider lens (not macro) and a Fotodiox Rhinocam that allows me to put my X-T2 on the back of the 4×5. With this setup, I can easily vary the distance to the negative with the bellows and can fill the frame with the negative to take a shot. I could even blow the magnification to almost medium format size and stitch the negative with the Rhinocam.
Now to the point that bugs me: The quality of the scan with a single shot is far from great with this method and looks worse than a scan on my Epson V800. Do you think the resolution of the 4×5 lens is just too weak in comparison to a macro lens for 35mm cameras or even the Fuji Macro? Or am I doing a wrong comparison between the scanner file with approx. 7MP vs the Fuji/4×5 scan with almost 24MP?
Wow, interesting setup! It seems like there is a lot that could go wrong along the way in that setup (compared to a simple 1:1 macro lens), so I think it is quite possible that your setup is part of the issue. If you are comparing the sharpness to a scan from your Epson V800, be aware that the scanning software is likely adding a fair amount of software based sharpening to it. So to really compare apples to apples, you need to be using sharpening on your camera scan as well. Negative Lab Pro has a sharpening module that includes a “scanner” sharpening setting that tries to emulate the amount of sharpening you’d expect from scanner software, but you can also adjust by hand. Also remember to use “output” sharpening on your final output before comparing!
Nate, I’m quite desperate because I cannot focus properly. When i compare scans made by the Plustek and My D5200 with Macro lens, Plustek is way more in focus.
I found very difficult focusing on the grain, as the live wiew in my camera doesn’t have enough resolution to “see” the grain”, i suppose.
Does it have focus peaking? That really helps on the XT-2 when manually focusing. You can also just try auto-focus.
Hi Nate, I bought NLP early in February, but then was away for a couple of weeks but happily that gave time for my 1:1 macro lens purchase to arrive. So far I have converted one roll of Ilford XP2 captured with an X-T1, and your tool is truly excellent – easy and clear to use, very professionally designed with helpful tooltips etc, and very quick to apply edits once the conversion is complete. You must be a very skilled developer but also have excellent knowledge of the technical details of digital photography/scanning processes. I know that those of us scanning film represent a niche market but I hope that it is a large enough niche to support your work. I recommend this tool to everyone – the quality of the results far exceeds anything I have ever tried before with flatbed scanners.
One question, though, I think a very useful development would be to allow conversions of colour positive film as I am sure your colour technology and scanner profile modelling would create equally helpful excellent results, needing little manipulation in LR afterwards. Is that something you wish to, and can, implement?
Wonderful! Glad to hear you are enjoying it! And yes, I’ve learned a lot in the process of building this that could be helpful for positive images (both film scans and digital images) that I will either implement in the form of future preset packs or via an entirely new tool. Stay tuned 🙂
Thanks for replying, Nate, and good to read that something may “develop” in the future!
This looks great Nate. I am in the process of buying some gear for my setup and this is likely to be the final piece… I do have two questions if you don’t mind?…
Would it still actually work on a Tiff through Lightroom? (with some drop in quality)
I am planning on stitching two overlapping shots of a 6×7 negative together to get the combined resolution – but the resulting stitched image could not be saved as a RAW file (possibly converted to a DNG?)
If not, then would it be possible to open the first shot, follow the treatment as above and then exactly copy those settings on to the second shot – and then stitch the results together at the end? Im guessing this could be tricky as there is some “auto” evaluating going on which would not necessarily be easy to mimic between the shots?
Hi!
Yes, it would convert a TIFF from a DSLR but this is not ideal, since it has already been “baked” with whatever camera profile / WB setting was used when it was made into a tiff.
For stitching overlapping shots, I recommend you first process them as RAW inside of Lightroom using Negative Lab Pro – you can develop one, and then use a feature called “sync scene” to make the exact same conversion settings apply to the next. Then, you can export out tiff files to be stitched together (Lightroom also has an image stitcher built in that works pretty well in most situations, but doesn’t give you as much control as you could have in Photoshop).
Wow – how’s that for a quick response – and the answer I was hoping for too.
Thank you very much sir.
Rick.
Hi,
I just discovered the existence of NLP this morning and now I kinda regret having bought color perfect last year. Despite being a nice tool, it never gave me the quality and facility of usage I was expecting.
I’m gonna try and most probably buy NLP as soon as I would have exchanged my V700 for a DSLR setup.
My question is : what gear should I choose ?
I know this is a very open question but I mostly want to know if there are things I have to look up closely (full frame or not ?, every macro lens ? etc…).
Thank you very much.
Clément
Hi! Thanks for your question. I’ve seen great results with all kinds of DSLRs and Mirrorless digital cameras, both full-frame and cropped sensor. So if you already have a good digital camera, you should be able to make it work. The most important factors I believe will be getting a great Macro lens (1:1 is ideal) and a good light table (I like the Kaiser Slimlite Plano, although I’ve scene iPhones and iPads used as light tables with as good or even better results). Do NOT get a cheap, art sketching light table off Amazon, as this really really hurts color rendering.
If you don’t yet have a DSLR and are looking to invest in one, the type you get will just depend on what you plan on scanning. In theory, a full-frame sensor would be best for 35mm film (since you can replicate at 1:1), but I’ve been really pleased with the results from my X-T2, even though it is a cropped sensor.
Hope that helps!
Couple questions please.
I bought Negative Lab Pro. After installation I’m not seeing the NLP presets in Lightroom Classic CC. Do I need to have NLP open to see them? Even with it open, working on an olympus orf file, they don’t appear.
Also. I see you have a profile for the Nikon Z7. I will be using my Z6 to scan. Do you think you might have a profile for my camera soon – ish? Can I use your software without a z6 profile?
I don’t have negatives to convert yet. Waiting on my nikkor 60mm af-s lens. Have the scanning kit from nikon. Just ordered a bracket for my z6. And need to order the light table as well.
thanks for any help…
M
One short ps, Nate. All the NLP profiles are in the camera raw / camera profiles folder.
Thanks for the video explaining the whole process here. I’m not sure. Use the Nikon ES 2 attached to the lens with a Lume cube for light? Not sure with the es2 attached the light table/tablet would have enough light. Or just do what you are doing. Negatives, color and black and white, lying on the light source.
Hi Morris!
In theory, I believe you should be able to use the ES2 laying on a light table (or with a light table behind it), but in this case would definitely need to remote shutter to avoid shake. I’ve mostly seen ES2 used with a flash behind it.
In the early beta version (shown in video), I had separate presets, but now everything is integrated into the plugin itself. When you use it, you should see the camera profile automatically change to “Negative Lab”. And yes, the Z6 profile is in V1.3 (which is in pre-release and just putting on final touches for general release).
Ok, thanks Nate.
Hello Nate,
I’m Dominique from Belgium and have the following question for you,
I just bought an Epson V850Pro and today my workflow is Silver Fast or Epson Scan then edit my files in ligthroom then using Silver Effex to tweak my B&W same for color negative (minus Silver Effex).
My question is :
Your workflow seems to be based on a DSLR scan setup so would I get any advantage in terme of quality by using your Pluggin knowing that I use a workflow based on a flabbed scanner ?
Many thanks in advance for your answers.
Dominique
Hi Dominique!
The Epson V850 is great! And yes, to answer your question, there are advantages to using Negative Lab Pro in a scanner workflow, especially with the newer versions (v1.3 and later). The newest version (currently in pre-release on the private facebook page), has special support for Vuescan RAW DNG scans, and support for general TIFF and JPEG scans (and yes, I do recommend Vuescan over SilverFast).
There are a few advantages I see to using Negative Lab Pro in a scanner workflow (and I’m working on an article with more details):
1) Separation of capture and editing – it’s a significant advantage (both in time saving and quality) to be able to scan everything in one session, and then edit in a completely different session. Imagine if after every digital picture you took, you had to edit it before you took another picture! With Negative Lab Pro, you can separate out your capture sessions from your editing sessions.
2) Non-destructive editing – By capturing the original negative and editing in Negative Lab Pro, your original, unedited negative is always there, ready to be tweaked or completely re-editing using the original, un-corrupted data.
3) Batch conversions, Scene Sync, Etc – There’s a lot of cool things you can do when you have all your original negatives all together and edit them with Negative Lab Pro that simply are not possible (or at the very least, extremely difficult) to do any other way.
4) A painless experience – Most scanning software still looks bad software from the 90s. It makes a big difference I think in the overal experience to have an easy-to-use, simple solution that gets your tones and colors dialed in fast.
So… definitely more to come for scanners out there!
Hi Nate,
Many thanks for your quick and very detailled answer !
I will look after the new pre-release version on FB and will definitively try it !
Dominique
Hey man would I be able to get good scans with the Fuji 35mm 1.4? Or do realy need a macro lens?
A macro lens will make a huge difference, especially if you a digitizing 35mm film. You may be able to get decent results digitizing medium or large format film with that lens, but a macro will make such a difference!
Hey! I’m sure the macro lens would be a huge difference, but would working with something like a 50mm 1.8 STM canon lens give at least some decent results compared to an older epson flatbed scanner?
Hi,
I like the look of this plugin – something which has stopped me shooting negative film again is the lack of proper colour profiling in a RAW workflow.
One question – I use a Fujifilm X-T2 and use Iridient X-Transformer to demosaic the raw files to DNG (avoiding the dreaded X-Trans ‘watercolour effect’). Will your software still work correctly with this DNG file?
Thanks!
Hi, I believe that it should work, but definitely try the free trial first and let me know if it isn’t allowing it for some reason… it’s been a while since I’ve used X-Transformer, but I believe the DNGs they produce will still give you access to the camera specific profiles in Lightroom (including the one for Negative Lab Pro).
Regarding the ‘worm / watercolour effect”… Have you tried LR Classic 8.3 yet? They new “enhanced details” feature has completely solved this in my experience, and produces really amazing demosaicing from X-Trans sensors. Need to do a more thorough comparison, but at first glance, it seems to do far better than X-Transformer!
Hi Nate,
Thanks for this, I’ll do a free trial and check, but believe you’re right that I should still have access to colour profiles after X-Transformer does its thing.
Having tried both Enhance Details and X-Transformer, I personally came to the conclusion X-T is superior, and a lot faster to process. In fact I prefer Capture One to either and Lightroom, but plugins such as this keep me running LR a little longer…
Cheers!
Hi Nate, I just take the analog photography, and I find your LR plugin absolutely fabulous !! I just bought it this morning after testing it in a trial version. Thank you also for your tutorial on scanning with an APN, it can do a good job!
Wonderful, glad to hear that!
Recommendations for a film scanning mask like the Digitaliza film scanning mask from lomography BUT FOR 35mm SLIDES? To help line them up on a lightbox for consistent shooting with DSLR.
(Note, I just bought a license for your fabulous tool!!! Wonderful and caring work done by you.)
Hi,there is also a Digitaliza film scanning mask for 35mm film. There are a number of exciting film scanning masks coming real soon, like the pixl-latr and the Negative Supply MK1.
Hello Nate,
Negative Lab Pro sounds like a great tool. I know from working with Vuescan and an old Minolta Dimage Scan Multi II how long it takes with conventional scanning. The DSLR/DSLM route seems like a really attractive alternative for the huge pile of old black and white and colour film I’ve yet to scan. But I don’t have Lightroom and have no intention of getting involved in Adobe’s subscription model. Is there any chance you could make Negative Lab Pro as a standalone app or even as a plugin for software like Affinity Photo? Thanks!
Hi! I completely understand that Lightroom isn’t for everyone. If your biggest hangup is the subscription model, you should still be able to buy a license for Lightroom 6 which isn’t a subscription, and use that with Negative Lab Pro. The issue with integrating with another photo platform like Affinity is that they don’t allow for the kind of deep integration I can do with Lightroom that makes Negative Lab Pro work so well. The issue with making something standalone is that I would need to recreate the wheel in terms of building a RAW photo processor, a GUI, digital asset management, etc… it would be very challenging to get the basics of it as good as Lightroom (which has a massive development team and spends millions on development). So for now, I’m focusing on making it a better and better tool for using with Lightroom. Cheers!
Hello,
Thanks for this article. I have always loved my Minolta dual 4 but the time it takes… and I have sold my Leica M2 to switch to Fuji XT2 and Canon FD lenses so the article is a godsend !
Question : to scan 35mm, would the canon FD 50mm f3.5 with a 1:2 magnification would work ? if not there is an extension canon fd25 to achieve the 1:1.
Thanks !
Julien
Hi Nate,
Thank you for all this fantastic info. I’m currently scanning Kodachrome using my Canon EOS 60D. I’ve been playing around with HDR for high contrast slides and adjusting colour on Lightroom. At the moment my biggest obstacle is getting the tonality and depth of detail of Kodachrome visible with the naked eye all into one digital photo with as little post-processing as possible.
I was wondering whether your presets work for positive film at all or if you have any suggestions as to how best to achieve the desired results.
Thank you in advance!
Mónica
Hi Mónica! Sorry, no, at the moment it only works with negatives (color or black and white).
Hey thanks for taking the time to write all this up. Are you photographing the emulsion side of the film?
Also I know you said not to do this, but I’m curious if you have tried using optical mylar and a wet mounting fluid, maybe on top of an optical glass layer set directly onto the light source for diffusion? Obviously it would add some annoying elements to the workflow but I wonder if it would take advantage of some of the gains in wet mount flatbed scanning, like flat negatives, disguising dust and scratches etc.
Cheers!
Yes, photographing the emulsion side of film, although in testing it doesn’t seem to make much difference.
And yes, I have experimented with wet mounting / optical mylar. I have a kit from aztec that included kami fluid and optical mylar (along with the Epson V800 wetmount kit). It is a bit of work for setup, but there is definitely improvement in flatness and minimizing dust and scratches. If I have time, I’ll post about that sometime. Cheers!
Looking forward to purchasing Negative Lab Pro! Please email me when it’s available.
Thank You.
It’s available now at https://www.negativelabpro.com
Hello,
I reviewed your piece, purchased the negative film holder you recommended, the lightbox and I purchased Lightroom 6 and Negative Pro. Now I’m trying to figure out how to get the RAW files to Lightroom because my Canon 5D Mark IV CR2 RAW files are not recognized yet according to the Adobe Lightroom site. I’m so confused abut the conversion to the DNG format and if my RAW information will still be edited in Lightroom 6. Also, I could not find any updates to 6.7 on Lightroom. Can you help me? I really want to make this work since I’ve spent the money already.
Hi! I think you should be able to use the downloads in this link to update to 6.14 — https://helpx.adobe.com/download-install/kb/creative-cloud-previous-version-apps-download.html
Thank you very much Mr. Johnson. After I posted my original note to you, I decided to put down my Canon 5D Mark IV and try my Canon 5D Mark III as well as my Canon 5D Mark II cameras to see if the RAW negative files would load and appear in my Lightroom 6 Library. Not only did they load but I was able to pull up my Negative Pro plug-in and convert the files to positive and make some minor adjustments. I am positively stoked. The program is working just great and I am indebted to you and your Negative Pro software for motivating me once again to pull out my negatives from the early 70’s up until 2000 which was my last year shooting with film and my Hasselblad cameras. On the Lightroom update, I did download the file from the link you provided. It looks like the complete Lightroom 6 program. Since I already have the Lightroom 6 software loaded on my Mac, will this impact what I already have? I don’t want to mess with what’s working. Thanks.
Nate,
Does this process apply at the same way to B&W negatives? Seems that colour rendition should not be important such?
Yep, there is a black and white conversion option in Negative Lab Pro. I’d recommend trying the “Linear + Gamma” tone profile as a starting point with black and white because it better matches the gamma of black and white film. It’s obviously not as difficult to convert black and white by hand as it is for color, but it is really nice to have Negative Lab Pro do it for you. It’s fast, optimizes for each scene, and gives you good control over the tonality.
Comparing a $200 flatbed to literally thousands in camera gear? I would hope you could get better images out of a DSLR “scan” than a consumer-grade flatbed.
Hello,
I would like to use dslr scanning of my 6×7 cm negatives. To capture as much as possible from the information in those negs, which is pretty much, I consider to buy an appropriate macro lens for 1:1 reproduction, like an Apo Rodagon D 75mm and reproduce the negative in 4 or 6 patches with an Nikon D 850 and combine them in Photoshop Photomerge, before inverting the files with Negative Lab Pro in Lightroom. Do you have a best practice work flow? My aim is to capture all the information in the negative, even the grain structure, so I don ´t have to redo the process, if I should need files for larger outputs.
Hi! If you are doing multi-shoot, is extremely important that your film is perfectly flat and perfectly parallel to camera. You can try to use Lightoom’s photo merge (photos > photomerge > panorama > perspective) which is nice because the merge it produces is still RAW (Photoshop cannot do this). If you use Lightroom, you can then convert the photomerged raw file in Negative Lab Pro, just like you normally would. This is what I do for 2-shot merges. If you want to merge more, you may find Photoshop works a bit better. If you want to use Photoshop for the merge, I’d recommend converting the files first in Lightroom… convert the one with the most dynamic range and then use “sync scene” across the rest so they have the same settings… export those as tiffs (or high-quality jpegs) and merge them in Photoshop.
Hi Nate,
Just thought I’d ask before purchasing “Negative Lab Pro”.
Is this software compatible with the most recent version of Lightroom etc…are you keeping it up to date with firmware updates.
Thanks,
Yep, compatible with the latest version of Lightroom Classic (9.0), which I would recommend upgrading to if you have the chance as they’ve made some fixes to the GPU acceleration so that it now works with Negative Lab Pro!
Hi Nate,
Quick question before I purchase your software.
When you import or tether shoot images into Lightroom, what are the sharpening settings you use.
I find that my RAW files from my 5D Mark III usually need a little sharpening.
I was wondering what your thoughts are on sharpening the photographed negatives before converting in Negative Lab Pro.
Thanks for any reply.
Hi, there are a few sharpening options inside Negative Lab Pro (that essentially generate sharpening settings in Lightroom for you), but of course you can also manually sharpen in Lightroom. It’s usually best to use a two-step sharpening process… with the Lightroom sharpening as first step, but then also applying output sharpening when you export.
I noticed that your negative lab pro example has the film frame. Though it had to be cropped away or the app couldn’t color correct or am I mistaken?
Hi, first, crop is not destructive in Lightroom… so you can have it cropped one way for conversion, and then recrop afterwards however you’d like. Also, there is now a feature in Negative Lab Pro v2.0 called “border buffer” – you can tell Negative Lab Pro to ignore a certain percentage of the area on the border around the photo during the conversion analysis… so for most situations, you can now skip the step of cropping / recropped and instead just specify how much border area to ignore.
Really interesting, opened my eyes to this favoured work flow.
How would you deal with multiple 35mm cut film strip’s?
Use a different negative holder?
Capture the whole strip and then create virtual copies and crop?
Then batch edit?
Yep, just use negative holder specifically for 35mm film. With a proper 1:1 macro lens you can fill the frame of 35mm shot and get incredible detail on each shot.
Hey Nate,
What do you think of substituting the Fuji XF 80mm (over $1,200 new up here in Vancouver Canada) versus a 7artisan 60mm manual focus macro lens? I can get that on amazon for $219.00
Cheers,
Michael
Wow. Thanks for sharing your workflow.
I’m using a Pentax 50mm prime (£25) and a macro conversation ring (£10) to achieve the macro quality good enough for my eyes with my Fuji XT10.
I usually shoot black & white film as it’s easier to get a good result. But now with your workflow I’m going to dig out those colour Konica negs from many a family holiday and give it a go.
Many thanks
Andy.
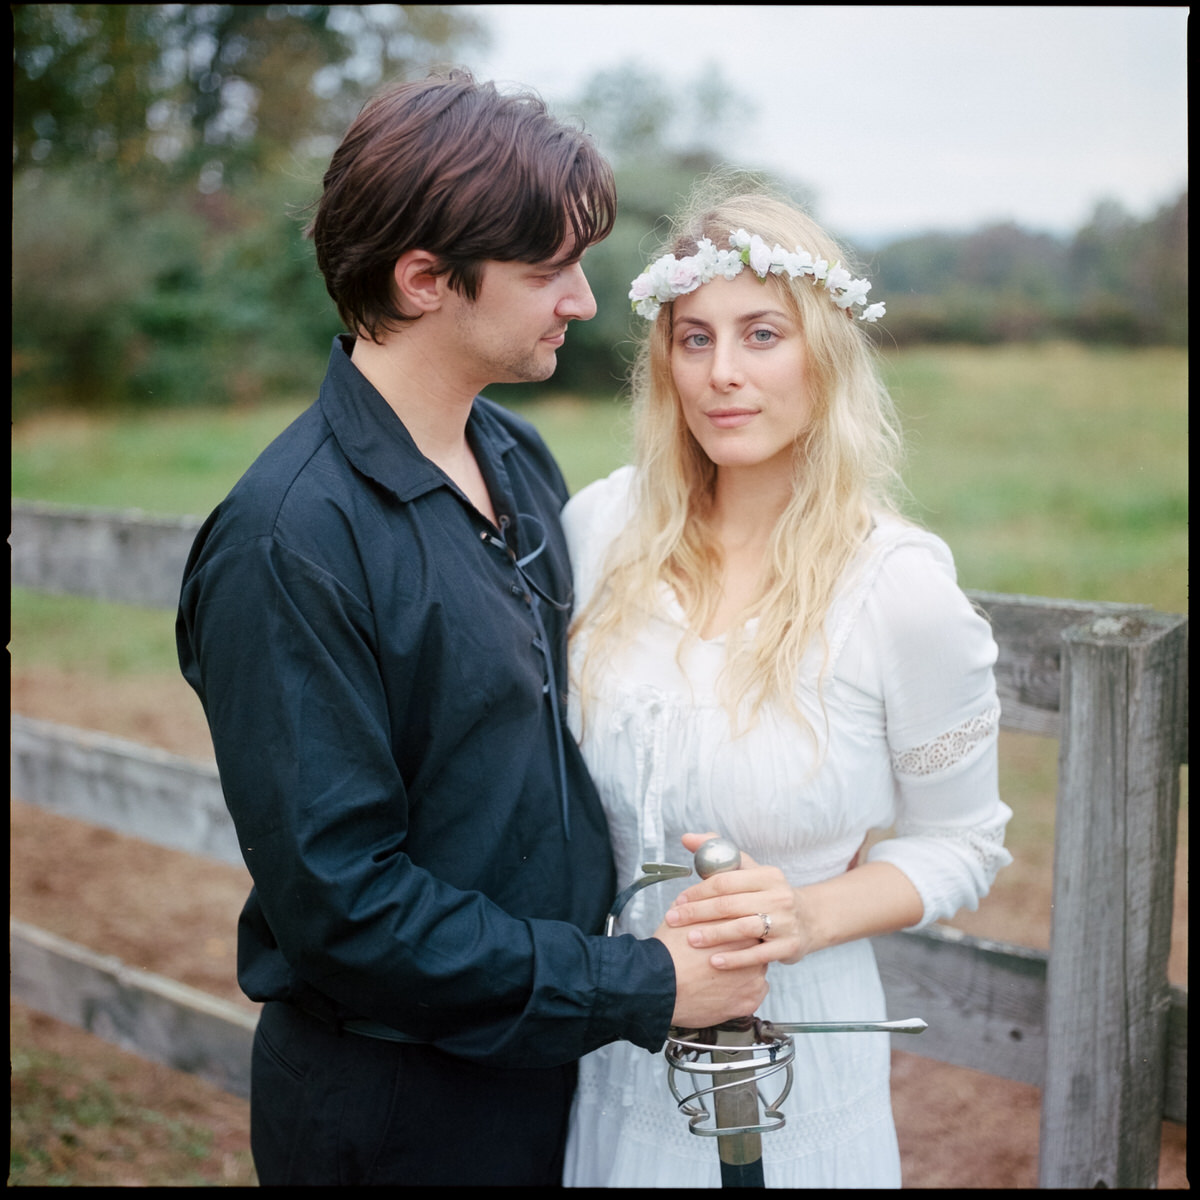
Hi Nate. Thanks for a good presentation. I want good transfers without fiddling with curves and what not (about which I know very little). I thought your very first version of the “wedding” photo was damn good. is that typical of what I would get right off the bat? I have about 9,000 frames to digitize (about 300 rolls of 30). So I must budget at most 2 hours per roll (clean the film, set it in the holder, focus, shoot, process in the software, etc.). Is this reasonable?
Hi! I’d say that this is a pretty typical result with a good setup and shooting a scene with good, even light. But there are a LOT of variables that go into the results you’ll get with the initial conversion… for instance, if your film shot was a scene with multiple lighting types, or backlighting, or tungsten light, you’ll probably find you still need to make some color corrections after the initial conversion – but fortunately this is pretty easy in the latest version of Negative Lab Pro (v2.1), with a couple of different “auto” color correction algorithms (my favorite is Autocolor – Warming). You may also find you need to make some adjustments based on film type and for your personal preferences. For instance, the current “standard” tone profile in Negative Lab Pro adds a fair amount of contrast, which is great for balancing out low-contrast films, but for higher contrast films, you may want to start out with “linear” or “linear + deep” profile. In any case, I think 2 hours per roll is MORE than enough time once you have your setup and editing style figured out!
Hi Nate, thanks for this amazing resource. I’m thinking of going down the DSLR route for scanning medium format negatives and slides and have a quick question for you. How essential is the 1:1 magnification? I have a Leica Q2, which has a macro mode that allows for focusing up to 17cm, which I’m guessing is sill too far, right? Any thoughts would be greatly appreciated! Many thanks,
Omar
Good question… I don’t know enough about the macro mode on the Q2 to answer that well. But based on it being a 28MM lens, I do expect that you would see a fair amount of distortion, even if you could focus close enough.
Thanks for the reply, Nate. I managed to borrow a Canon 5D MKii with a 100mm macro lens for 1:1 in the end rather than use the Q2. Now, since I’m scanning 6×6 negatives using a 35mm equivalent digital sensor, I’m just wondering what’s the best practice: one shot or 2 or more to cover the size of the 6×6 negative? I’ll then probably do as you suggested and merge in Lightroom rather than Photoshop so I can apply the NLP processing on the RAW file. Thanks again for your help and keep up the great work! Cheers, Omar
Worked on this type of scanner technique 10 years ago using a copy stand, portable light table and adapted 65mm f/3.5 Leitz Elmar with EOS 5D. Resolution and details as you’ve described in less amount of time. In principle a scanner is a very slow digital camera, where as a digital camera, DSLR and mirrorless give more control with camera shutter speeds and aperture settings. In all can produce a scan at the original resolution of negative or transparency.
Impressive work. I have been digitizing slides using a Nikon D500 or 800 with the 60 mm/2.8 Nikon lens and the ES-2 Digitizing adaptor. When you start, you use the eyedropper to start the color calibration. I don’t see edge available with my set up. Will the software still work?
I should clarify. I’m now moving on to digitize color prints and did a test of 3 negatives.
Jerry
Hi Jerry, yes, you can still use Negative Lab Pro even if there isn’t any available film border to sample with the white balance tool. Just set LR’s white-balance to “auto” and it should be good to go. It’s important though to understand that this step is just helping to separate the color channels, and will not actually “white balance” the converted negative. That’s why there are color correcting tools built in to Negative Lab Pro, with various autocolor analysis and manual color cast controls. So do not be surprised if you still need to color correct after conversion!
Thanks. I try the demo soon. Great job!
Need to know if NLP is compatible with Photoshop. I have CS5 and it is under utilized.
Thanks,
U. Moharana
No, Negative Lab Pro will not work with Photoshop – it is for Lightroom 6 and Lightroom Classic. That’s because Negative Lab Pro is meant to work directly on the original RAW and allow for non-destructive editing and future edits against the original — which isn’t really possible in Photoshop.
Hi Nate, I have a question on scan quality. You’ve talked mainly in tone and color but I’m interested in how the results (image quality wise) of the scans using this method compare with your typical flatbed or drum scanners
It will vary quite a bit just depending on your setup and if you are working with 35mm film or 120 film. For instance, I find that my Fuji XT2 + 80mm Macro setup is significantly sharper than my Epson v600 when working with 35mm film, and about equal when working with 120 film (assuming it is just a one-shot “scan” with my Fuji – if I do a mutli-shot-stitch on the 120, I can get more detail). I’ve seen others do comparisons with drum scanners that show you can extract a similar amount of detail with the right DSLR setup as you can with a drum-scanner, but if cost/time were no object, I think a drum scanner would still produce the most “perfect” details.
These are really beautiful photos and you saved me a lot of time and money on buying a dedicated scanner. I don’t know if you know, but I actually stumbled upon your scans via Negative Lab Pro’s sample photos.
I was wondering if you could share what film stock you shot with and what camera, specifically for one of the shots of the Warby Parker school bus. I couldn’t stop going back to that photo.
Thanks for the guide it was incredibly informative and eye-opening.
That’s very kind of you, thanks! That Warby Parker school bus photo was taken on my Hasselblad 500cm with the 50mm Zeiss lens, and using Fuji 400h film.
Your article is quite helpful! I have so many questions, and you have answered many. Thank you! Such a nice and superb article, we have been looking for this information about DSLR film scanning perfect color negatives. Indeed a great post about it!!
Using an X-T2 would an XF35mmF2 with the Fuji 11mm extension tube work?
Too shallow a depth of field?
Thanks
It would work but definitely not ideal… the 35mm length means you’ll need to get real close to the negative (increasing chances of reflections) and extension tubes really degrade quality and increase the chance of uneven lighting (which negative conversions are VERY sensitive to).
great write up! are you shooting tethered?
Thanks! I know people who love shooting tethered when they are digitizing, but I typically just shoot on the memory card and then load everything up after the session. It’s easy to do this on the Fuji XT2 because the display is really good and I can use features like focus peaking to make sure everything is perfectly in focus.
I must be missing something somewhere… where on your site do you go to purchase the DSLR scan Neg Lab plugin?
Hi! It’s not on this site… it’s at https://www.negativelabpro.com
Cheers!
-Nate
I was looking to see if it had been asked already but didn’t find it: during the cropping section, you cut off the film sides because you mentioned that the tool will assess the image wholly. Is there a recommended workflow if I wanted to conserve that as part of the image? I suppose for example, re-do the crop after the steps, since it’s non-destructive, no harm done?
That’s right… any cropping you do in Lightroom is non-destructive, so easy enough to crop however you’d like after conversion. I’ve also added a feature called “border buffer” – basically it just ignores a certain percentage of the outer border area. So if your scan is showing just a little bit of border, you don’t need to crop – just set the border buffer so that area is ignored during conversion.
Hello Nate. You seem to have a bunch of happy followers. I just finished Digitizing many years of slides. Recently, I spend a good deal of time organizing my color and b & w negatives for the second part of the project. After looking at the LR curves invert and the color perfect process, I have been putting the second part of the project off. Maybe I am glad I did. I digitize with a D800E with a PB-4 / PS-4 bellows setup using a 55mm 3.5 Auto (the old CA one) getting me to 1:1. I am pretty happy with the results except for the expected minor color shifts which I can adjust (hopefully in batch mode). My guidance has been mainly through Peter Krogh’s DAM book series. My compliments on your fine work. I appreciate all your efforts coming from a 30 year career in IT as a developer. I expect to be a license holder very soon. WELL DONE.
Hi Nate,
I’m interested in trying out NLP and I’m looking at changing my setup so I can see the best results. I’m hoping a new setup and NLP will help me reduce the amount of time I spend scanning and editing images.
My main concerns are regarding my camera and lack of macro lens. I currently use a Canon 5D Mark III which only produced images of 22 megapixels. Would this image size be sufficient to capture the grain and quality of 35mm film, or would images from a scanner be better with NLP? I’d imagine I’d have to stitch together quite a few shots of 150 film to try to get “the most” out of it.
Regarding the macro lens, would there be any models/specifications you’d recommend I look for or avoid?
If these questions have been addressed above, please feel free to point me in the right direction. I read quite a few posts but not all.
Thank you!
Hi!
The macro lens is key to the setup. I’d recommend a modern macro lens (which have better anti-reflective properties vs older macro lenses – something that is really crucial to avoiding “orange flares” in your digitizations). And ideally, it would be 1:1 reproduction ratio. In terms of the camera body, 22 megapixels should definitely be enough to capture grain and quality from 35mm film.
Cheers!
-Nate
This is incredible. For those of us who don’t want to spend ANY time scanning, are there any major photo labs who have adopted this workflow in order to offer raw film captures?
Yes, there are a few and I’m hearing more and more pop up! I believe that Linus and His Film Lab (https://www.linusandhisfilmlab.com/) offers full raw, and I’ve heard from many other lab owners who are planning to do the same!
Love how you jeep updated the article, thanks Nate!
Congratulations on the article!
I would like to know how do you set the white balance of your Fuji camera when you “scan” the negative strips?
Car? Daylight? A fixed value?
Although the shooting is in RAW, I believe that using the appropriate white balance in the shot can optimize the development process.
Thank you so much!!!
Hi Santiago – I typically have my Fuji XT2 set to 2800k, but it really doesn’t make a difference since shooting RAW. No matter what your in camera white balance setting is, the final white balance will be the same after you have used the white balance dropper tool on the film border to calibrate the film.
Hello, where can I download those RAW color profiles without using negative lab?
Hi! They are included in the download pack of the free trial version of Negative Lab Pro, which you can download from https:/www.negativelabpro.com. On the mac package, you would need to “right-click” the installer, and go to “contents/resources” to find the folder with the camera profiles. Or you can download the windows version, and the profiles are there once you unzip. Cheers! -Nate
Hey Nate, Thank You for the terrific article! I very much appreciate the information.
I wanted to give you a overview of the equipment I intended to use with my scanning project, following that I do have a specific question:
Canon Rebel T7
Albinar High Load 28″ Copy Stand
Kaiser Slimlite Plano 5000K
and either:
Sigma 105mm f/2.8 EX DG OS Macro Lens 1:1
or
Laowa 100mm f/2.8 2x Ultra Macro APO 2:1
My intent is to scan my entire Archive of photographic material. Starting with negatives, while the bulk of my collection is 35mm and larger up to 8X10 negatives, I also have a fair number of consumer-grade 110 and DISC negatives.
When the 110 and DISC negatives were originally printed they were exceptionally sharp with excellent color, tonal range and contrast. When recently reprinted as a test there has been very minimal color shift/fade and the images were still sharp with good contrast. As a result it is my intention to DSLR Scan all negatives, including the 110 and DISC. This is where some of the confusion comes in, such as what macro lens should consider, as 110 and DISC Image Area is so small. Are there additional considerations.
I very much appreciate any advice or suggestions that you can offer in connection with my DSLR Negative Scan, in particular what Macro Lens? 2:1 or 1:1?
Again, I thank you for your easy to understand straightforward article. I very appreciative that I found it, otherwise I was about to begin this project using the advice of another individual, that likely, would not have worked out as well and would have resulted in me having to rescan approximately 18,000 individual frames of film.
Kindest regards,
/s/ Brian
Hi Brian, I think a 1:1 macro on your Canon Rebel T7 should work great for what your needs are. The sensor size on your Canon Rebel T7 is 22.3mm x 14.9mm, and the size of 110 film is 17mm x 13mm. So with a 1:1 macro, you will be quite close to filling up the frame. And the 2:1 would certainly be overkill when it comes time to digitize your larger formats. Hope that helps! -Nate