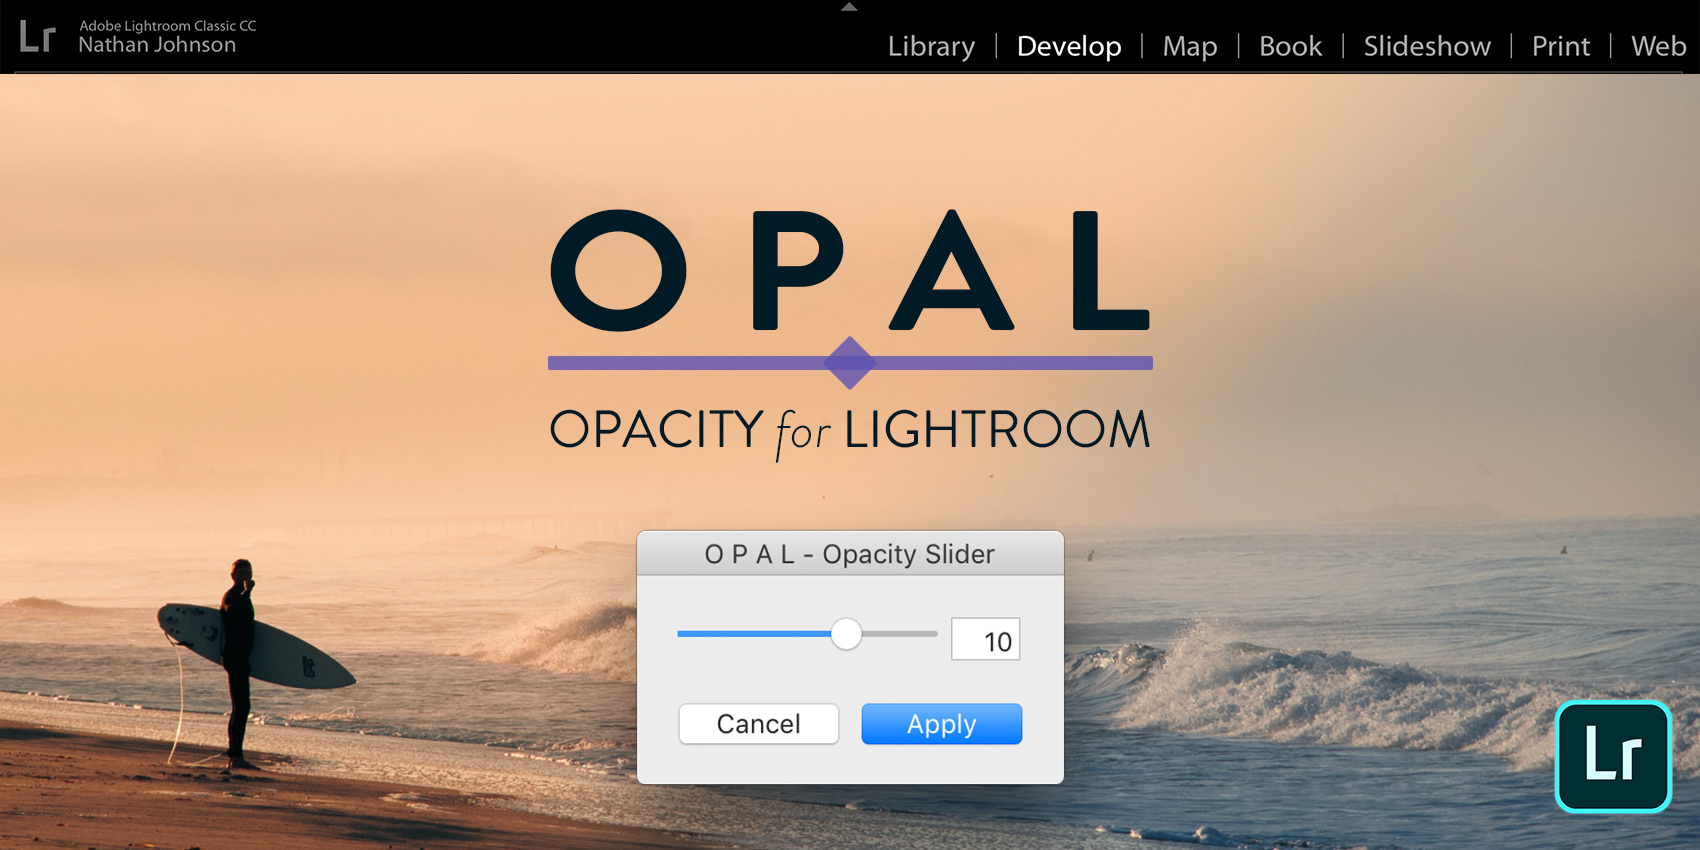
OPAL - Opacity Slider for Lightroom Presets - $15
Meet Opal – the tiny (but brilliant) Lightroom plugin for adjusting Lightroom Preset strength. It works like having a Lightroom Opacity slider, so you can turn down (or crank up) any Lightroom preset in seconds.
NEW 🎉 – Version 1.2 is here! Lots of goodies, like Windows hotkeys, sticky settings, and more. See the v1.2 release notes
What's inside:
Compatability
✓ Checkout Page Secured with 128-bit TLS Encryption
Have you ever wished you had a "Lightroom opacity slider" that let you tone down the intensity of your Lightroom presets?
Since I started NATE Photographic, I've gotten emails about this almost every day: "Help! When I apply a Lightroom preset, I find the effect is usually too strong for a photo. Is there a way I can easily turn down the strength of the preset, like an opacity slider in Lightroom?"
As a preset designer and Lightroom trainer, this doesn't surprise me at all. Because here's the problem...
Adjusting Lightroom Presets by hand is complicated, time-consuming & rage-inducing
Why? Because Lightroom presets can have very complex settings in them. There are over 50 individual settings you can adjust, not to mention Lightroom's tone curves (how do you accurately adjust the strength of those by hand???).
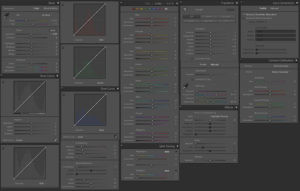
Just look at this wall of settings you'd need to go through!
If you have ever tried to adjust each setting by hand, I'm guessing it ended with you either giving up, or throwing your laptop against the wall in a tone-curve-induced rage. (Ok, maybe not, but still, it sucks, right?).
Enter Opal...
Meet Opal - the crazy good Lightroom Opacity Slider for all your presets
So many photographers were asking me for a feature like this that eventually, I decided to make my own Lightroom Plugin called "Opal" (a combination of the words "opacity" and "lightroom" – get it??) Ready to see how easy it is to edit in Lightroom with Opal? Watch this:
(ABOVE VIDEO: Using the Opal Opacity Slider on EX07 from E-Chrome Preset Pack)
Having a tool like this makes it so easy to find the perfect strength of any preset in just a few seconds, without the pain or frustration of trying to adjust the preset one setting at a time.
The most thrilling part for me about making Opal is getting to use it now everyday in my own Lightroom workflow. It really is fun to use. Here are a few things I think you'll love about using Opal too:
Opal makes it fast & easy to adjust Lightroom Presets
With Opal, it's incredibly easy to get just the right effect of any preset. Just start editing your image as you normally would. You can try out different presets, or adjust any settings you want.
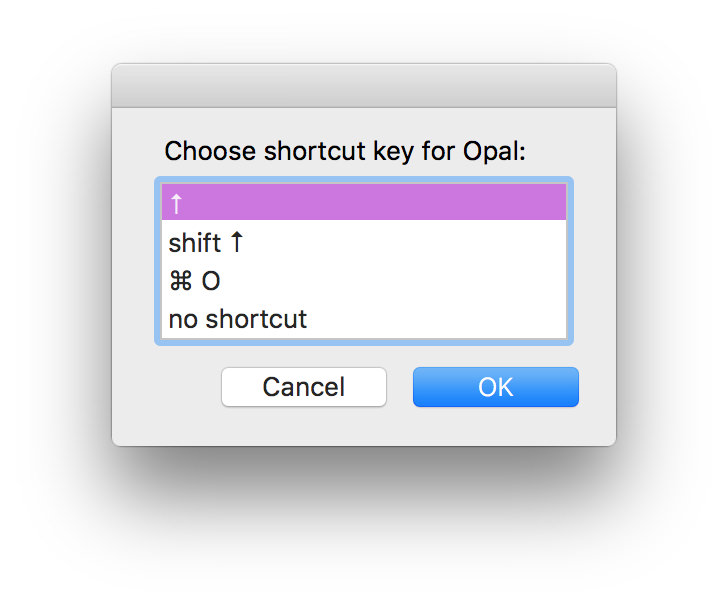
Whenever you're ready, hit the UP ARROW (↑) and your Opal Opacity Slider will pop up!
Now, you can drag the Opal slider to change the opacity of your settings. Opal does all the work for you, adjusting all the settings of the preset in unison, to fine-tune the strength of those settings.
Wanna edit even faster? Opal has a number of shortcuts that make editing your photos lightning fast. Check out the to learn more.
Opal works great with ANY Lightroom Preset (yep, even that one)
It was important to me that Opal work well with ANY Lightroom Preset (yes, even one that I didn't design). This means making sure that Opal could work with Lightroom presets that use custom camera profiles (like VSCO presets, NATE presets, DVLOP presets, etc). And work with presets that use a custom White Balance (and give you a way to choose the white balance you mix it with).
Here's an example of Opal adjusting the strength of a VSCO film preset (in this case, it's Portra 800+¹ ++ from VSCO 06):
Opal works flawlessly here, even with VSCO's custom camera profile, and complex R/G/B tone curves!
Opal makes complex adjustments simple
One feature I really wanted was a way to adjust the opacity of different Lightroom settings individually, to create more complex adjustments in Lightroom.
It would be WAY too overwhelming to include every setting (or even every Lightroom panel) to Opal. So instead, I've grouped the advanced options using the 4 building blocks of Lightroom style I teach in my Lightroom Mastery course.
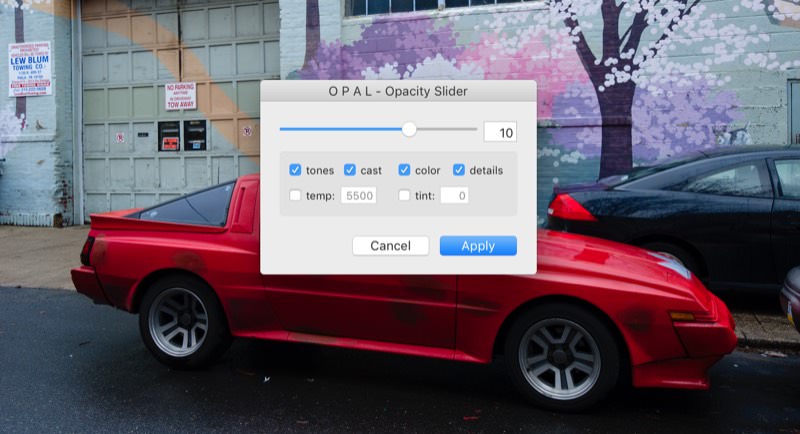
So now, you can independently adjust the Tones, ColorCast, ColorPalette & Details of your presets. This is so SO powerful! In just a few seconds, you can make advanced edits that used to take hours, and design amazing new preset variations with a few clicks.
You can
Opal makes smarter choices, so you get better results
What's the point of an opacity slider if your final image quality isn't amazing, right? Of course, just the fact that this keeps your workflow RAW in Lightroom is a plus. But, it's also important that it makes smart choices about how to fade your presets.
As a preset designer, this is one area where I've seen other Lightroom plugin's fail. They assume that all settings should fade linearly – which works fine on some of the simple settings, but starts to break apart on others (particularly tone curves).
SO, for Opal, I built a dynamic interpolation engine that produces better results than linear interpolation. Basically, it builds in my deep knowledge of Lightroom and preset design into Opal, so you don't even have to think about it.
Ready to get better, faster Lightroom editing with Opal?
✓ Checkout Page Secured with 128-bit TLS Encryption
Common Questions
Release Notes:
Version 1.2 Release Notes:
=====================
Hey guys! Lots of great stuff in the newest release. Check it out!
-Nate
Windows Shortcut Key
Opal now includes shortcut key for Windows users!
More Shortcut Key Options.
Both Mac and Windows users have multiple options for what shortcut key they want to use.
Quick Start PDF guides:
Both Mac and Windows versions now include a quick start PDF, which shows you step by step how to setup and use OPAL.
Better instructions + error reporting.
The installer and activator now gives more specific directions to users (and error reporting if something goes wrong)
B+W Detection.
In Advanced Mode, Opal will detect if photo is in color or black and white mode. For color photos, they will see a "color" checkbox item. For b+w photos, they will see a "bw mix" item
Sticky Settings
Opal advanced settings are now "sticky" - meaning Opal will remember what you used the last time.
Other Various Fixes
Including black & white conversion issue, invoking from outside the develop module, and more.
This is great! I got your mail in Spam and I tend to delete all Spam-Messages, but thank god I checked it. Bought the Plugin immediately and really enjoy this feature. I bought so many presets from famous influencers which tend to be toooo intense for my pictures. Too saturated, too much contrast etc. – and I really love to be finally able to change the intensity of the presets without having to change everything by hand! Thanks for that and regards from Germany 🙂
Oh no, haha! Glad you were able to find it and rescue it from spam. And really glad you are loving Opal 😊
Cheers,
-Nate
Hi Nate,
I tried to buy it but when i select paypal it still asks for a creditcard while my paypal it self has enough money on it. You know why this is happening?
Hi Richard,
Yeah, sorry about that. I don’t know why my payment platform (gumroad) does this… if you really want to use your paypal credit, you can paypal me directly here https://www.paypal.me/natephotographic (in the notes, just say that it is for Opal and include the email address you’d like me to send it to) and I’ll send you your download package.
Cheers!
-Nate
Hi Nate,
Yea i dont know why gumroad does this but i have already send them a email and i have contacted paypal but got zero response but good to hear that we can work it out this way so ill be send you the money right after this email so thanks again for the quick reply and for helping me out.
Hi Nate!
This is a wonderful idea and I can’t wait to use this tool. However I downloaded it onto my Mac and am having a problem with the up arrow key being the shortcut for Opal. I edit my photos by clicking on the boxes containing number values and use the up and down arrow keys to change the values. Whenever I click the down arrow, there is no problem, but when I try to change the value in a positive direction, the up arrow key opens up Opal. This is a pretty big setback for me considering my editing method. Is there something I’m missing? If not would it be possible for me to assign a different shortcut key? Thanks!!
*UPDATE*
As of Opal 1.2, you can now choose your shortcut key during installation. You can choose “↑”, “Shift + ↑”, or “⌘ + o”
Hi Stephanie! Of course, let me know what you’d like the shortcut to be, and I’ll send you a script to run to change it for you. 🙂
(Btw, another way you can edit your settings with your keyboard is by clicking on the setting name, then using the “+” and “-” keys to change the values. This method has the advantage of continuing to work even as you switch photos or make other changes. So for instance, I usually click on the “exposure” setting name, and then I can use the “+” and “-” keys to change exposure as I go through photos. Try it!)
Nate! I just bought the update but have the same issue. I’m so used to changing via the up/down arrows. Can i have that script? I’d like my shortcut to bring up OPAL to be the n Key or the ` symbol (next to the 1 on the apple keyboard)
Ohh, I had no idea you could use the +/- keys as well! It would probably take me a while to get used to that, and it looks like it only does +5/-5 increments. I would love a script for the letter ‘o’ as the shortcut! Thanks, Nate!
Oh sorry, I see your comment about changing the shortcut key to ⌘ Ctrl O, I will go ahead and do that. Thank you!
*UPDATE*
As of Opal 1.2, you can now choose your shortcut key during installation. You can choose “↑”, “Shift + ↑”, or “⌘ + o”
Old response:
Ok – I added this in FAQ section, but real quick, here’s how to change the shortcut key to ⌘ Ctrl O:
1. Open up the “terminal” application. (You should be able to find this in Applications/Utilities/Terminal)
2. Copy and paste the code below into the terminal, then hit enter:
defaults write com.adobe.Lightroom6 NSUserKeyEquivalents -dict-add " OPAL - Opacity Slider" "@^o" ; defaults write com.adobe.LightroomClassicCC7 NSUserKeyEquivalents -dict-add " OPAL - Opacity Slider" "@^o"
(You could make this shortcut key something different, but it shouldn’t already be assigned to something else in Lightroom. For instance, you shouldn’t use the backtick key (`) directly because that is already assigned to toggle flags, but you could do ⌘ `. The code for that would be:
defaults write com.adobe.Lightroom6 NSUserKeyEquivalents -dict-add " OPAL - Opacity Slider" "@\`" ; defaults write com.adobe.LightroomClassicCC7 NSUserKeyEquivalents -dict-add " OPAL - Opacity Slider" "@\`"
3. Then just restart Lightroom, and you should now be able to call up Opal anytime using your new shortcut.
Nate you rule! You always have the best customer support. I was running into the same issue as the others above and ran the script and now I’m back in business. But I like your tip about the + & – keys may have to start using that shortcut instead.
Awesome Chris! 🙌
Thank you very much 🙂
Hi!! I will receive future updates?? And How to download this future updates?
Yep! When you purchase Opal on the checkout page, it will ask for your email address. When I make future updates, I will email you the new download 🙂
Looks very interesting. Can this string of shortcut keys on Windows be mapped to a midi slider unit like the Berhinger ones?
It seems like that should be possible somehow? I don’t know enough about MIDI or Windows to really answer that, but maybe someone else can chime in?
Steve – just following up on this – it looks like you can set up macros – at least on windows keyboards. I’m on a mac over here (with VMware for emulation). Would love to see if someone can get this to work? https://www.microsoft.com/accessories/en-us/support/how-to/keyboard/macros
Hey Nate! I’m wondering how it works if we email you/paypal you instead to bypass the CC needed – will you add us to the email list for updates? Where do we paypal you instead?
You will still get updates… I will send you a link that will let you redeem and register your copy just like you normally would (just bypassing normal payment). You can paypal me here: http://paypal.me/natephotographic
I snagged it but just realized there aren’t any shortcuts for Windows – didn’t realize that before. Do you know of a way to set up anything? 🙁 Even the alt +f series mentioned didn’t work.
*UPDATE*
As of Opal 1.2, Windows also includes the shortcut key options. If you’d like to map Opal to a tablet or another controller, you can use the keystroke combos below for reference
Hi Holly – Ok, so the series of keystrokes you need to use will be dependent up the language you have Lightroom set to. I’m building a shortcut tool for Windows but in the meantime, here’s the correct series of keystrokes to use for all the different language settings.
English
alt f – u – enter – O
Dutch/German:
alt d – z – O
French:
alt f – M – O
Netherlands *Lightroom Classic*
alt s – u – enter – O
Netherlands – *Lightroom 6*
alt s – s – enter – O
Italian – *Lightroom Classic*
alt f – x – O
Italian – *Lightroom 6*
alt f – p – O
Portuguese
alt a – p – enter – O
Spanish
alt c – x – O
Swedish
alt a – h – O
I have to echo Vivien’s comments.
I’m a preset collector but I too also like to just adjust my photos with subtly.
THIS is the tool I need.
Thanks for your efforts Nate.
Awesome, that’s so great to hear, Grant! Thank you for your comment!
How does OPAL work with multiple presets, lets say you have one preset for sharpness, noise and vignetting and a second preset for color adjustment and tone curves, which preset does OPAL adjust, both?
Hi Mark – Opal works on whatever presets or settings have already been applied to your image… so if you apply one preset for vignetting, and then another preset for color, Opal will fade those combined settings.
Because of this, Opal works really really work with modular preset systems (like X-Chrome) where you combine multiple types of presets to get the final effect. Just build the combo you want, then use Opal to adjust the effect.
(It’s also really really fun to play around with Opal’s advanced mode when you’re using modular presets like this!)
Cheers,
-Nate
Given that Opal affects multiple presets, would I be correct to assume that it does not actually analyse and target the settings changed by the preset/s but simply takes the current state of the image and adjusts the areas that the advanced mode allows to be toggled? By extension, if no preset was applied and the image is as imported, will using Opal actually make changes?
Exactly. It takes settings you currently have on your image (whether applied through preset, or even just adjusted by hand), and fades those settings. If you have no settings applied, Opal will not make any changes.
Looking good. Does it also work with any presets installed on Lightroom? or it only applies to your presets.
Anyway, I also wanna use my paypal balance with your $5 coupon code. What should I do? Please email me the instructions. Thanks!
Opal works for any presets installed on Lightroom (not just my own)!
Yes, you can pay me via paypal balance here: https:paypal.me/natephotographic . If you have a special discount code, just note that in the description and calculate into the price. Also be sure to note what email address you’d like me to send your redemption link to!
Already paid. Looking forward to your tool! 🙂
Hello Nate, Thank you for your great colour work, I’ve loved using your Ektachrome set. I especially like that you are not emulating the films but adapting their colours to modern uses (and I’m a film user from way back). I generally use your presets with tweaks and lesser strengths in Photoshop so your Opal slider is going to be an ideal time saving tool. I downloaded the plugin package and have been trying various methods to add it to my Lightroom but with no success. I subscribe to a monthly plan for Adobe and had thought I was up to date but I’ve checked my LR and it’s only 5.7. My question is, do you think that is the problem? Your plugin may not load on outdated versions? Kind regards, Annie
And, duh, I just saw your Common Questions and can see that you’ve already addressed my question. I need Lightroom 6. I’d better update!
Just bought it but i have a question that i can’t seem to find the answer to.
Is it possible to change the button from arrow up to something else. I use the arrow up key all the time while editing in lightroom.
*UPDATE*
As of Opal 1.2, you can now choose your shortcut key during installation. You can choose “↑”, “Shift + ↑”, or “⌘ + o”
What happens if you already installed it as the arrow up key but need to change it to a different key?
Just re-run the installer and select a different shortcut key.
Or, if you want to do it manually, or select a key that I don’t offer as an option, you can also do this manually:
1. Go to Apple > System Preferences
2. Select “Keyboard Preferences”, then “Shortcuts”, then “App Shortcuts”
3. You should see a listing for ” Opal – Opacity Slider” with the current shortcut key on the right side.
4. Double-click the current shortcut key, then enter the new shortcut key you want to use.
I purchased Opal the moment I got the email. I have a few of your free downloads and liked what I saw. I know it’s only been out a few days but I am already hooked on Opal. What a time saver. I think I will have to break down and get x-chrome. So many other presets that I’ve purchased have been useless in the long run. I keep going back to your x-chrome starter pack but I know the package will be much more versatile. Glad to find someone I can trust for presets. Opal is fantastic.
Fantastic Kenny! Thank you so much! 🙏
When I first installed Opal, it didn’t seem to work then I thought maybe I need to be in the develop module. It’s a pretty simple plugin that makes a good deal of sense but, perhaps, something needs to be said in your instructions about being in the develop module before it works – or maybe I’m more challenged than most.
Yes – you need to be in the develop module for it to work!
*UPDATE*
As of Opal 1.2, it will automatically take you into the develop module if you try to use Opal from inside another module.
Can you help me? I installed the Opal slider. But when i use the slider a colour preset become B/W by using your slider. Even in advanced mode. ???
I have the same problem
Hi Martin and Thomas – I’ve had a very small percentage of other people having this same issue as you, but haven’t been able to reproduce it myself. If you’re experiencing this issues, can you email me the following to nate@natephotographic.com:
* Lightroom Version you are using (including the release version, which you can find in “Lightroom > About Lightroom” menu item)
* Operating System
* Current language
* Process Version of Photo
* Does it happen on all photos or only some? If only some, can you send me what preset or settings this is happening.
Thanks!
Hi Nate, thank you for your quick help via mail. Opal 1.1.1. its now works correctly for me! 🙂
Good job!
Martin
Heya, just bought it after wanting something like this for years. Problem: when I go to activate (followed instructions and the key is there including the – things), nothing happens… not even a dialogue pop up box. Any ideas?
Don’t worry, fixed it! Was a ethernext connection issue.
Great! Glad it worked out for you!
I’m having trouble with the shortcut script. Could you change the script to work for CMD+y ?
I tried to change it myself, but this would only result in no working shortcut at all. I suspect running the script multiple times mixes up the shortcuts in the plist?!
Hello! I really love how it changes the settings on the images. This will become a staple for sure! However, I’m on a mac, and didn’t notice the “common questions” section, so I installed the windows version of the plugin. I installed it and it worked great, but I couldn’t use the shortcut, so I removed that plugin and followed your directions using the mac installer. However, the shortcut still doesn’t work. It just makes that dull noise that tells you a key doesn’t work. I would appreciate any help. Thank you!
Hi Madeleine! If you go to “File > Plug-in Extra” you should see “OPAL – Opacity Slider” with a ↑ the right of it. Do you see that?
If you don’t see “OPAL – Opacity Slider” there, just go to “File > Plug-in Manager”, click the “Add” button, select “opal.lrplugin” and click “Add Plugin.”
If you don’t see the ↑ there, close Lightroom, run the mac installer again, and then restart Lightroom.
Let me know if that helps!
-Nate
On how many computers may/can I install OPAL?
You can use the license on up to 2 computers you own and on multiple Lightroom versions. So, for instance, if you have a desktop and laptop, and both have Lightroom Classic and Lightroom 6, the license should work for you on all of these installs. If you run into any issues, or find you need to activate on more than two computers, just email me at nate@natephotographic.com 🙂
Great; I just bought it for my two Macs
This is awesome, dude. Thank you so much!
Awesome! 🙌
if you find solution how to open it with keyboard key on windows i will buy it, can’t wait for that 🙂
Yep – I’ve got a solution for windows shortcut working here and with a few beta testers 🙂 Should be in the next release!
*UPDATE*
As of Opal 1.2, Windows shortcut is working
ok i just bought it now gonna install it 🙂 i might be a beta tester if you don’t mind 🙂 anyway looking for that next relase. bless you
awesome, working perfect, wacom keystrokes makro opal popup excelent, what a nice weekend, windows 🙂
Hi!
Interested in OPAL.
What about syncing/batching images with opal settings?
Hi Paul! Yes, after you apply changes with Opal on a single photo, you can then sync those new settings with any other photos you want (that’s typically what I do in an editing session). But you can NOT use Opal on multiple photos at once (so if you tried to use Opal with multiple photos selected, it wouldn’t work). Does that make sense?
-Nate
It does for sure! So Opal is actually changing the original values. Great! Will purchase right away! 🙂
Will this be updated for Lightroom CC (as opposed to LR Classic) at any point? I’d like to purchase it but I’ve moved my editing to the new CC version and don’t want to have to go backward. 😉
Hi Erica, first, if you are using Lightroom CC (release 2015.xx) these will work… It just won’t work on Lightroom CC 2018. I would love to add support, but CC 2018 doesn’t currently support plug-ins of any kind (that’s one of the many many reasons most pros aren’t using it yet). If Lightroom decides to allow plug-ins, I will definitely add support 🙂
Glad I decided to read down. Was just about to update to the latest Classic. I’ll hold off now.
Will you let us know when a future LR update is Opal compatible?
Just to be crystal, when you refer to CC2018, do you mean the mobile app or the Classic?
Thanks!
✅ It WILL work in Lightroom Classic CC (which is I what I recommend using). So yes, go ahead and update to the latest Classic.
✅ It also work in Lightroom CC (2015)
🚫It won’t work in the app that Adobe now confusingly calls “Lightroom CC – the cloud-based photo service” – which is basically their mobile app adapted for desktop.
🚫It also will not work in Lightroom 5 and earlier.
This plugin works with latest classic lightroom. The CC that doesnt have plugin support is the Creative Cloud version which is only for online so you can just update the classic to the latest without problems.
Perfect support, thanks
Hi Nate!
Would it be possible to release the shortcut options as .ahk scripts as well as .exe files? I’m already running AutoHotkey on my PC and would rather not need the program running twice to use the shortcuts. Thanks!
Yep! Just drop me an email once you’ve purchased and I’ll send you the .ahk scripts. (I would include them in the regular download package, but I don’t want to confuse the average user!)
Hi Nate, I regularly use your presets during my editing. How will this affect my workflow given that your presets come with different strength levels too?
Hey! Great question, Kenric! A couple of things: 1) Opal gives you way more control to fine-tune the strength, anywhere between 0-150%, 2) Opal works with other presets (most of which don’t have their own strength adjustments, 3) You can do some really cool and useful adjustments in advanced mode that aren’t available any other way.
Hope that helps!
Nate
Fantastic, now the shortcuts works in wondows, verry usefull tool, all best for you.
Wow, this 1.2 update with the windows shortcut is so freaking awesome so Nate, thumbs up and keep up the good work bro!!
Really appreciate that, Richard! Thanks for your support 🙂
-Nate
Is there a way to change the shortcut key after being installed? I use shuttle pro and didn’t realize that it already uses the up arrow to adjust the sliders.
Yep! Just re-run the installer and select a different shortcut key 🙂
Hi Nate! Really enjoy this tool.
Two points though:
1) I find that when I bring a preset down to 0, it doesn’t actually reset the image to how it looked prior to applying a fixed preset. This makes it difficult to compare a before/after version while Opal is still open. DO you have a fix for this? If you would like an example, please email me and I send you an example of what I mean.
2.) Is there anyway of making the pop-up window for Opal a bit wider? By moving the slider around in such a small area there isn’t much room for fine movements. And what about having the scale be from 0-150% so there is more room for fine movements rather than just 1-15?
Thanks!
Shivan
Hi Shivan! Really glad you are enjoying Opal!
1) Hmm… bringing Opal down to 0 should make the image look as it did when it was initially imported into Lightroom (with one exception I’ll get to in a second…). So at 0, all the “major” settings should be zeroed out (including the tone curves). If you find that this isn’t the case, make sure you are using the latest release of whichever Lightroom you use (for example, the old release 2015.10 is known to have bugs from Adobe that prevent the tone curves from resetting properly). The one big exception is if the preset you are using contains a “custom camera profile.” If so, bringing Opal down to “0” will zero out the settings, but the custom camera profile will still remain. Depending on how the custom camera profile is built, this usually just makes the results from Opal a bit more sensitive, so you should try making smaller adjustments.
(Oh, and if you want to compare the before/after while Opal is still open, hit the “shift + Y” keys right before using Opal. This will bring up the before/after comparison. Then as you use Opal, you can watch it blend in with the original image as you decrease the opacity of the preset with Opal.)
2) If you aren’t already, try running Opal in Advanced Mode, which will actually make it a bit wider. You can also make finer adjustments using the “up” and “down” arrow keys once you’re inside Opal (this will increment in 0.1 steps), or by typing the strength you want with your keyboard. For instance, if you want 75% strength, just type 7.5. I did quite a bit of testing with having the slider scale between 0-150%, and doing this dramatically decreased the speed of Opal… for instance, if you dragged from 150 to 0, Lightroom is trying to redraw your photo 150 times (which is extremely processor intensive and makes for a very laggy experience). So making the slider a 0-15 scale makes the experience much zippier, and you can still get greater precision using your keyboard if you really want to.
Hope that helps!
-Nate
Can i use the same license code on my iMac & on my macBook?
Yes!
Hi Nate,
I have to say that OPAL is the greatest thing since Lightroom itself. Utterly fabulous. Thank you for designing it. Just as an example of how transformative it is (I only downloaded it yesterday!), I’ve recently been gravitating towards VCSO Mobile for Lightroom, where I’ve tended to use their RAW 1/2 settings. Now I don’t have to accept this arbitrary measure and can just use the full-fat version in combination with OPAL instead. Genius!
Apologies if this has already been covered by other commenters (I’m sure it has), but what I would be yearning for in your next update would be a before/after check-box so the slider increments can be instantly compared with the original preset values. Instead, I’m already having to make a couple of different ‘strengths’ to compare in Lightroom after closing OPAL (something that is especially relevant when VSCO are already giving you a half-strength and you want to get somewhere in between.) I’m sure you can appreciate how time-consuming this could be.
I hope this makes sense and you may give it some consideration. But even if you don’t, this is by far the best plug-in ever invented for anything (JPEGMini might run you a close second!)
Thank you again,
Jonathan
Thanks so much for that encouraging feedback, Jonathan!
Let me think a little about your “before/after” suggestion… if enough people would find it useful, it would be easy to do, but I just want to balance that with making sure I don’t overcomplicate things!
In the meantime, here’s a technique that might be helpful:
1) Apply your preset
2) Make a virtual copy of that photo (hit command + ‘). The “before” version of this virtual copy will be with the preset applied.
3) Hit the “Y” or “Shift + Y” key to bring up Lightroom’s before/after view.
4) Now call up Opal. As you change the value in Opal, you will be now be able to see before and after as you make changes.
Cheers!
-Nate
Hi Nate,
In my enthusiasm and excitement I don’t think I expressed myself very well and it’s just possible you may have misunderstood what I was requesting.
It’s more of a little “disable” box, just like all the similar check-boxes on the right-hand-side Develop panels in Lightroom. I use these all the time to instantly assess the effect of my changes, which is what they’re designed for. In fact, far from overcomplicating things it’s actually simplifying and will speed up the Opal workflow (again, in my opinion!) in a way that’s more efficient than your own suggestion, dare I say it.
So, I know I want to tone down a preset, but by how much? Seven? Six? Five? Once you’ve left the default 10 the eye can’t judge these subtle comparisons in relation to the original but a disable box will always give you instantaneous feedback.
Hope that makes more sense now (but forgive me if you understood me first time around!)
Yes. I understand. Totally agree that from a design standpoint, a small enable/disable toggle (like what Lightroom already has on the develop modules) would be ideal. It wouldn’t get in the way and would fit in with how people already use Lightroom…
The problem is that Lightroom gives developers a very limited vocabulary of UI elements that can be used inside plugins (and where they can be placed). And unfortunately, I don’t think it would be possible to do exactly the design you’ve suggested. 🙁
I could, however, do something like how filters in Photoshop allow you to check before/after.. by default, before you apply a filter, it has a “preview” checkbox that is enabled. You can disable the preview by clicking the checkbox (i.e. turning “off” the default preview).
A preview checkbox like that would be doable. But I’ll continue to think if there is a better way to design this that fits within the confines of what Lightroom allows plugins to do…
Your suggestion would be just perfect, Nate, and is exactly what I was after! I fully take on board your problem with regards Lightroom developers but the solution you suggest instead seems identical in outcome (and is probably nearer to what I meant in the first place!)
Thanking you in anticipation – but no pressure of course 🙂
Hello
I am interest about your plugin.
I have adobe lightroom classic cc ,is it compatible?
Thanks in advance
Friendly
Antonis Panitsas
Yes, this is compatible with Lightroom Classic CC 🙂
hi Nate
I run two computers for my work, can I install OPAL in both?
thanks
Jorge
Yes!
Hi Nate,
I Love Opal and this its pretty bad ass and was hoping you could make a new tool/plugin that shows a preview of the photo with all presets owned. Now i have to go to every preset on its own and would be nice if a plugin showed the sample image with small previews of every preset in a specific folder if you get what i aiming for 🙂
Can you use OPAL on my iMac and MacBook Pro on the one licence. Obviously I use the laptop when I’m on the road.
Yep! You can use the license for up to three computers that you own!
Hey, is this compatible with the new Lightroom Classic 7.3 with the new .xml presets?
Hi Bart – Yes, Opal works awesome in LR Classic 7.3 on the new standard XMP presets (in my tests is runs a bit faster than before). So any presets that Lightroom converted over for you, you can continue to use Opal to adjust just like before. Just note that if you use an “enhanced profile”, Opal currently will NOT adjust the changes made by that enhanced profile (because the settings are not exposed to the user). Does that make sense?
-Nate
Yessir. Understood. My original question came because LR 7.3 has (mistakingly?) removed the ability to “build” an image with various presets layered on top of each other. This has caused me headaches so far but my understanding is it’s being worked on by Adobe. That’s why I wanted to see if your slider had been affected.
Where in LR CC not the Classic LR would i install this?
As noted, this will not work in the newly designed Lightroom CC (2018). They do not offer the ability for plugins to be added. It’s basically a port of their mobile app onto desktop. I highly recommend using Lightroom Classic CC. Much more powerful and you can use plugins (like Opal!)
hello, can you please provide hotkeys for letter “o”, i am using midi2lr to map buttons to midi device and that will help me a lot thnx 🙂
hi nate, i’ve been arguing for a version of this in LR for years. 2 things:
I’m in the process of writing a really simple autohotkey skript that will open OPAL with one keystroke (in windows at least).
I’d love to see a version that lets you fade in a preset *over the top* of whatever preset is already applied. This would mean finding the There’d be a bit more maths involced, but it should be possible.
Hi Gethin!
Yep, Opal already comes with an autohotkey script for windows (with a few options for which keystroke you’d like to use to open it). If you’d like to incorporate it into an existing autohotkey script, I can send you the source for it with a few pointers 🙂
It is definitely feasible to write something that would interpolate between two or more presets. Opal isn’t really designed for that use case and I like to keep it simple, so I would probably just make a different plugin for what you’ve described.
Thanks!
-Nate
Hello. I have purchased de opal plugin and it works like a charm…. Unfortunally i need to reinstall it and i cannot find de email with de serial key you send me… Can you send me that email again? thanks
Hi Jorge – glad you are liking Opal! I just sent you an email with your download info. Cheers!
-Nate
Hi,
I’ve recently updated my system and had to reinstall opal again, unfortunately, I can’t find the email with the license key. Could you please send me the email again? Thank you 🙂
Hey! I’ve had the receipt resent to you, with download link and license key. Sorry for delay!
Is Opacity Slider included adjust the Tones, ColorCast, ColorPalette & Details ?
Yes
Good afternoon! Tell me, please, will it work with the Russified version of the program? And does it always only affect all parameters at once? Can not only adjust curves or other parameters separately?
Hi Elena – it *should* work just fine with the Russified version of the program. That said, sometimes Lightroom version contain bugs that are specific to localized versions, which can impact the way that the plugin interacts with Lightroom. So give it a try. If it doesn’t work, I can refund your purchase.
And yes, it is possible to only adjust certain groups of settings (in the advanced module).
This is a revolution! I just bought this and installed it. However, everything is executed in manual order, but the shortcut does not work. I’m using Windows 10 and I’ve applied all three shortcuts, but it does not work the same. It is really perfect if only the shortcut keys work. You have to reward you in Adobe. Please help me to work with shortcut keys.
Hello Nate, I want to purchase your Opal but I’am not sure if this work with Lightroom CC 2018. Pls let mo know if this application is already updated. thanks
It works with “Lightroom Classic CC”. It does not work with “Lightroom CC for Desktop”
Will we eventually be able to use it with LR CC for desktop through the Adobe CC pkg?
The current $9.99 creative cloud plan includes both “LR CC for Desktop” and “Lightroom Classic CC.” There are rumors that LR CC for Desktop will add support for plugins at some point, but until then, you can use Lightroom Classic CC (which is my strong preference in any case!)
Hello Nate.
Will OPAL Work with the latest Lightroom Classic CC 8.0 (for Mac)?
Thanks. Emanuel
Yes!
Is there a way to change the hotkey on mac after you’ve already installed?
Thanks!
Yes, run the installer again and just select a different key. Then restart Lightroom, and the new hotkey should be working!
Have your 1.1, didn’t get the 1.2 update. How do I get that?
Nate, just got Opal and installed and activated on LR6. I cannot bring up OPAL with the UP arrow,
If I go to FILE/PlugIn Extras I can – but that is a lot of keystrokes each time.
What’s up – how do I activate the UP arrow shortcut??
Are you on Mac or Windows? On Mac, you should just need to run the installer program that is included. On Windows, it is a few more steps. Refer to the included “Quick Start Guide” that was included in the download for detailed step-by-step instructions!
Hi Nate!
Will OPAL work with the latest Lightroom Classic CC 8.2 for Mac?
Thanks!
Yep 🙂
Thanks Nate for this plugin. I have the contrastly preset bundle and with opal it gives me more control. Well worth the money. Two thumbs up!
Hey Nate, just bought and downloaded Opal for my Windows machine. Got to the registration dialog in the Lightroom Plug-in manager, entered my copied License Key and press the Activate Opal button and got this
ERROR: COULD NOT CONNECT.
Please check Internet connection and try again.
Well, that’s a fine how-do-you-do as I am connected with your website open and a few others. Tried a second and third time with the same results. Any suggestions?
Here’s one. I scrolled down the registration manager dialog and found…
Status: This plug-in is enabled.
So, I thought I’d try it. Had a image open in the Develop work area, applied a random preset, pressed the up-Arrow, and nada!
So I read a little more. Go to File>Plug-in Extras>Opal – Opacity Slider and it tells me to please register Opal. Ok, I’ll try again. This time it worked. (you have a little screen slop on the Thank you message)
I tried it and now the slider shows itself.
Thanks, — Robert
Hi I purchased but as I am using Lightroom Classic version 8.2 just says cannot open or add this file.
Hi. Have you *closely* followed the video instructions, step-by-step? If you are on Windows, the most common mistake is forgetting to *extract* the zip file, and move the plugin to another folder before trying to add in the Plugin Manager. If you try to add the plugin while it is still in the original zip, the plugin manager will say it cannot open the file.
Hi Nate, I have just bought this, but when I go to download the Windows file, Avast tells me that
“Threat secured.
We’ve safely aborted connection on files.gumroad.com because it was infected with URL:Blacklist.”
Now I can’t download it…
Please help
For some reason, it looks like Avast has decided to blacklist any file being downloaded from gumroad.com (a popular download service provider, and the one I use, along with many many other artists). You will need to change your Avast settings to whitelist gumroad.com so that it allows you to download it. You will need to check with Avast on how to do this.
Unfortunately I have had a hard drive crash on my new Dell computer and reinstalled Windows and lightroom etc. Is there any way I can download the Opal without paying for it again.?
Kerry Knudson
The original email receipt that you received (from “gumroad”) will include a link to your download area and your serial number for authentication. You can search your email for “gumroad” to try to find it. Or, you can go to gumroad.com and create an account (if you haven’t already) with the same email you used to purchase. This will then give you access to re-download.
I’ve forgotten my license number.
Hi, search your email for “gumroad” to find your original receipt which has your license. You can also go to gumroad.com and use your email to create an account there, and it will have the latest download and your license available.
Hi Nate, thanks for the great plugin:
Is there a possibility way in the future to use the profiles (from the profile browser)
to be included in the extended options from the opacity slider?
Regards Wolfgang
Hi! It isn’t officially supported in the SDK that Lightroom provides, but I think I should be able to add this as an option.
Hi Nate – I need to find the license key to add the plugin to my new laptop. I can’t find it in my emails (I have tried searching for “Gumroad”). Is there a way around this?
You can also go to “gumroad.com”. If you have an account, you can login and find it there. If not, you can create an account with the same email address you used to purchase originally, and it will be in your account once you create the login.
Hi,
Is it possible to make Opal works with opacity only with the preset which is over another preset? I’d like to use Preset-1 and put a Preset-2 over it with 30% opacity. But if i’m trying to do it with Opal – all sliders just goes to 0 and raw image, not for the previous settings.
Opal is always interpolating between your current settings and no settings (i.e. the orginal raw image). It isn’t possible current to interpolate between two presets. I’m not sure I could build this, because interpolating between two tone curves would be really problematic.
i start Opal_UpArrow.exe on windows 10 but hotkeys ↑ not work!
What language are you running Lightroom in? I’ve tried to make it compatible with multiple languages, but it still may have trouble with some locales. Try changing the language preference in Lightroom’s settings to “English” and see if the up arrow key is working then?
Hi Nate I like your plugin very much.
But is there a possibility way to adjust in advanced mode only rgb curve? I need this possibility all the time, when I want to adjust how strong the rgb curve should be. The same with the individual channels red, green and blue.
Hello,
i have question if opal Plugin work with Adobe Photoshop Lightroom Classic 9.0.
Thank You for reply.
Hi, yes, it is working with Lightroom Classic 9.0.
Works perfect. Thanks.
Hello. Is the plugin compatible with Adobe Lightroom Classic 8.4? Thanks!
Yep! It’s compatible with Adobe Lightroom Classic 8.4!
Thanks! We will buy.
Nate – does this work with Photoshop Camera Raw or just Lightroom?
Just Lightroom. Camera Raw doesn’t have capability for plugins. – Nate
Hi Nate. I purchased Opal in March, 2018. I’ve since gotten a new computer and no longer have the email from gumroad.com with the download link and product key. I do have a copy of my Paypal receipt however. I have tried going to gumroad.com and creating an account using the same email I used to purchase Opal. On my Gumroad account, it says I have not purchased anything. Is another way to get the product key so I can re-activate Opal?
Hi Stephanie, I’ve had your receipt resent. I see the purchase under your email address, so I’m not sure why Gumroad wouldn’t show it when you created an account. Cheers! -Nate
Hello, Nate.
Thanks for the cool opacity slider with advanced functionality (OPAL). What a very clever idea. Just one quick note for you: for folks installing OPAL on late model MAC computers running OS 10.15 Catalina, they’re almost certain to run into a MAC OS system error message advising them that they “cannot install the software because it is from an unidentified developer.” This has been a security feature of the last several versions of MAC OS. MAC OS DOES allow users to MANUALLY OVERRIDE this download security block on “unidentified software” installations on a per-item basis (i.e. each “unidentified” software title must be manually unblocked individually, one-at-a-time, at the time of attempted installation; no “global” or permanent override is permitted, as a self-protection feature). See here: https://support.apple.com/guide/mac-help/open-a-mac-app-from-an-unidentified-developer-mh40616/mac.
You might consider mentioning this on your website and especially in your download and installation .pdf, as some (MAC) users may be alarmed and frustrated by their inability to successfully install OPAL if they’re not familiar with this MAC OS security feature. Thanks again for OPAL and for the lovely LR plugins. Kind regards.
Disregard my previous, Nate (regarding MAC OS security settings attempting to block installation). Despite perusing practically every page of your website very carefully, I just now noticed that you do, indeed, cover this topic in your “Common Questions” section for OPAL. Thanks again for your fine presets and for OPAL…
Hi Nate
I have the same issue as others – bought opal (and still have license code) but can’t get back on gumroad to download the necessary windows files – could you kindly assist? Many thanks!
Hi there,
I am now using Lightroom Classic 9.4 (Creative cloud) Even though Opal shows “Installed and running” all in the plugin manager does not show up in Lightroom. Does not come up when I press the up arrow. What is wrong?
Hi! If you’re on Mac and that isn’t working like it should, you may need to add the shortcut manually. You can do that by going to “Apple > System Preferences > Keyboard > Shortcuts > App Shortcuts” and adding a shortcut to Lightroom Classic. Just note that when you add the menu item, you need to add three blank spaces before it. So it will look like ” OPAL – Opacity Slider” (without the quotes).
If you’re on Windows, you’ll need to see the included instructions on how to set up the hotkey program!
I was hoping to use Opal to allow me to adjust the strength (opacity) of an adjustment brush preset. But, as far as I can tell, Opal can’t do that, right? It seems to only take effect when I apply a Develop preset from the left sidebar.
Am I right about this?
You are correct… Opal will not make adjustments to “localized adjustments” – like the adjustment brush or gradients.
Hi nate,
can i adjust multiple image at once with this opal?
No, only one image. However, you can use Lightroom’s own “sync settings” function to take the adjusted settings from one image over to the others.
Hi nate,
i just purchase your opal plugin,
but when i fill the code,
it says error could not connect,
but my internet is online,
can you help?
Hi, it should be working… just make sure you have entered the code exactly (without any spaces before or after), and that if you have any firewalls they are turned off temporarily (also turn off any programs that try to intercept traffic, like LittleSnitch). If you are still having this issue, please email me at nate@natephotographic.com
I have Opal 1.2. on a MAC. Not working with LR classic. Is there an update or do I have to purchase a new Opal slider?
Hi, it should be working great with LR Classic… you’ll have to be more specific about what isn’t working exactly? The fastest way to get support is emailing me at nate@natephotographic.com
-Nate
Hi Nate,
I’m working with Lightroom Classic Version 10.4
Is Opal working with this version?
Thank
Alexander
Yes, Opal is working with Lightroom Classic 10.4.
i had to format my laptop and now i cant find my OPAL License key .. does it mean i have to re-purchase the plugin ?
Hi, no, you typically would not need to re-purchase. You should able to find the previous purchase in your emails (search for “gumroad”, which is the payment provider) and you should be able to find the receipt email. Or you can email me at nate@natephotographic.com and let me know what email you used to purchase Opal, and I can look up your license. In your particular case, it looks like something had gone wrong with the initial purchase, so I’ve just emailed you with more details. Cheers!
-Nate