Welcome to my in-depth guide to the Nate Cam E-Chrome Collection!
The E-Chrome Collection is my new pack of Lightroom presets, based on classic analog films. It goes beyond emulation to bring out incredible tones in your photos. If you want to learn more about what went into this pack and how photographers are using it to take their work to the next level, check out the E-Chrome Collection Launch Page.
My goal in this guide is simply to take you inside each of the presets and show you how to use this pack to dial in just the right tones in your photos.
Think of this as your field guide to the E-Chrome Collection.
Ready? Let’s jump in!
Preset Details // Film Toolkit Details // Usage Notes // Purchase Information
Preset Details
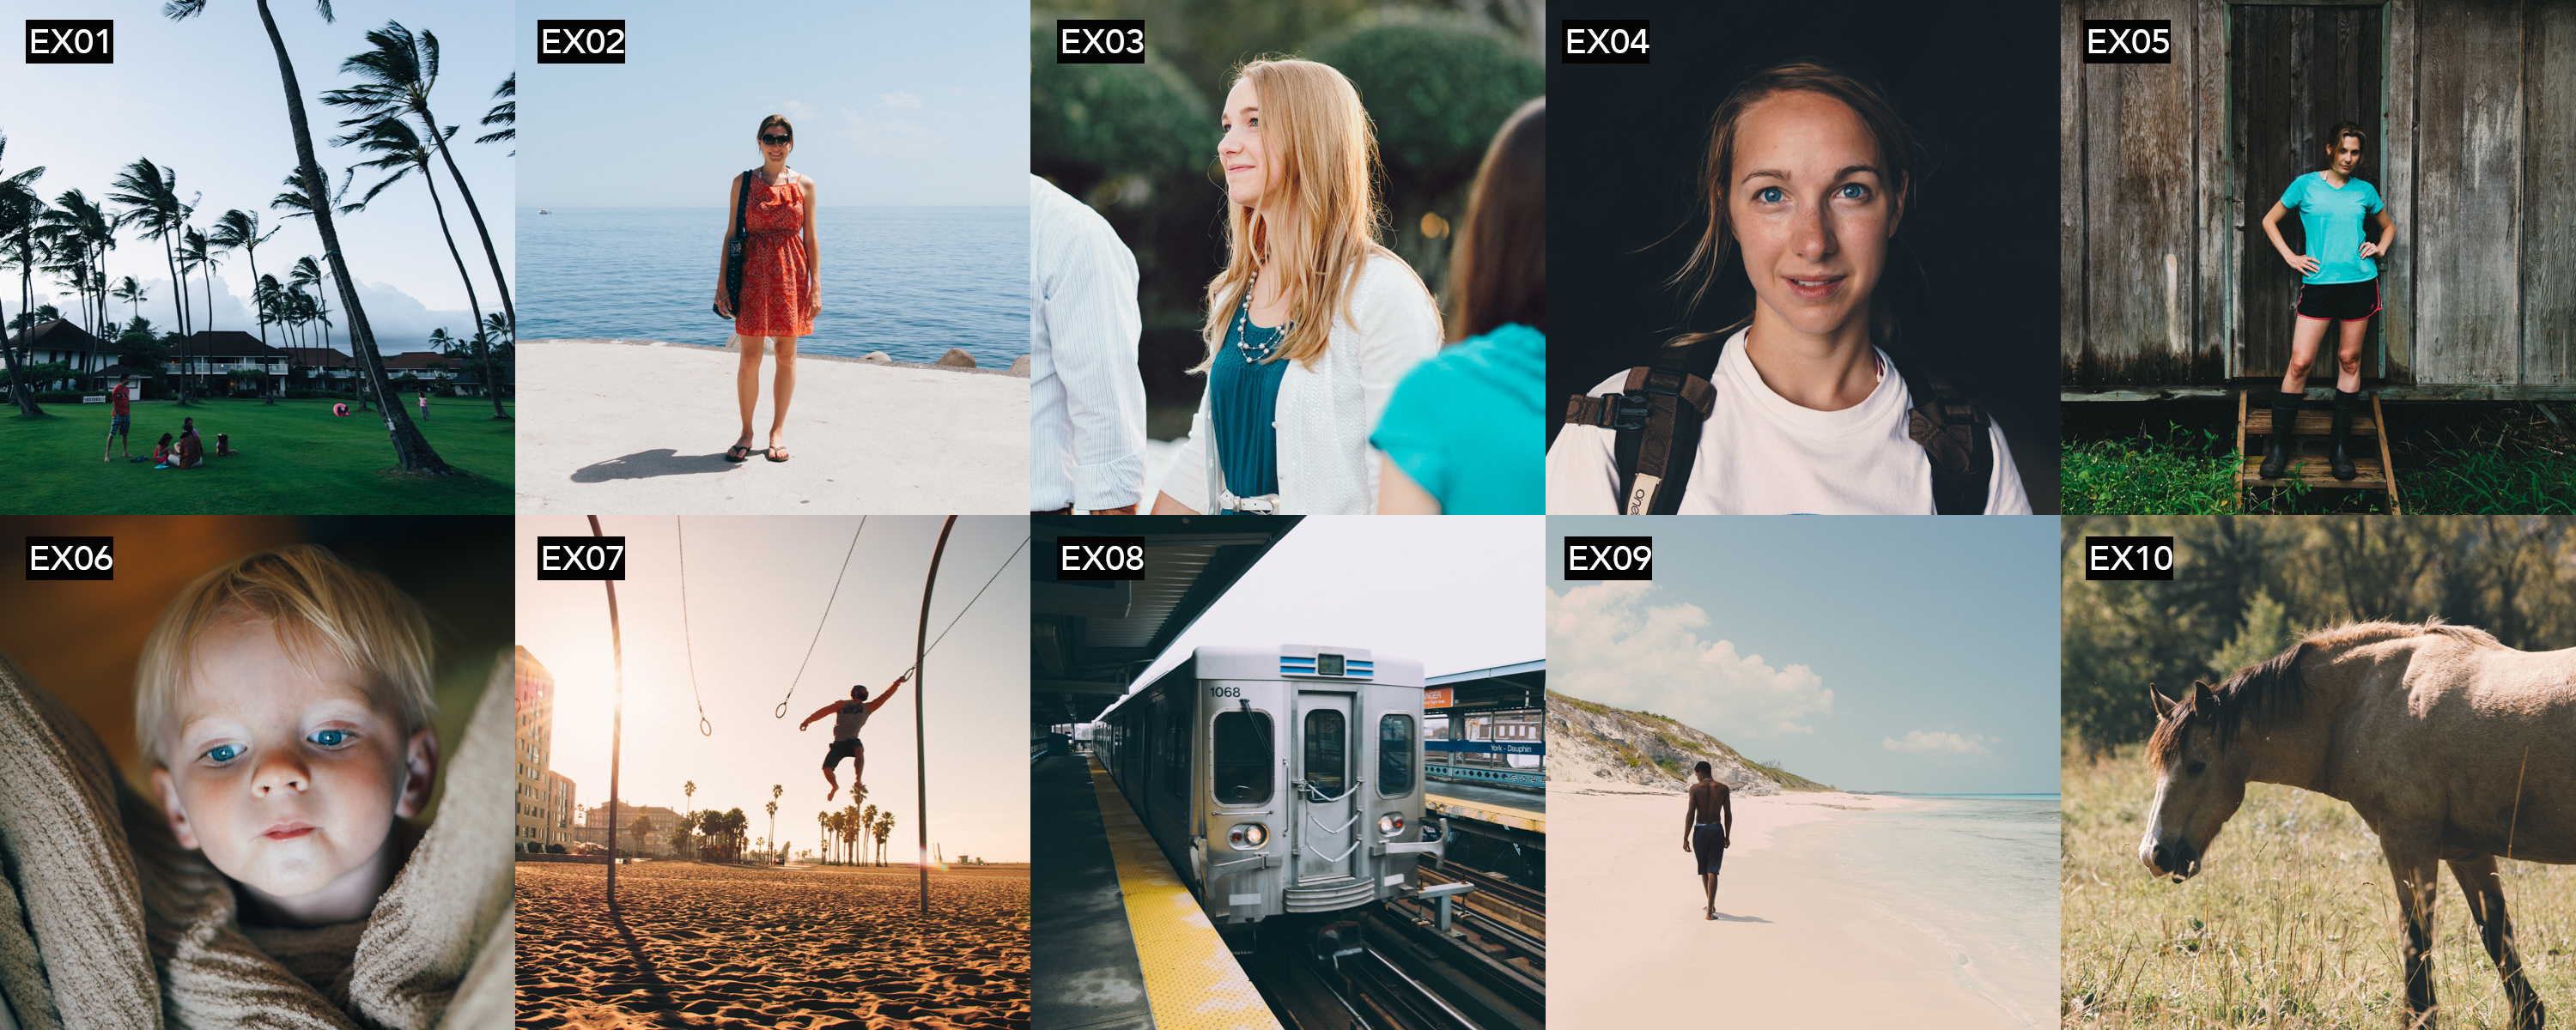
EX01 // EX02 // EX03 // EX04 // EX05 // EX06 // EX07 // EX08 // EX09 // EX10
There are 10 main styles in the E-Chrome Collection, with 4 strengths each [standard, –, ––, +], for a total of 40 presets.
While they are all based in classic films, I’ve tried to include looks that will accommodate just about every situation, from weddings & portraits, to landscapes and street photography.
However, some presets definitely work best in certain situations, so I’ve tried to note that in the preset details below.
The strength settings simulate the effect of blending the preset effect with the original image. So for instance, the [–] setting simulates lowering the opacity of the effect to 75%. If you are use to the “strength slider” on VSCO cam, this will give you a similar effect.
Don’t be afraid to use the strength variations. The before and after photos below all use the standard strength just for illustration, but I typically prefer the [–] version.
Ok, let’s look at each of these presets.
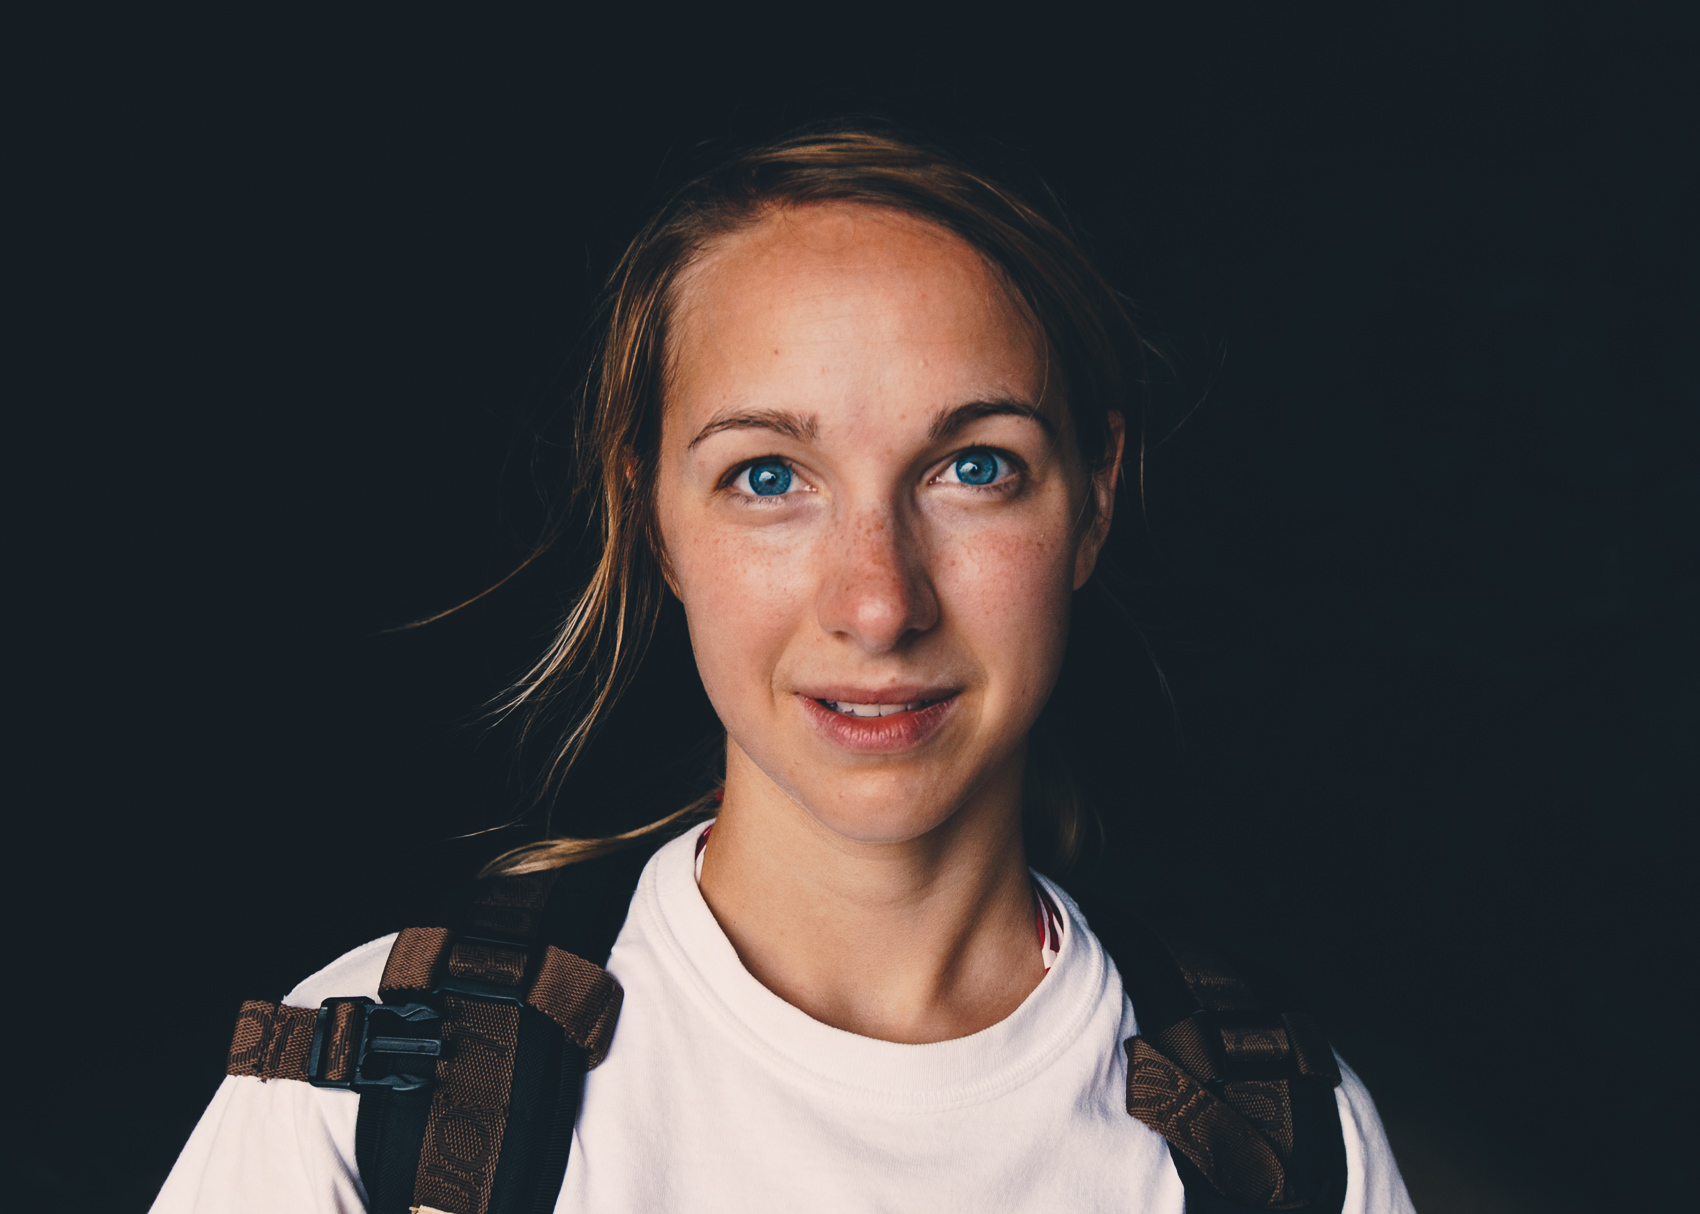
EX01 – Super Clean, Ektachrome Tones
Overview: A lively, super-clean aesthetic. This preset was inspired by a set of Kodak Ektachrome film prints, but with (I think) improved skin tones (real Ektachrome has a tendency to produce overly-magenta skin tones).
Best for: This is a good preset for general use, but I particularly like it for softly-lit portraits, architecture, food photography, still-life and travel photography. If you find the full-strength version makes images a little too “hot” you can pull it back with the [–] and [––] versions.
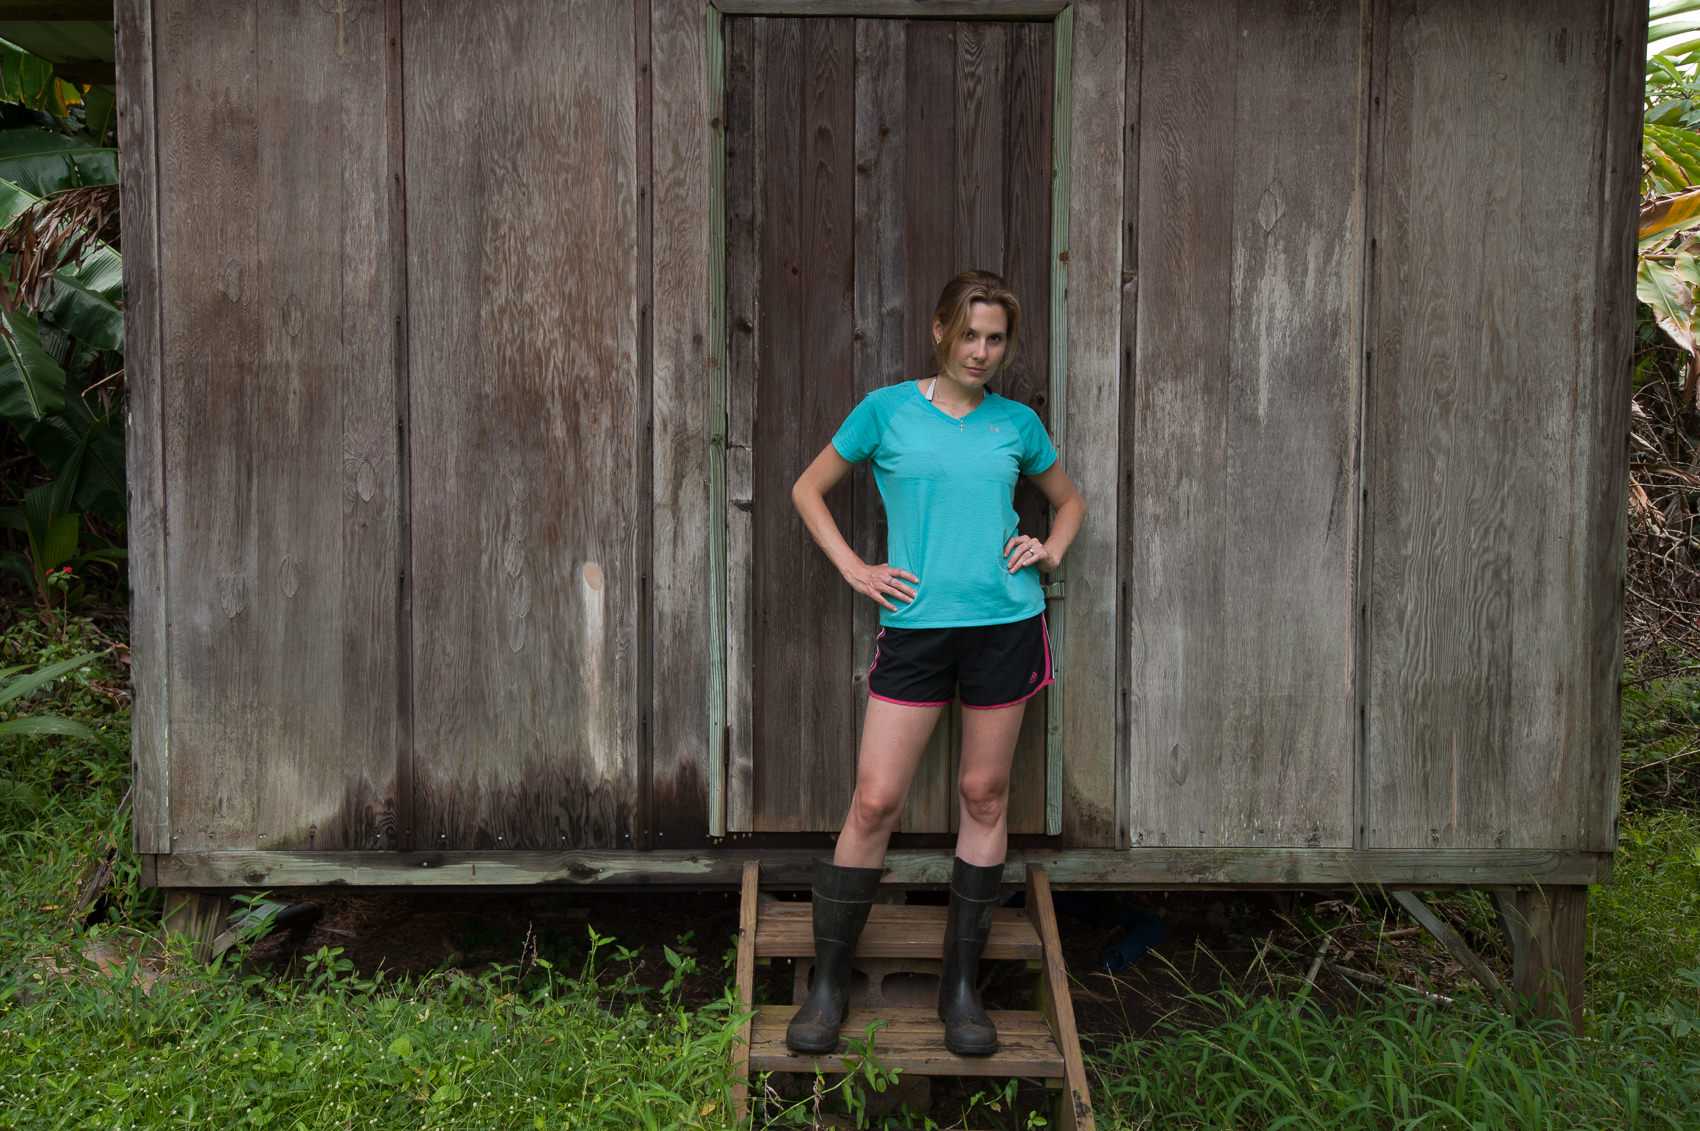
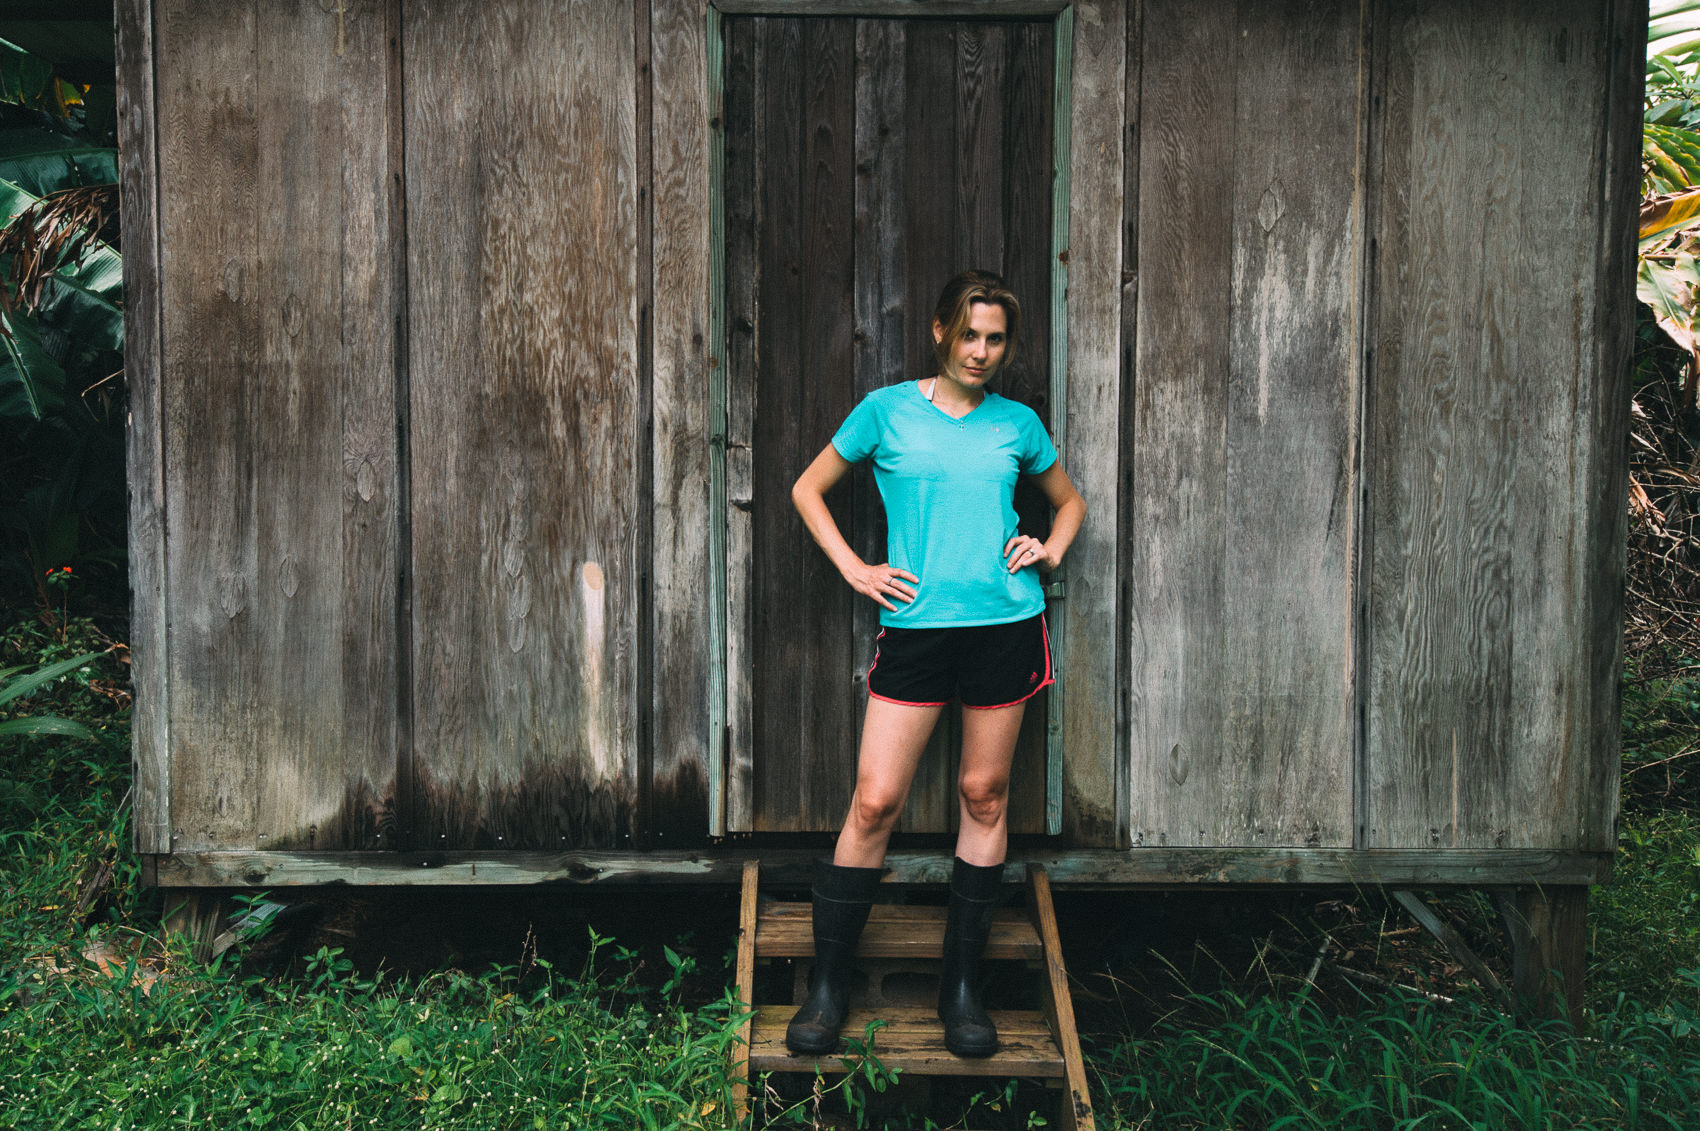
Before & After:
Drag the slider to see before and after. In all of these examples, the only thing that has been changed in each image is the use of the NATE Cam preset (unless I’ve noted otherwise).

The EX01 preset really cleans this image up and gives it an added “crispness.” You can see in the before that the skin tones have an unpleasant magenta cast (which is a common issues with the Adobe Standard camera profile). The NATE Cam custom camera profile fixes this issue and is a key part to making this preset look so great.


This preset produces very clean tones. It adds a slight lushness to greens and warms the reds up a bit. I’ve used the “Film Punch +” preset (from the Film Toolkit) just to make this feel a bit bolder.
EX02 – AGFA-esque, with warm reds
Overview: An Agfa-esque look with prominent red undertones. This is a very usable general preset. It produces beautiful, nostalgic tones with the smallest hint of cross-processing. Great for snapshots of all kinds.
Best for: Good general purpose consumer film-look, with warm skin tones. Looks great in sunlight or in shade. If you find that it gives your image an overly red cast, try using the [-] or [–] variation.
Before & After:
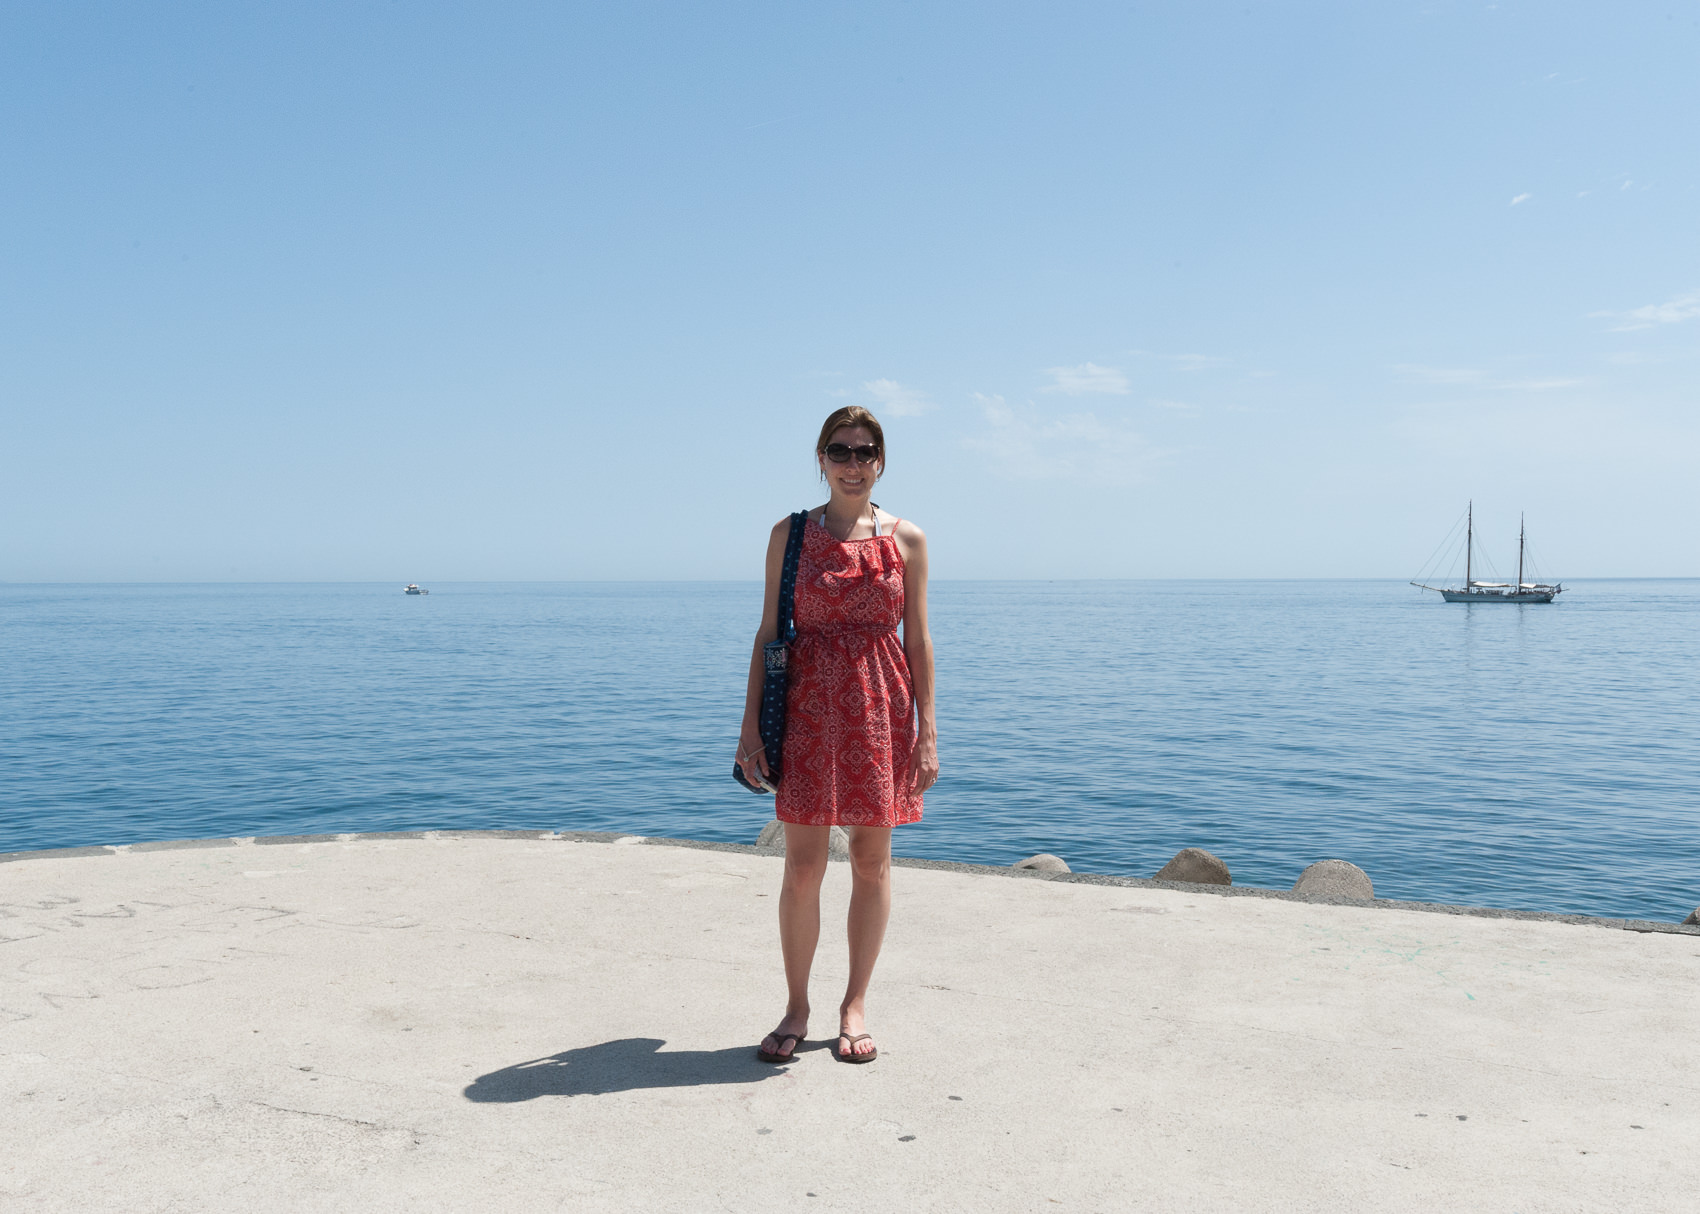

The EX02 preset has an AGFA-esque quality to it and is good for adding just a bit of consumer-film “pop” to everyday photos. It has really pleasing, warm undertones that work great in shadow or in shade.
EX03 – Perfect Portra
Overview: This preset has beautiful, soft, organic feel that is similar to the effect of over-exposing Kodak Portra . Very natural skin tones with beautiful teal blues. Soft, faded shadows and highlights.
Best for: Weddings & Portrait Photography
Before & After photos:

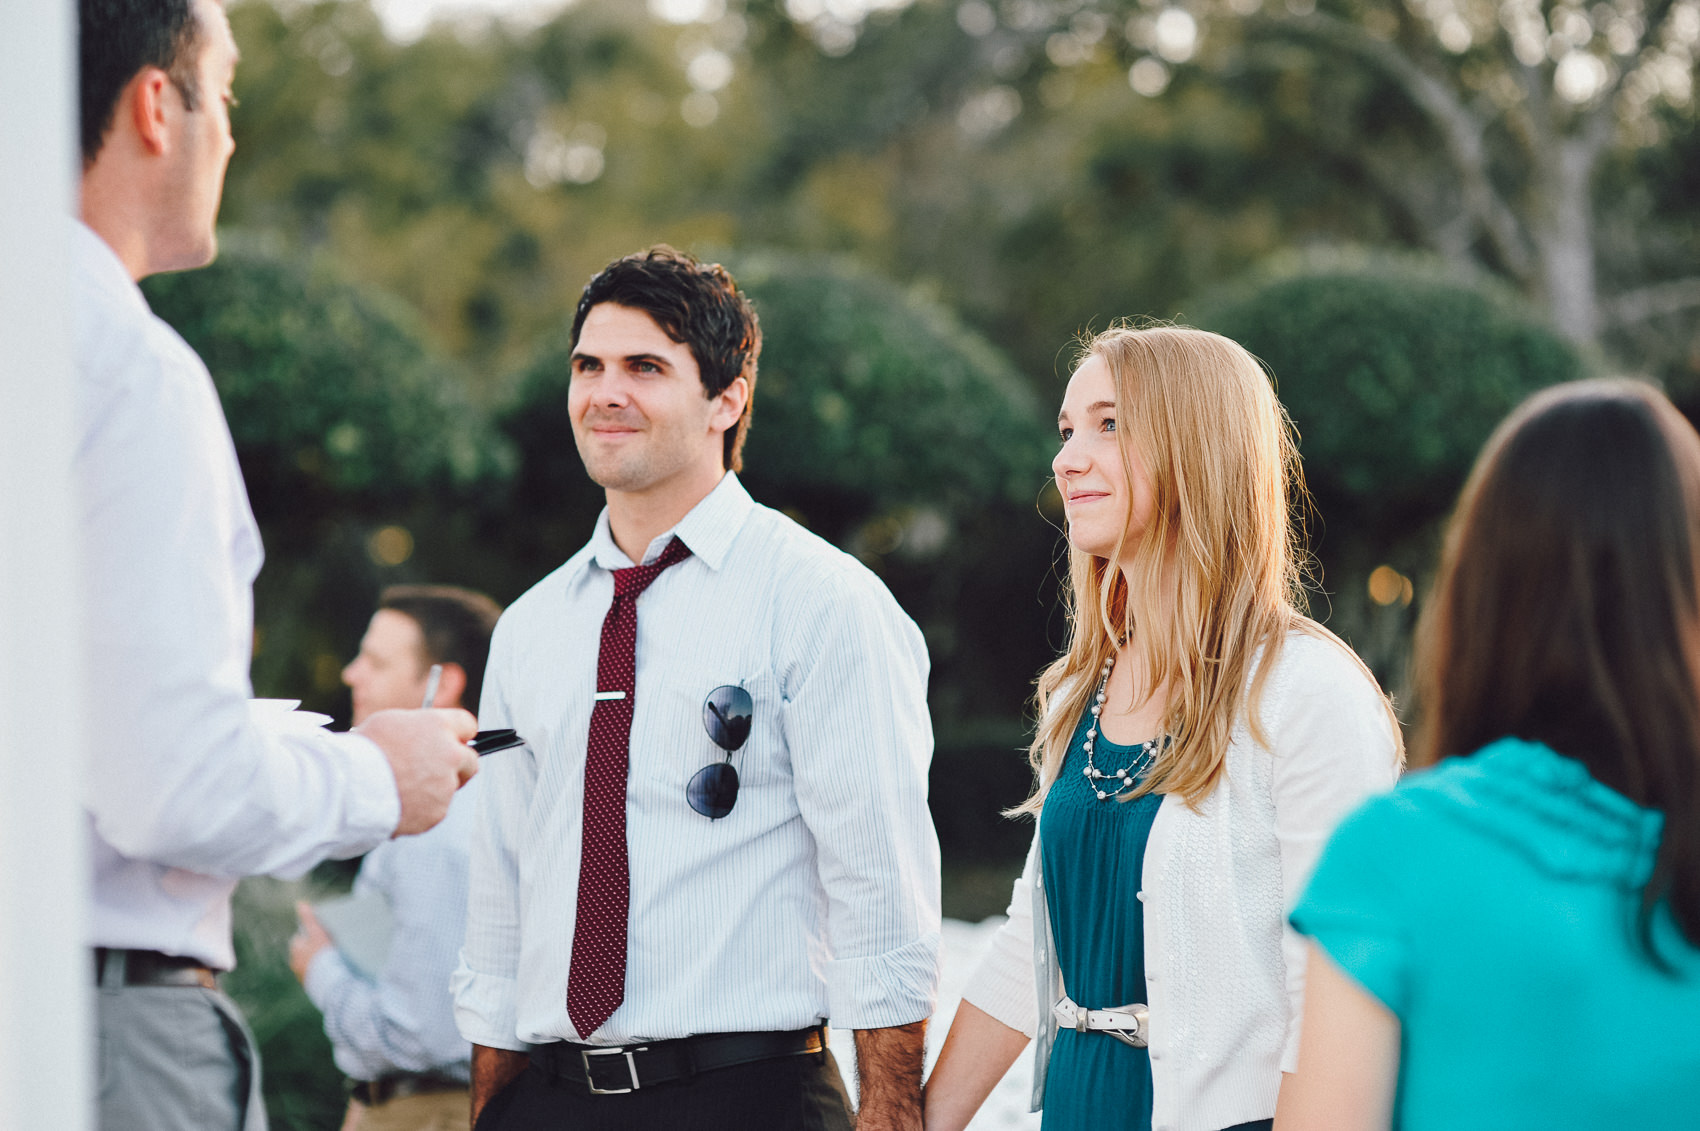
This preset really works magic on skin tones, with a soft, pastel color palette. It’s also a great option for desaturated landscapes


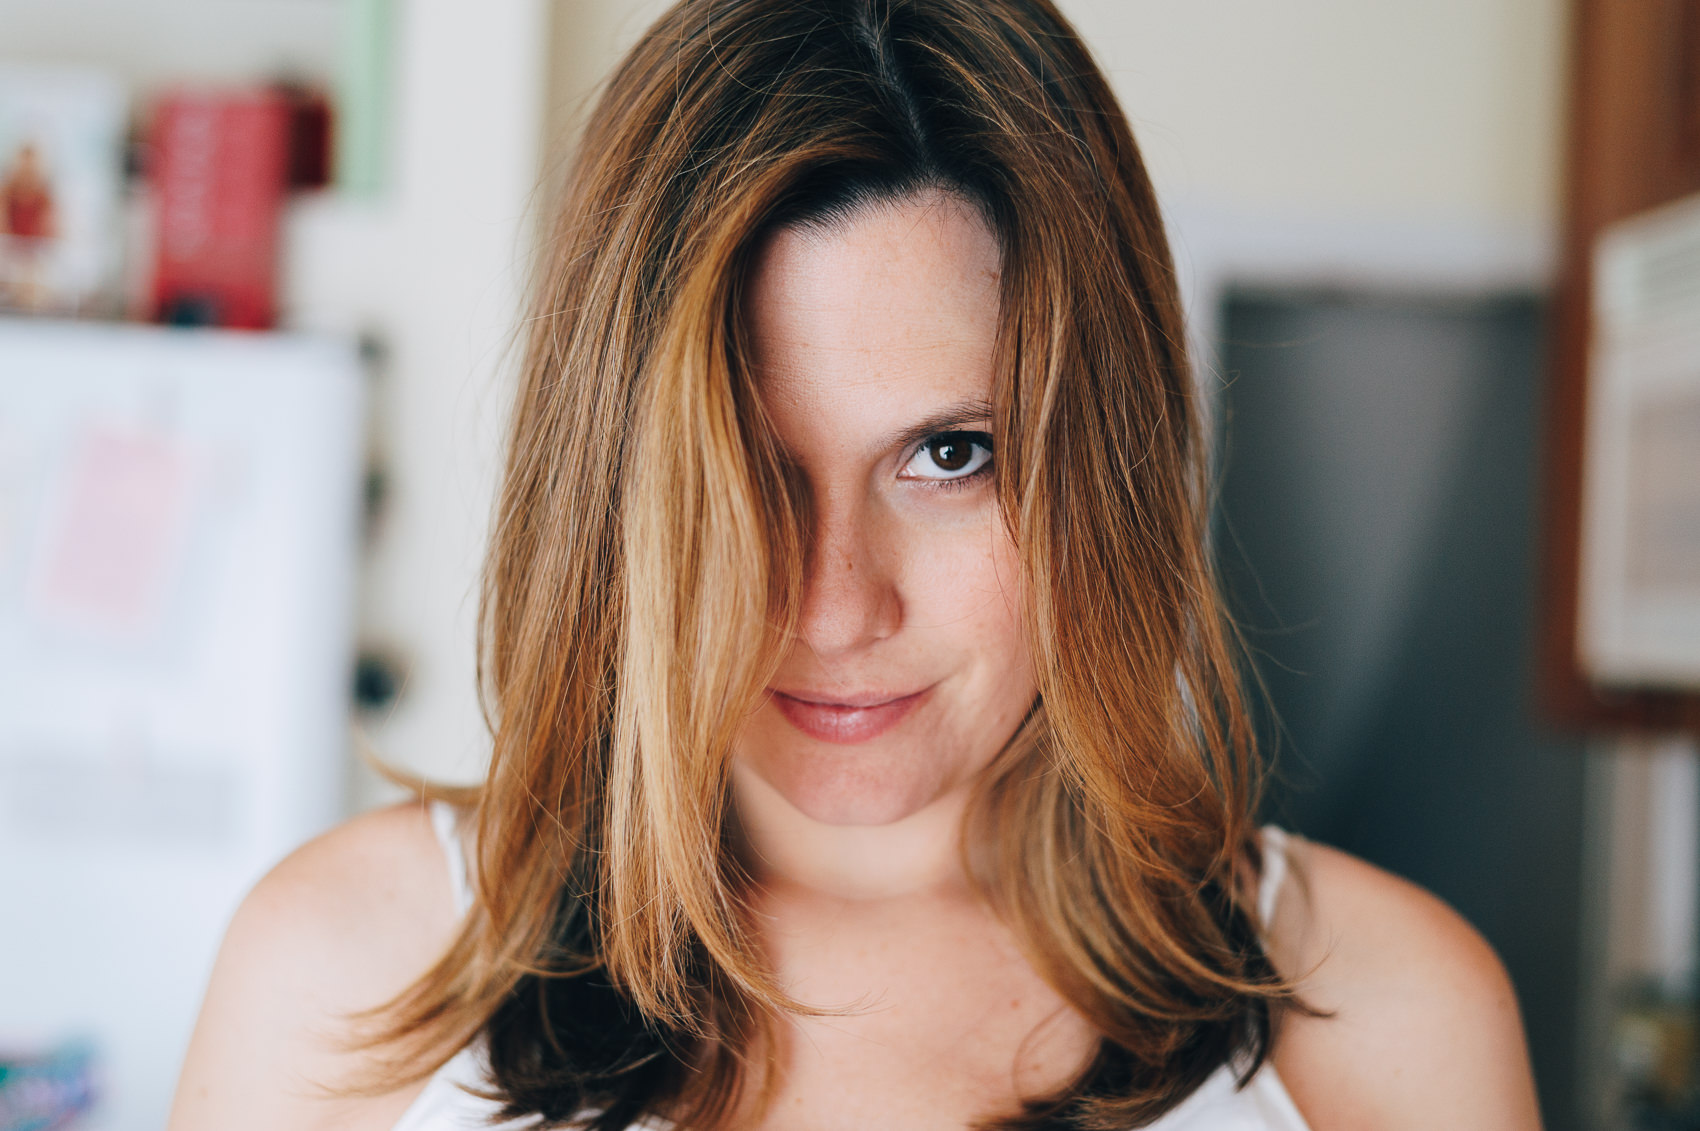
EX04 – Impossibly Warm & Moody
Overview: This is probably my favorite preset in the pack. The color palette has a strong bias towards golden orange tones, but it does it in a way that is really smooth and natural. There’s also a good amount of fade here in both the shadows and highlights, which really enhances the moodiness of the photo.
Best for: This is a strong effect, but it can actually work well in a lot of situations. Use it on portraits when you want a “warm and dusty” look or on landscapes to create a deep, warm mood.
Before & After:

Super warm tones all the way from the shadows to the highlights. Notice how smooth the gradations are in the skin tones.

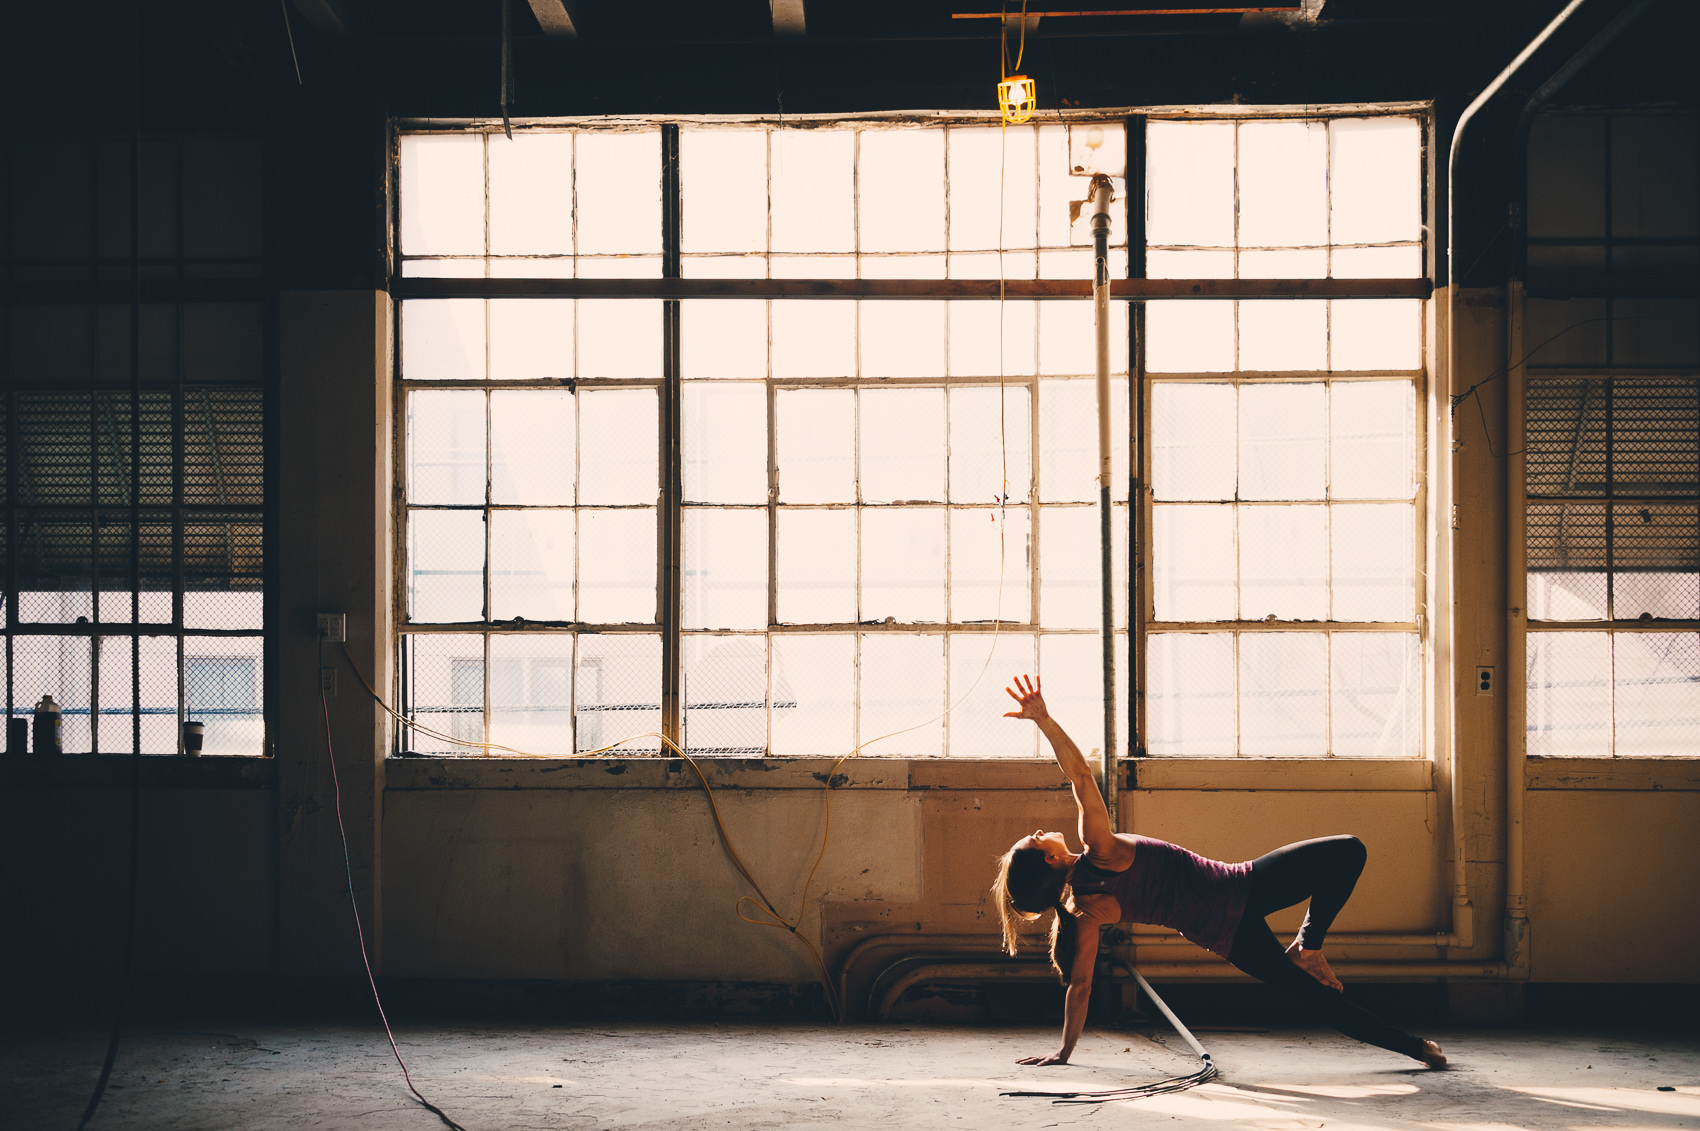
The EX04 preset really ties this shot together. It dramatically changes the feel of the scene, but still manages to seem natural and organic. I also used the “Film Punch +” filter from my Film Toolkit pack to give this photo even more drama.
EX05 – Kodak Maximus, Super Lush
Overview: This preset adds a gorgeous, lush style that’s reminiscent of Kodak’s consumer film. It has an exaggerated amount of “punch,” with dramatic, deep shadows, extra cool green tones, and balanced skin tones.
Best for: I like to use this to give photos a “dramatic fashion photography” feel. This preset can be strong, so be sure to try the [–] version.
Before & After:
Look at how much drama the EX05 preset adds to this photo. The skin tones stay perfect as the rest of the scene changes pretty dramatically to compliment the skin – with deep, detailed shadows, super lush greens, and turquoise blues.
EX06 – Fuji tones, pro-grade
Overview: My take on Fuji professional portrait films, like 400h. Soft, warm skin tones with the perfect amount of green tinting in the shadows. This is also a popular look for fashion photography and wedding photography.
Best for: Fashion Photography, Wedding Photography
Before & After:


With the right light, this preset is pure magic! I’ve also added my “400ISO” grain filter from the Film Toolkit just to give this a more film-like look, and some pleasant depth.


EX07 – Extra Golden Kodak
Overview: Gorgeous warm glow with lots of punch. This is what Kodak Gold should look like.
Best for: Perfect for adding drama to cityscapes, especially on sun-drenched morning or afternoon shots.
Before & After:
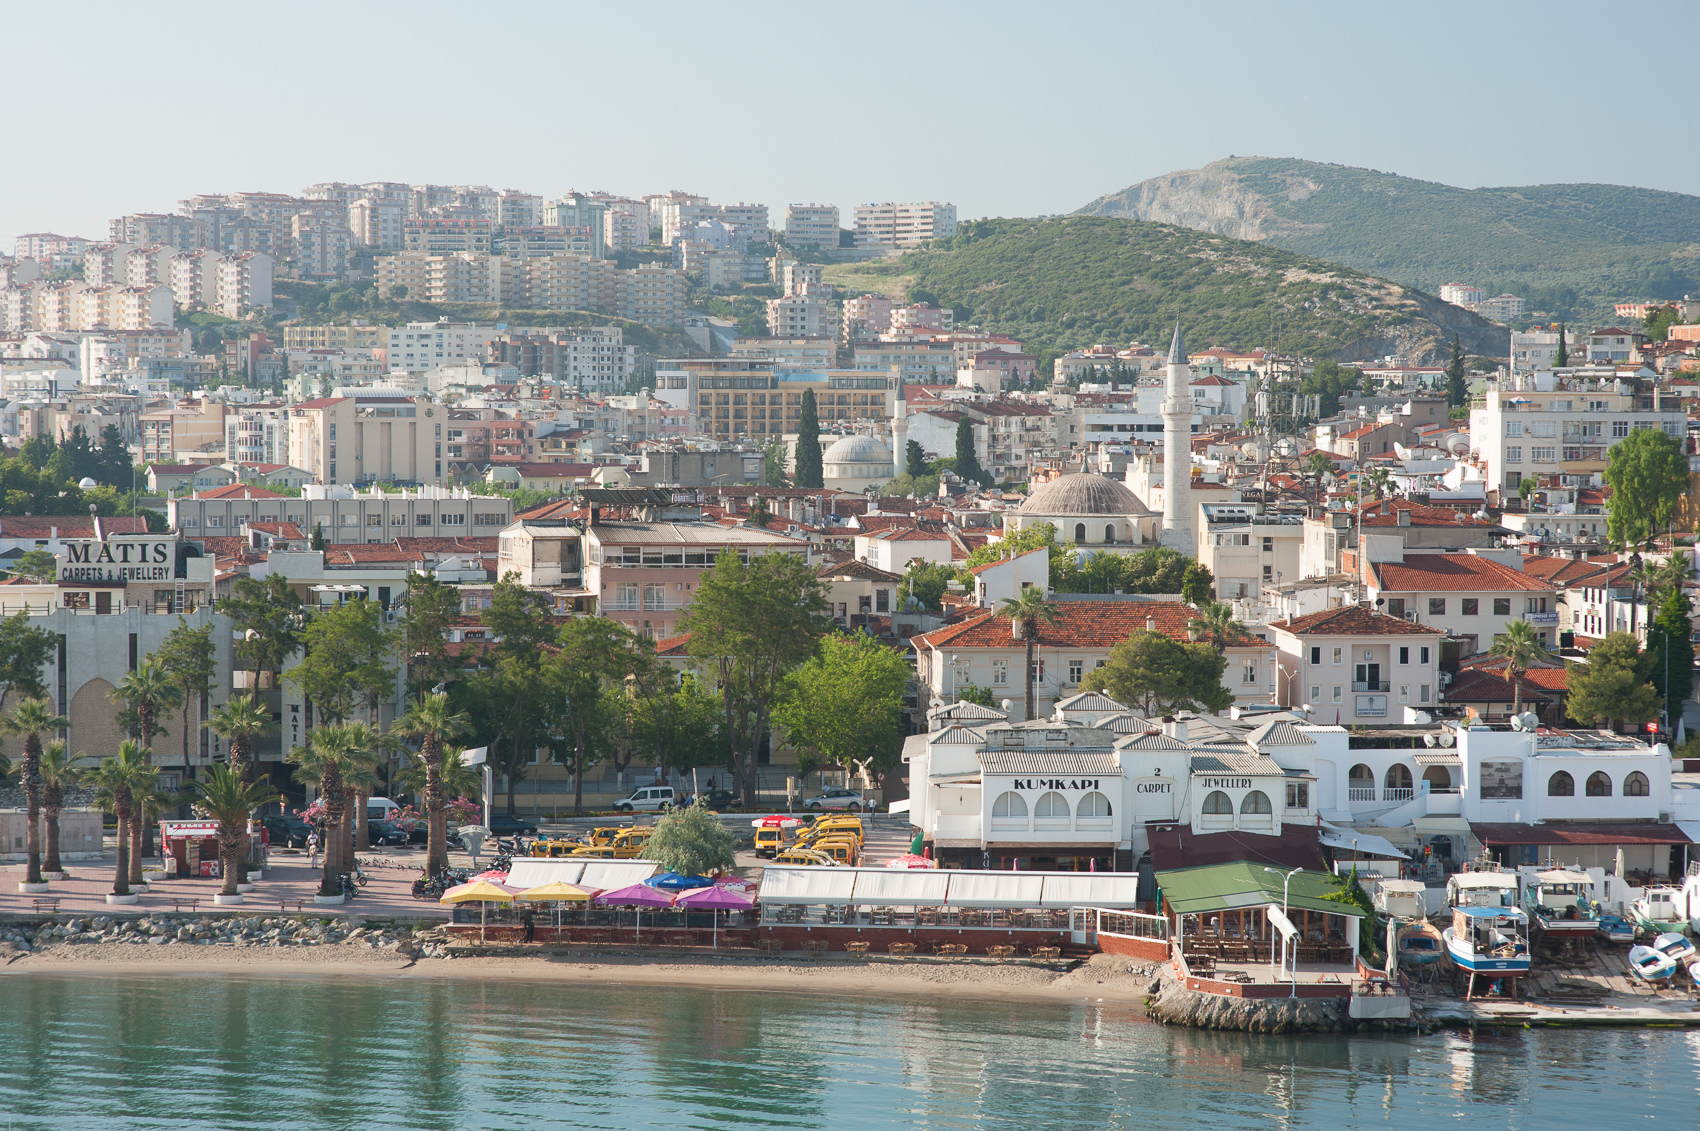

I took the shot above from a cruise ship as we were approaching Ephesus, Turkey. It didn’t really “feel” right until I used the EX07 preset. The preset really gives it that sun-drenched, arid, 110-degrees-in-the-shade feeling I was trying to capture.

I love the warmth and punch that the EX07 preset added to this shot. It really brings shots like this to life.
EX08 – Moody Fuji Superia
Overview: Cool tones with a super moody vibe. This is my new “go-to” for street photography. Add a touch of grain from the NATE Cam Film Toolset, and you’re in business.
Best for: Perfect for moody, overcast city shots and landscapes.
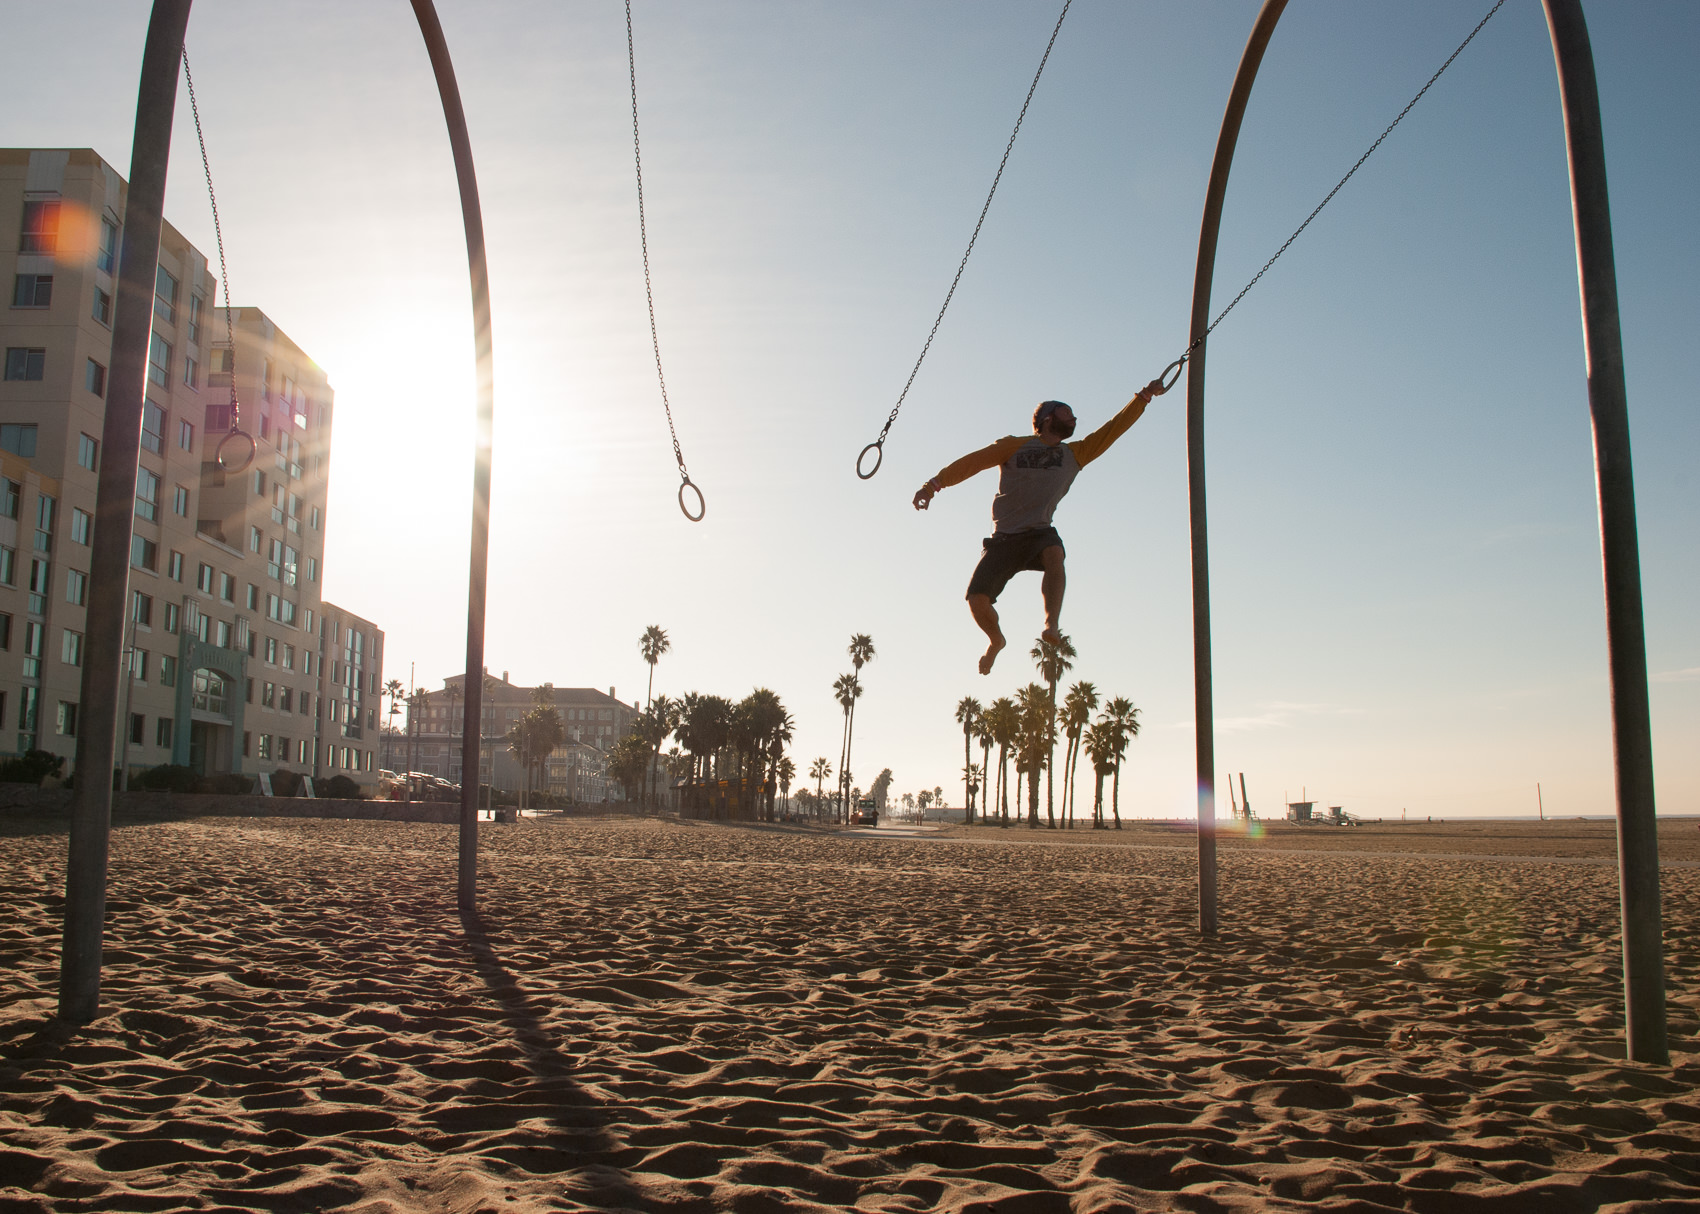
Before & After:

This EX08 filter adds great moodiness to city and landscape shots, particularly in soft, overcast lighting.

EX09 – Washed-Out Portra
Overview: Dreamy, washed-out tones with a noticeable tan-tint. Great for soft, muted landscapes.
Best for: Great for soft landscapes.
Before & After:


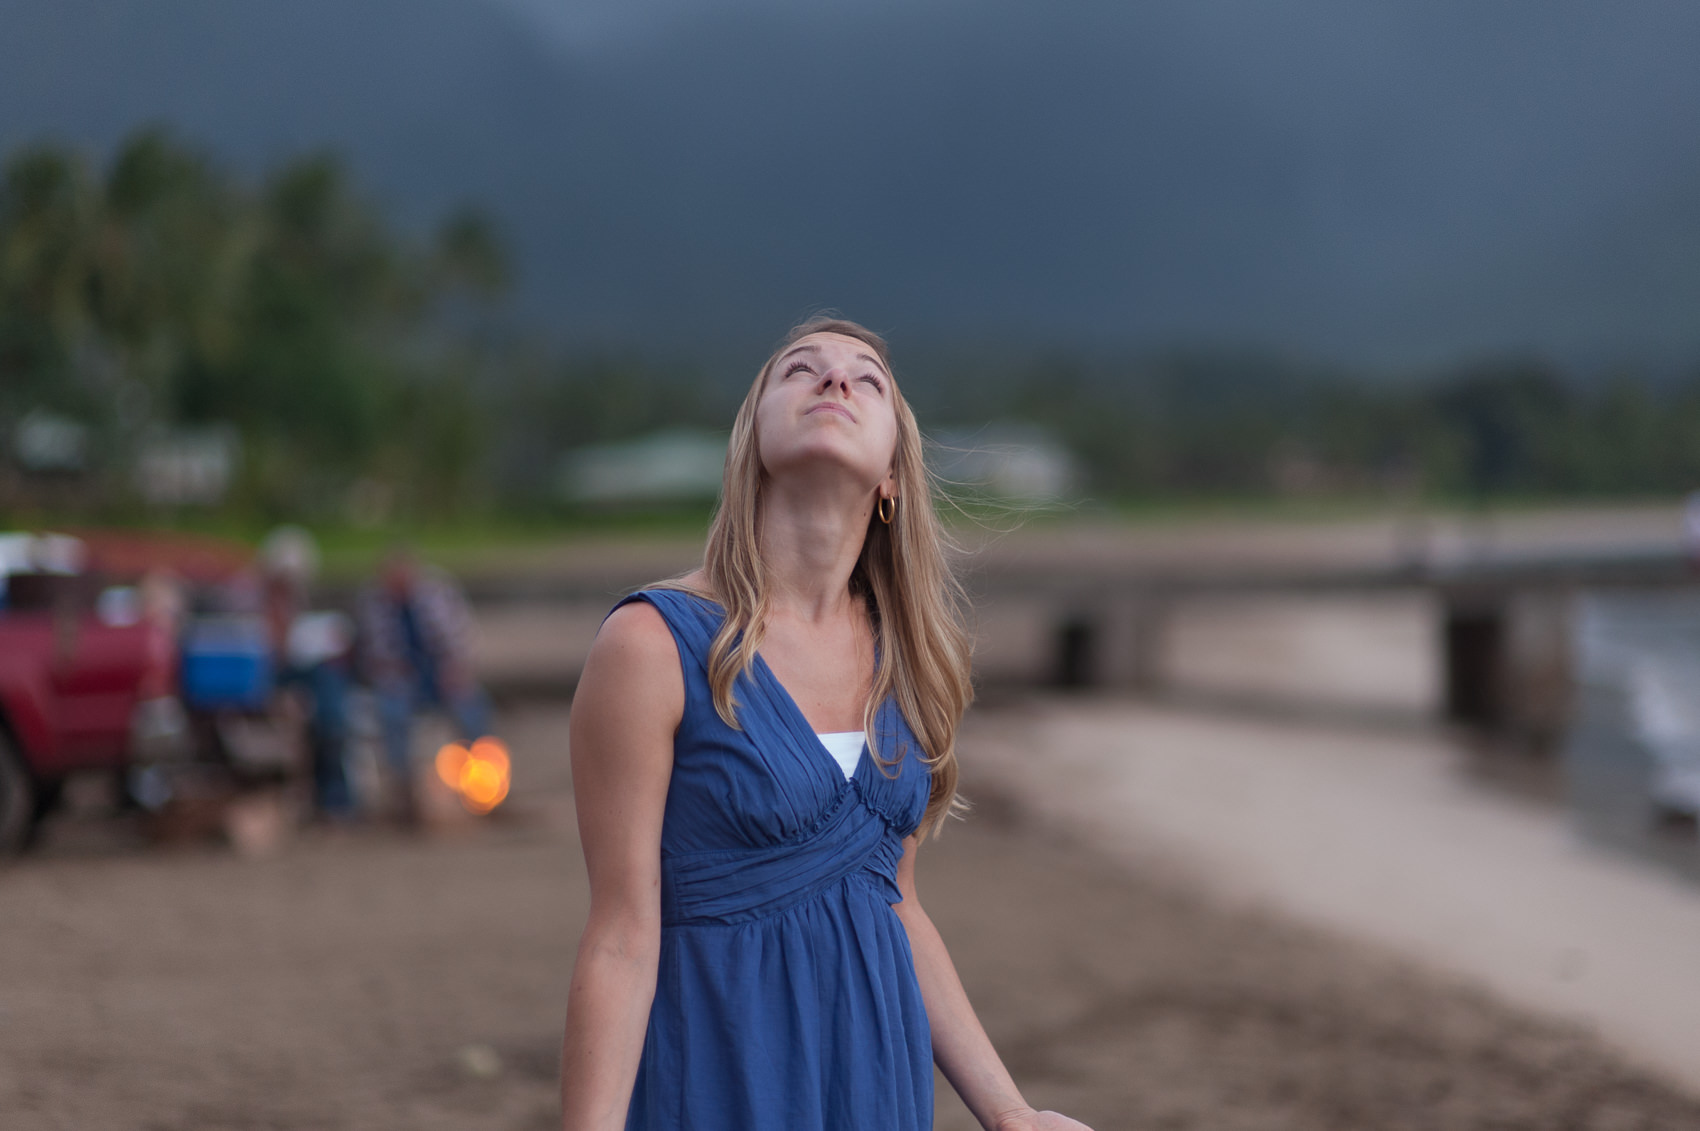
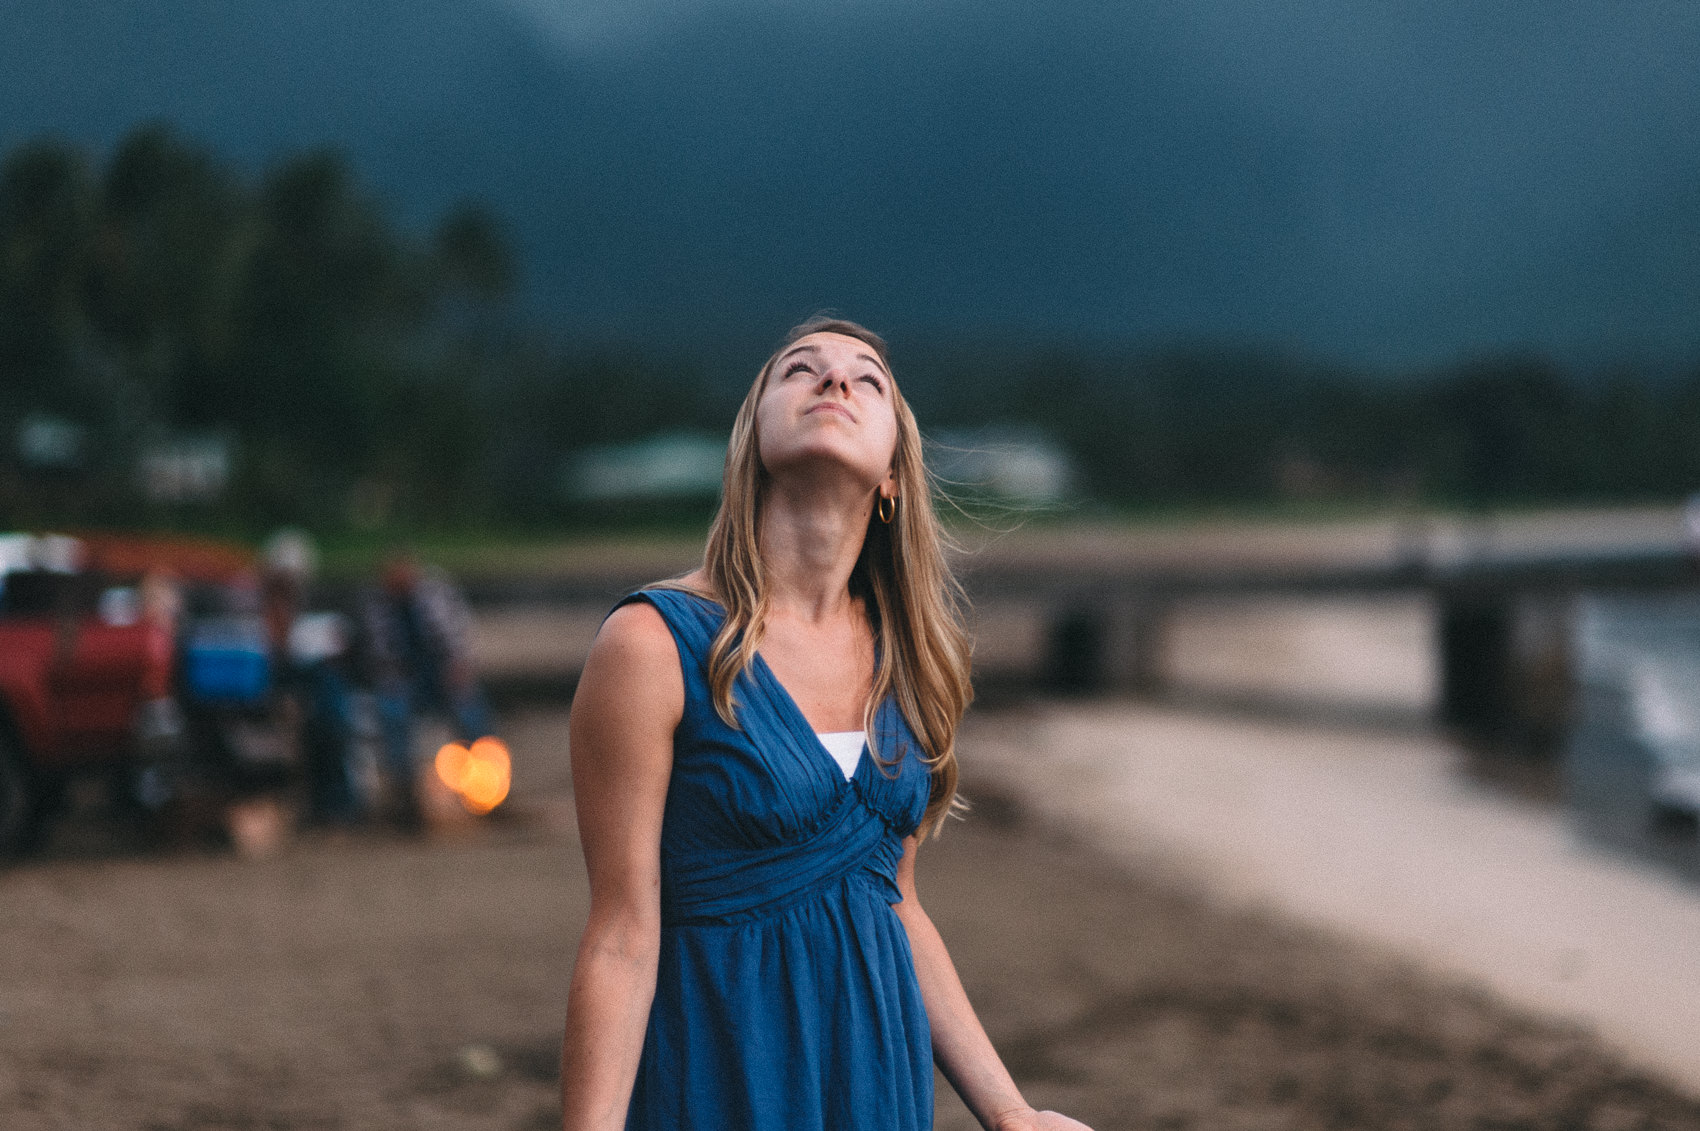
EX10 – Cross-Processed Fuji
Overview: This preset adds just the right amount of “moodiness” to a photo. It has a classic fuji-esqe color pallet with subtle cross-processing effect that gives images blue/teal shadows and yellow/rosy highlights. There is also subtle fade which adds to the moodiness.
Best for: Moody portraits, city shots, landscapes.
Before & After:


The EX10 preset adds warm highlights and cool turquoise shadows, which balance each other out well. There’s also a tiny bit of fade.
Film Toolkit Details
Film Dynamics // Film Fade // Film Punch // Film Saturation // Film Grain
A lot of other preset packs come with separate “toolkit” add-ons, but I always find two big problems with them:
First, other toolkits have presets that are probably easier to set directly. I saw one toolkit selling for $50 that had 10 presets just for setting the exposure. Seriously, how hard is it to change the exposure? Do we really need a preset for this?
Second, other toolkits were overwriting the settings in the original preset, leading to bad and unpredictable results. When I hit the preset to “add fade” on other preset packs, it was just as likely to decrease the fade (because it is overwriting whatever fade was on the original preset). Same with the grain setting. It seems like whoever built the toolkit didn’t communicate with whoever built the preset.
So I built the NATE Cam Film Toolkit around two principles:
- My Film Toolkit only includes settings you can’t quickly adjust yourself.
- My Film Toolkit is designed to compliment the main presets I built. This means I have strategically used the settings available and purposely left settings untouched in the main preset so that the Film Toolkit will work on top of it.
Having the Film Toolkit has cut down on my development time dramatically and really improved the results I’m getting. In a couple of clicks, I can make the exact adjustments I want.
Let’s look at each of these settings and see what they are doing:
Film Dynamics // + // ++ // +++
These tools help to recapture the softness of film in a way that is natural and pleasing. You will find these tools useful if you find that the full-strength presets are a little “harsh” or “too contrasty” for your style, or you just want a more subtle analog film look.
Using Film Dynamics is different than using the [-] or [–] of a given preset. Using Film Dynamics, you keep the overall effect of the preset (i.e. hue shifts, tinting, etc) and only soften the dynamic range of the image. If you want to lower the overall effects of the preset (including color shifts, etc), you should start by trying the [-] and [–] versions.
Film Fade // 01 // 02 // 03 // 04 // 05 // 06 // 07 // 08 // 09 // 10
Adding fade via an RGB curve is pretty easy. But doing it predictably is all but impossible, because those damn tiny points on the curve are so sensitive and difficult to control.
So this is simply a predictable, pre-built way for you to add very precise fade to your images.
And because my presets make their curve adjustments in the channel specific curves, the fade will truly be on top of the existing preset (and not messing up an existing curve).
Film Punch // + // ++ // +++
I use this one a lot.
This preset adds intensity to your photos by carefully pulling down the blacks and shadow tones without effecting skin tones.
Even though it’s simple, I think this is one of the most useful presets in the pack and I try each level of this preset as one of the final steps in my processing flow.
Film Saturation // – // + // ++ // +++
The Film Saturation presets solve a problem I’ve been working on for a long time: how to increase saturation levels just in the shadows and highlight areas of an image.
In Lightroom, there isn’t a direct setting to do this, but I’ve found a way that works really well (and it doesn’t involve the saturation settings at all). It basically “tricks” Lightroom into adding more saturation right where we want it.
You can also do the opposite of this and keep the mid-tones saturated, but de-saturate the highlights and shadows using the [-] version of this preset.
Grain [megapixels] // 200 // 400 // 800 // 1600
In Lightroom, the grain effect isn’t scaled for the resolution of your image.
Let’s say you have two images. One is 12 megapixels, the other is 20 megapixels. If you apply a grain with a size of “30” to both of those images, you will see large grain on the 12 megapixel image, and virtually no grain on the 20 megapixel. It makes a HUGE difference!
To solve this, I’ve calibrated the grain size and strength for three different megapixel ranges: 10-15MP, 15-20MP, 20-30MP.
So for instance, say you’re lucky enough to be shooting with a Nikon D5, and you want to replicate the approximate grain from a 400 ISO analog film. You would just select “Grain [20-30MP] – 400 ISO”. Or, if like me you are sadly still shooting with an older model that is just 12 megapixels, you would select “Grain [10-15MP] – 400 ISO.”
Usage Notes
Setup and Organization // NATE Cam Profiles // My Workflow
Setup & Organization
Getting started with the E-Chrome Collection is easy. You’ll get an email with more instructions and a video, but just in case you lose it, you can click here to watch a video on how to install E-Chrome.
I’ve tried to organize the pack in a way that makes it very easy to use and to pick which preset you want to use.
There’s a preset description next to the main strength of each preset.

This serves two purposes. First, it means you don’t have to memorize what each preset does. Because it’s labeled right there next to the preset. And second, it makes it easy to see which preset is the standard strength. (Also, it just looks better.)
This solves a complaint I’ve heard a lot (and experienced) with VSCO Film. With VSCO Film you just have this massive wall of indistinguishable presets and its very difficult to know which one to use. Should you use the “Agfa RSX 50 II +” or the “Kodak Elite Chrome 160T Alt +“??? It just all starts to blend together, even for someone like me who has studied each of these films.
NATE Cam Profiles
The first time you use an E-Chrome preset on a RAW photo, it will automatically select the right NATE Cam Profile made for your camera model. You should see the Camera Calibration change to “NATE Cam.”

You don’t have to manually select the profile. Just choose a preset, and it will do this for you.
Even though it just says “NATE Cam”, the profile is specific to your camera model. This is kind of a peculiarity of the way that presets and camera calibration profiles work. The camera profile is smart enough to only be loaded for your specific model, even though internally they are all labeled as “NATE Cam” so that the preset can consistently select it.
If the profile is listed as “embedded,” you are not working on a RAW file. This means you are working on a JPEG or TIFF file. The NATE Cam presets will still work fine, you just won’t get the added benefit of the camera calibrations.
My Workflow
A lot of people have asked about my workflow using these presets, and how they should use them. Here’s roughly the flow I typically take.
- Exposure & White Balance – Get these close to “correct.” The exposure should be low enough to avoid highlight clipping. The white balance should be close to neutral, but don’t worry about getting it perfect. Your image should look unremarkable at this point.
- Apply the E-Chrome Preset – I usually have a good idea of which preset I want, but you may need to play around a bit at first. Imagine what you want. Read the preset descriptions. Start off with the regular strength.
- Adjust strength of preset – Depending on the scene and what you want your image to look like, you may want to dial down or dial up the effect using the strength variations.
- Fine Tune with NATE Cam Film Toolkit – I usually like adding a bit of punch. Depending on the image, I may also add a bit of fade and grain (by default, no grain is added in main preset).
- Re-adjust Exposure & White Balance if necessary.
- Make any other adjustments. 95% of the time, this should be all you need to do, but if it still isn’t the look you are going for, of course feel free to make additional edits! It’s beyond the scope of this post to talk about all the adjustments you could make, but if you have an idea, go for it! That’s how you learn!
- That’s it!
Purchase Info
If you haven’t purchased E-Chrome yet, there are a couple of different packages available right now.
Guaranteed to be the Best Presets You Own
I know you are probably wondering, “Will E-Chrome really look this good on my photos?” Yes, it will. But just in case there is any doubt, go ahead and try it out. And if you don’t absolutely love it, just tell me and I’ll give you a 100% refund. No questions asked.
Hope that helps! And let me know if you have any questions or comments below.
Hey man,
Just wondering what sort of picture profiles the 3D LUTs pack is design for? I am shooting S-Log 2 mainly on an A7S.
Thanks!
The 3D LUTs were designed for Rec.709, but you could add an S-Log 2 -> Rec.709 lut in your workflow before the E-Chrome Luts. If there’s enough interest, I can also just make versions for S-Log 2.
This is so amazing! Thank you so much for everything you’ve shared here. I found it extremely useful and enlightening.
This might be a little off, but I actually decided I wanted to give all this a try since I realized I love the work of many photographers that use these presets and have an analogue approach, even when editing digital photography. I’m particularly obssesed with this photographer: http://www.emaritraffie.com/.
Do you have any recommendations for me as in ‘…you definitely need to give these *** films a try’, or something? So I can try make my images have a similar look. Again, sorry if it’s way off.
And congrats again! Seriously, fantastic work! 🙂
Hey! Thanks so much for your kind words and support 🙂
Emari is amazing. Looking through her feed, there are a couple of things to keep in mind:
Hope that helps!
-Nate
She is definitely amazing, I couldn’t agree more.
And I just purchased a Canon 6D, and I bought Canon BECAUSE of the colors. So I totally get what you’re saying.
I don’t have the E-Chrome pack (I actually wrote my comment here because it was the last post I read, from all those I read). However, I have the 07 pack, but was thinking about purchasing another that might help me get closer to my photography goals.
I bought that one because of it’s subtle effects, but I don’t know. I probably am a little misguided.
Which pack would you recommend for me, given this purpose?
Thank you so much for eveything!
L.
Hey Nate! Stumbled upon this little nugget via web analytics and have to say I appreciate you. Love the insight. It’s very accurate 😉
Haha, small world. Gotta love analytics 😉 Lovely work, and glad to know that I wasn’t too far off!
Hi Nathan.
What happened to the third package (Lightroom + Video)?
More updates coming soon, but my Lightroom Mastery video course will be launched soon as a stand-alone, 4-week masterclass on my post-processing techniques and tools.
If you’re interested in getting the E-Chrome Lightroom presets + LUTs for video, I’m going to make the $79 option include both.
Cheers,
-Nate
Great, so I’m waiting for this option.
Awesome, just updated 🙂
Just to make sure does the $79 pack include everything’s in the $59 one?
Yes. The $79 pack includes everything in $59 pack, plus the 3D LUT files for video.
-Nate
Hi Nate, thanks for doing all this good stuff, you are doing a great job! Are the NATE Cam Profiles in the E-Pack also included for Fuji Cameras, like the X-T2?
YES – I love fuji cameras and support them with custom profiles (the X-T2 has actually been my go-to camera recently – so great!).
Here’s the full list of custom camera profiles right now: http://natephotographic.com/wp-content/uploads/2016/09/camera_list.txt
There are a couple new models that I haven’t added yet, but will update support soon. If there’s a model you want that you don’t see on there, just let me know and I’ll add to the list 🙂
Hi Nate – I have been thinking of purchasing this preset, but I noticed that the Fuji XH-1 isn’t on the list of supported cameras. Is there an update for this coming soon?
Thanks!
Mike
Yes! Coming this week… along with some other updates
UPDATE: The newest package now includes Fuji XH-1 🙂
Hey Nate. Does the update include the Sony A7riii as well?
Yep, it includes profile for Sony A7riii.
if i buy it, how to update it?
you’ll receive email alerts when updates are available. 🙂
Amazing!
I just wanted to say thank you what you’ve already shared with us! Keep going and I’m looking forward to seeing more))
You’re doing a great job indeed!
Just got the E-Chrome 1.3 update. Dang….these are even better than the originals. The included installer works well
Awesome to hear, Charles. Thanks!
-Nate
Hey Nate,
I like to buy your presets but in one point i struggle a Little bit. I use the Olympus OM-D E-M1 Mark II and this camera is not listed. Can I use the profile for the Mark I instead or will you provide the Mark II profile soon?
Thank you 🙂
Hi Max,
Good news! This package does include a profile for your Olympus OM-D E-M1 Mark II… The way that Lightroom names cameras internally, it has removed the “OM-D” for the title, so you will see in on the list as “Olympus E-M1 Mark II”. Hope that helps!
-Nate
My camera is not listed under the camera profiles, are you updating them frequently?
My camera is a Canon EOS 6D Mark II.
Canon EOS 6D Mark II is included in the latest version (1.4)!
Hi Nate. Fantastic Presets! I’m owning a D850. Is this camera profile included in the presets? If not, do you update the profiles from time to time?
Thanks in advance
Chris
UPDATE: Nikon D850 profiles now included in latest version
Hey! I do update the profiles and push through updates from time to time, but if you have an immediate need for a camera not on the list yet, I can send it to you (actually already have built a D850 profile for some other photographers, just haven’t packaged it yet, so just email me if you purchase!).
Hi Nate,
I have purchased some times ago the E-Chrome presets and I am much, much more than happy.
As of today April 4th 2018, Adobe has released an update to Lightroom that actually mess up badly with your presets and the order they appear in the folder is messed up so that they are no more logically catalogued i.e. Agfa-esque is not followed by its different intensities – then — and then +, but scattered around.
Are you going to release an update to fix this or should we be waiting for Adobe to take care of it?
Thanks for your feedback and of course for your awesome presets!
Luke
UPDATE: This issue has been fully fixed as of E-Chrome 1.4
Hi Luke,
Yes, I’m aware of the issues caused when updating to Lightroom Classic 7.3. I am working on a fix that I hope to release later this week.
7.3 is a major update from Adobe with some serious flaws. For the time being, I would recommend people stick to 7.2 if they can and maybe wait until 7.4 to update (once they’ve ironed out some of the issues). Basically, Adobe attempts to automatically “convert” existing presets to a new format (.xmp), but it can cause some issues (the order being one of them)
Thanks Luke!
-Nate
Hi Nate, are you any closer to fixing the issue. Just went to edit a shoot from this afternoon and discovered the update problem.
I can use a VSCO preset for a workaround over the weekend but I am a massive fan of your presets.
Very best wishes,
Jon
Yes. Hoping to release updates today or tomorrow (along with updated camera support & mobile presets). If you can’t wait, send me an email at nate@natephotographic.com and I’ll send you a temporary fix.
-Nate
UPDATE: Newest version of E-Chrome (1.4) is sorted correctly in Lightroom Classic 7.3. Also, I’ve been evaluating a pre-build of LR Classic 7.3.1 where the ordering issues caused by Adobe are (mostly) fixed
Hi Nate,
first: your presets are really great!
When will you release the update for E-Chrome?
Thank you in advance!
Thanks so much Florian! YES! The new E-Chrome updates JUST went out to all current users (it may take a few minutes to reach your inbox). Will need to update the page but lots of good stuff including:
– new camera profiles
– updates for 7.3 to fix orderin
– enhanced profiles in 7.3
– LR Mobile presets
Wow, great, thank you Nate! I’ve just downloaded the updates but unfortunately I couldn’t find the PDF with the installation instructions?
Whoops! You’re right! I’ll send out a note with the update. I’ll also drop it here for others: E-Chrome Installation Guide.PDF. Thanks!
Hello Nate,
Firstly I want to say that your presets are really great!
I’ve been using them for a while and satisfied about it.
In the latest info it says the LR Mobile Presets are coming.
How can I use it and where can I find the PDF?
(I cannot find the PDF in my mail)
Hi Chang! Looks like I forgot to include the PDF! I’ll send out a new note (you can also check it out here: E-Chrome Installation Guide.PDF).
I’m also making a longer post here on the site about creating and using preset settings in LR Mobile. It will go way more in depth than the installation guide does on the topic. So be looking for that soon!
-Nate
Hey is the A7III supported?
Yes, A7III is now supported. Up to date list will now live here: http://natephotographic.com/nate-cam-profiles-supported-camera-list/
(Note for Sony users: I go by the model names Adobe uses internally, so the A7III is listed as ILCE-7RM3 on the list.)
Hey Nate,
How would I update my presets/camera profiles. I’m not seeing the a7iii in the version I have.
Hi Nate, Are the Fuji X100F and XT-3 currently supported? Thanks
Yes – I’ve just updated the camera profiles to support these as well.
Hi Nate – recently I noticed that iPhone 7 plus could not be supported. Am I right? Thanks. Joerg PS NegativeLab works wonderful. Great job 🙂
Hi Nate, I have noticed that in the last few updates of LR, your presets are listed as “partially compatible” and its title is displayed in italics: is any update planned to fix this or being partially compatible does not affect the result?
Would appreciate your feedback!
Thanks and regards!
HI Nate,
Just sent you an email with some questions. Thanks so much
Kinnari
Are these presets fully compatible with the latest Lightroom Classic?
Yes. Make sure you are using them on RAW (in some versions of Lightroom, you may find that they do not show up when working with jpegs)
Hi,
I installed this into Lightroom CC and the tool kit is fine but the E-Chrome preset folder only says –RESET EX – and none of the presets show although I followed instructions carefully. Please let me know what I can do to remedy this.
Thank you!
Hi Nate,
could you add the Nikon Z6?
That would be great!
Thanks and regards
Florian
Hi Nate !
I’ve just bought the E-Chrome preset. I followed the installation instructions ( for windows) carefully but the E presets don’t work. The names are gray instead of white in the list of presets. And when I try one, the profil change to NATE Cam but right below it says profil missing ..
I’ve try with files from different cameras..
The toolkit works fine.
I really don’t know what to do..
Hi, what camera are you using? Are you working with RAW files or with JPEGs? If the preset names are listed in grey, that means that the camera profile that it calls for is not available for your photo… this could either be because 1) you have a new camera model that I have not made a profile for yet, or 2) the camera profiles aren’t in the right place for Adobe to use them, or 3) you are working with a JPEG file.